

This Brioche Bread recipe stands out for its luxurious texture and rich, buttery flavor, making it a bakery-quality loaf you can create at home.
What makes this recipe special is its balance between decadence and everyday practicality—it delivers soft, pillowy bread perfect for breakfast, sandwiches, or a sweet treat.
While brioche is traditionally indulgent, this homemade version offers control over ingredients, allowing you to use high-quality butter, organic flour, and natural sweeteners like honey.
Each slice provides a moderate amount of protein from eggs, essential B vitamins from enriched flour, and good fats from butter, making it a more wholesome option than store-bought versions laden with preservatives.
This recipe is also a great choice for meal prep, as the dough can be refrigerated overnight, making baking fresh loaves easier for busy mornings or weekend brunches.
Must-Have Tools for Perfect Results
KitchenAid Artisan Stand Mixer
Handles the heavy kneading required for brioche, ensuring a smooth, elastic dough without manual effort. A versatile powerhouse for breads, cakes, and more.
USA Pan Nonstick Loaf Pan (8.5 x 4 inches)
Creates evenly baked loaves with golden crusts, thanks to superior heat distribution and a reliable nonstick coating for easy release.
OXO Stainless Steel Dough Scraper
Perfect for dividing dough portions cleanly and shaping loaves, while also being handy for cleaning flour from countertops.
ThermoPro Digital Instant-Read Thermometer
Ensures your bread reaches the ideal internal temperature of 190°F, preventing underbaked or dry loaves—a must-have for all baking tasks.
OXO Good Grips Pastry Brush
Allows precise, even egg wash application for that glossy, golden finish, and works beautifully for glazing pastries or basting roasts.

Easy Homemade Brioche
Equipment
- 1 Stand Mixer with Dough Hook
- 2 8.5 x 4-inch Loaf Pans
- 1 Dough Scraper/Cutter
- 1 Pastry brush
- 1 Digital Instant-Read Thermometer
Ingredients
- 120 ml warm milk around 100–110°F
- 9 g active dry yeast approx. 1 packet
- 10 ml honey or maple syrup
- 5 large eggs or 4 eggs + 2 yolks for extra richness
- 10 ml pure vanilla extract
- 60 g 5 tbsp granulated sugar
- 500 g 4 cups + 2 tbsp all-purpose flour (measured using the spoon-and-level method)
- 1 ½ tsp fine sea salt
- 250 g 1 cup + 2 tbsp unsalted butter, very soft and divided into 4 portions
- 1 egg beaten with 1 tbsp water (for egg wash, optional)
Instructions
- Preparing the Dough: Activate the Yeast In a stand mixer bowl, combine warm milk, yeast, and honey. Stir gently and let sit for about 10 minutes until the mixture looks foamy and bubbly, signaling active yeast.
- Whisk in Wet Ingredients: Add eggs (and extra yolk if using) plus vanilla extract to the yeast mixture. Whisk lightly to break up yolks and create a uniform base.
- Form the Initial Dough: Add flour, sugar, and salt to the bowl. Using the dough hook, mix on low speed until a shaggy, rough dough forms, about 3–4 minutes.
- Incorporate Butter Gradually: Add the softened butter in four separate additions. Allow each portion to fully mix before adding the next, kneading about 2–3 minutes between additions. Scrape the bowl sides as needed to ensure even mixing.
- Knead Until Smooth and Elastic: Increase mixer speed slightly and knead for 10–15 minutes, or until the dough is soft, silky, and pulls away from the bowl without sticking heavily to your fingers.
- First Rise: Transfer the dough to a lightly floured surface, shape into a smooth ball, and return it to the bowl. Cover with a damp towel and let it rise in a warm spot until doubled, roughly 1 hour.
- Chill Overnight: Punch down the dough gently, reshape into a ball, cover tightly, and refrigerate for at least 8 hours (up to 24 hours) for better flavor and easier shaping.
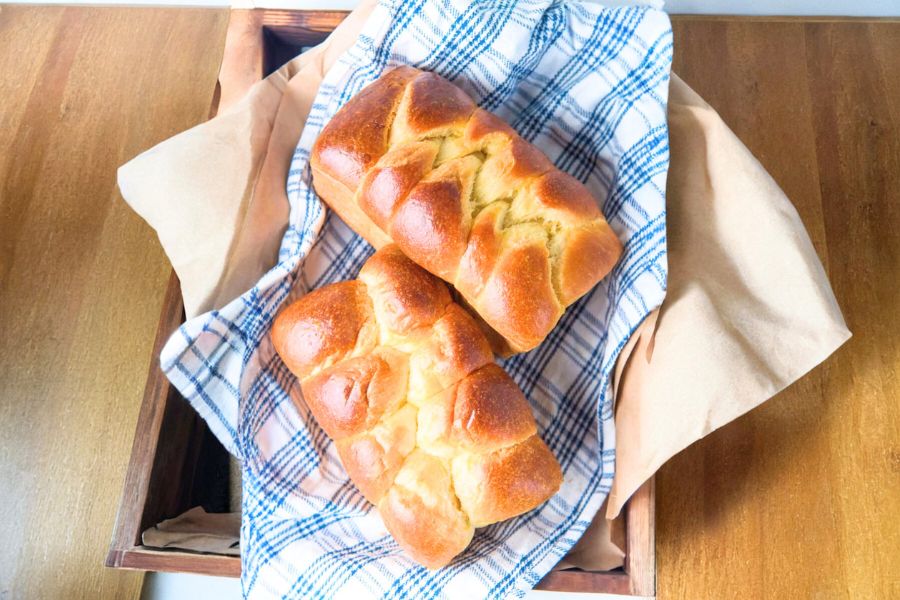
- Shape the Loaves: Pull-Apart Style (Nantaise): Divide one dough half into 8 equal balls and arrange in the pan in a zigzag pattern.
- Prepare Pans: Grease and lightly flour two standard 8.5 x 4-inch loaf pans. Keep a dough scraper and a small bowl of flour handy.
- Divide Dough: Turn out chilled dough onto a floured counter. Weigh and split into two equal portions for two loaves.
- Braided Loaf: Split the second half into 3 equal strips, roll each into a 14-inch rope, and braid tightly. Pinch ends and tuck under for a neat finish before transferring to the pan.
- Final Proof: Cover pans loosely with plastic wrap and let dough rise for about 2 hours, or until nearly doubled and puffy, almost reaching the pan’s top edge.
- Egg Wash & Bake: Preheat oven to 325°F (163°C). Brush tops with egg wash for a glossy crust. Bake 35–45 minutes until golden brown and internal temperature hits 190°F (88°C).
- Cool Completely: Allow loaves to cool 5 minutes in the pan, then transfer to a wire rack. Let them cool fully before slicing to maintain structure and texture.
Notes
- Room Temperature Ingredients: Ensure eggs and butter are soft to achieve proper dough elasticity and a tender crumb.
- Overnight Rest: Chilling the dough develops richer flavor and makes shaping far easier.
- Storage: Keep loaves in an airtight container at room temperature for up to 3 days, or freeze for up to 2 months.
- Variations: Add a sprinkle of pearl sugar before baking for a sweet, crunchy top or incorporate chocolate chips for a dessert-style brioche.
- Mixer Alternative: This dough is very sticky and challenging to knead by hand; a stand mixer is strongly recommended for best results.
Chef’s Secrets for Perfect Brioche Bread
Making bakery-style brioche at home is achievable when you know a few insider tips.
The first key is patience—the dough needs time to develop flavor, structure, and that signature buttery softness.
Always start with warm (not hot) milk to properly activate the yeast, ensuring your bread rises beautifully.
Use room-temperature butter and eggs for seamless incorporation, preventing a dense texture. Kneading is essential for gluten development; your dough should feel smooth, elastic, and slightly tacky but not overly sticky.
An overnight chill not only makes shaping easier but also enhances the bread’s aroma and flavor.
Lastly, use a thermometer to check doneness—brioche should reach an internal temperature of 190°F (88°C) for the perfect, tender crumb.
Serving Suggestions for Maximum Enjoyment
Brioche bread is incredibly versatile and pairs well with sweet or savory dishes.
Enjoy fresh slices with butter and jam for a classic breakfast or toast them lightly for a crunchy, buttery snack.
This bread makes an exceptional base for French toast, bread pudding, or a rich brioche bun for gourmet burgers and sandwiches.
For a brunch spread, serve alongside scrambled eggs, smoked salmon, or creamy cheeses.
Its soft, airy texture absorbs flavors beautifully, making it ideal for dipping in olive oil or pairing with hearty stews and soups.
For dessert lovers, brioche pairs perfectly with Nutella, fruit compote, or a drizzle of honey.
Storage Tips for Freshness and Flavor
To keep your brioche as fresh as possible, store it in an airtight container or wrap it tightly in plastic wrap once cooled completely.
It stays soft for up to 3 days at room temperature.
For longer storage, slice the loaf and freeze individual portions in freezer-safe bags for up to 2 months.
When ready to eat, simply thaw at room temperature or warm in the oven for a freshly baked experience. Avoid refrigerating brioche as it tends to dry out faster.
If you want to refresh slightly stale brioche, pop slices into a toaster or oven for a few minutes to bring back their softness and aroma.
Frequently Asked Questions About Brioche Bread
1. Can I make brioche without a stand mixer?
While it’s possible to knead brioche by hand, the dough is rich and sticky, requiring prolonged kneading to develop gluten. A stand mixer is highly recommended for ease and consistency.
2. Can I use salted butter instead of unsalted?
Yes, but reduce the added salt in the recipe slightly to balance the flavor. Unsalted butter is preferred for better control over seasoning.
3. How do I know if I’ve kneaded enough?
The dough should feel soft, elastic, and pull cleanly from the bowl without being dry. A “windowpane test,” where dough stretches thin without tearing, indicates proper gluten development.
4. My dough isn’t rising—what went wrong?
Inactive yeast, overly hot milk, or a cool proofing environment are common culprits. Always check yeast freshness and maintain a warm (but not hot) rising temperature.
5. Can I make the dough ahead of time?
Absolutely. The dough can be refrigerated for up to 24 hours after the first rise, enhancing flavor and making shaping more manageable the next day.
This recipe has been adapted and simplified from the original version by theflavorbender. We’ve refined the steps for a smoother cooking experience and added helpful notes, nutrition insights, and essential kitchen tools to make it even easier for home cooks.