
Crispy Chickpea Fries, also known as Chickpea Panisse, stand out as a delightful and nutritious alternative to traditional fries.
This vegan and gluten-free recipe boasts a high protein content (14g per serving) thanks to chickpea flour, making it an excellent plant-based protein source. It’s also rich in fiber (7g), which supports digestive health and helps keep you full longer.
With only 1g of saturated fat per serving and healthy fats from olive oil, this snack is heart-friendly and nutrient-dense.
The preparation is straightforward—combining simple ingredients into a batter, chilling, slicing, and baking for a crispy, satisfying treat.
Perfect for meal prep, the panisse batter can be made ahead and refrigerated for up to a week, making these fries a quick, wholesome snack or appetizer anytime.
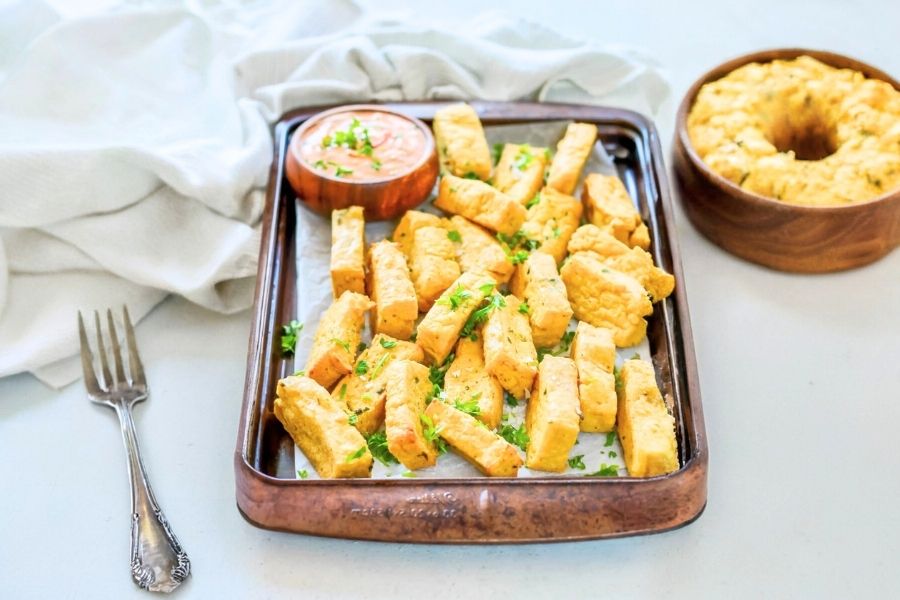
Their crunchy texture and fresh herb seasoning offer a flavorful, guilt-free way to enjoy a street-food favorite in your own kitchen.
Must-Have Tools for Perfect Results
Large Pot
Essential for whisking and cooking the chickpea flour mixture evenly without lumps. This pot’s high heat capacity ensures smooth, thick batter—perfect for creating the right texture in panisse and versatile for boiling, simmering, or making soups.
Whisk
A sturdy whisk helps incorporate chickpea flour into boiling water gradually and prevents clumping, ensuring a smooth, lump-free batter. Beyond this recipe, it’s invaluable for emulsifying dressings, mixing batters, and whipping creams.
9 x 13 Baking Sheet
Ideal for spreading the chickpea batter into an even layer for setting. Its generous size accommodates the batter perfectly and can be used for baking casseroles, roasting veggies, or baking cookies.
Parchment Paper or Silpat Mat
These liners prevent sticking and promote even baking, yielding perfectly crisp fries without mess. They’re reusable, heat-resistant kitchen staples for baking, roasting, or candy making.
Sharp Knife
Necessary for slicing the firm chickpea batter into fry-shaped sticks with precision. A sharp knife is an essential tool for efficient, safe cutting and prepping a wide variety of ingredients.

Crispy Baked Chickpea Fries
Equipment
- 1 Large Pot
- 1 Whisk
- 1 9 x 13 Baking Sheet
- Parchment Paper or Silpat Mat (1 sheet)
- 1 Sharp Knife
Ingredients
- 6 cups water
- 3 cups chickpea flour also called gram flour or besan
- 1 teaspoon salt plus extra for seasoning
- 1 teaspoon freshly ground black pepper
- 3 tablespoons olive oil divided
- 2 tablespoons fresh parsley finely chopped
- 2 tablespoons fresh oregano finely chopped
Instructions
- Prepare the Baking Dish: Lightly coat a 9×13-inch baking dish with olive oil to prevent sticking. Set it aside while you prepare the chickpea batter.
- Heat the Water: Pour the 6 cups of water into a large pot and bring it to a vigorous boil over medium-high heat.
- Incorporate Chickpea Flour: Once the water reaches a rolling boil, reduce the heat to medium. Gradually sprinkle in the chickpea flour while continuously whisking to avoid lumps. Keep stirring vigorously for about 10 minutes until the mixture thickens into a smooth, creamy consistency. Some small lumps may form but won’t affect the final texture.
- Add Flavorings and Oil: Remove the pot from heat and stir in 2 tablespoons of olive oil, the chopped parsley and oregano, and season with salt and freshly ground black pepper to taste. Mix until well combined.
- Chill the Batter: Immediately transfer the chickpea mixture into the prepared baking dish. Spread it evenly with a spatula. Allow the mixture to cool to room temperature before covering it tightly with plastic wrap. Refrigerate for at least 1 hour or overnight to firm up.
- Preheat the Oven and Prepare for Baking: Preheat your oven to 400°F (200°C). Line a large baking sheet with parchment paper or a silicone baking mat.
- Slice and Arrange the Fries: Once the chickpea mixture is fully chilled and firm, remove it from the fridge. Using a sharp knife, cut the block into thick sticks resembling fries. Arrange them neatly on the prepared baking sheet.
- Bake for Crispiness: Brush the chickpea fries with the remaining 1 tablespoon of olive oil. Bake in the preheated oven for 10 minutes. Carefully flip each fry, brush the other side with olive oil, and return to the oven for an additional 10 minutes. They should be golden brown and crispy on the outside.
- Serve: Remove from the oven and immediately season with a generous sprinkle of salt. Serve warm with your favorite dipping sauce and enjoy!
Notes
- Make Ahead Tip: The chickpea batter can be prepared up to a week in advance and stored covered in the fridge. Simply slice and bake when ready to serve.
- Reheating: Leftover fries reheat well in the oven. Bake them again at 400°F for about 5–7 minutes to restore crispiness.
- Herb Variations: Feel free to swap the parsley and oregano for other fresh herbs like thyme or rosemary to customize the flavor profile.
- Texture Tips: Whisking continuously while cooking the batter is key to achieving a smooth, thick base. Don’t worry if a few small lumps remain—they won’t be noticeable after baking.
- Serving Suggestions: Pair these fries with aioli, spicy ketchup, or a fresh herb dip for an irresistible snack or appetizer.
Chef’s Secrets for Crispy Fries
Achieving the perfect crispy texture in chickpea fries starts with patience and technique.
When cooking the chickpea batter, continuous whisking is crucial to avoid lumps and ensure a smooth, creamy consistency. Don’t rush this step—it sets the foundation for fries that hold together and crisp beautifully.
Using fresh herbs like parsley and oregano adds a vibrant flavor that elevates the simple chickpea base. Another key trick is chilling the batter thoroughly; this firming step allows you to slice cleanly and helps the fries hold their shape during baking.
For an extra touch of crispiness, brush the fries with olive oil before and halfway through baking. If you have a convection oven, using the fan setting can promote even browning.
Finally, seasoning generously with salt right after baking intensifies the flavors and completes this deliciously satisfying snack.
Serving Suggestions to Impress Guests
Chickpea fries make an incredibly versatile appetizer or snack and pair well with a variety of dips and accompaniments.
Try serving them alongside garlic aioli, tangy yogurt sauce with lemon and herbs, or a spicy harissa mayo for a flavor boost.
For a lighter option, fresh salsa or a zesty tomato chutney complements the fries’ earthiness. They also work wonderfully as a side dish with Mediterranean-inspired meals like grilled vegetables, falafel, or a crisp green salad.
For entertaining, arrange the fries on a platter with small bowls of different dipping sauces to let guests mix and match.
A chilled rosé or crisp white wine pairs perfectly with the herbaceous, crispy fries, making them an ideal choice for casual gatherings or sophisticated soirées.
Storage Tips for Best Freshness
To maintain the texture and flavor of your chickpea fries, proper storage is essential.
After baking, let the fries cool completely at room temperature before placing them in an airtight container.
Store them in the refrigerator for up to 3-4 days. When ready to enjoy leftovers, reheat the fries in a preheated oven at 400°F (200°C) for 5-7 minutes to restore their crispiness—microwaving is not recommended as it can make them soggy.
For the batter, you can refrigerate it tightly covered for up to a week before baking, which is great for meal prep or planning snacks ahead.
If you want to freeze baked fries, wrap them tightly in foil and store in a freezer-safe bag for up to 1 month; reheat slowly in the oven to avoid drying out.
Frequently Asked Questions Answered Clearly
1. Can I use canned chickpeas instead of chickpea flour?
While canned chickpeas are delicious, this recipe relies on chickpea flour to create the smooth batter that firms up when cooked. Using canned chickpeas won’t give the same texture or hold together for slicing.
2. Is this recipe gluten-free?
Yes! This recipe is naturally gluten-free as it uses chickpea flour and no wheat-based ingredients, making it a great option for gluten-sensitive diets.
3. Can I make the batter ahead of time?
Absolutely! The batter can be made and refrigerated for up to one week, making it convenient for quick snacks or meal prep. Just slice and bake when ready.
4. What can I substitute for fresh herbs?
If fresh parsley and oregano aren’t available, dried herbs can be used at about one-third of the fresh quantity. However, fresh herbs provide a brighter, more vibrant flavor.
5. How do I make these fries crispier?
Ensure the batter is well-chilled and slice the fries evenly. Brushing both sides with olive oil before baking and flipping halfway through helps promote even crisping. Using a convection oven fan speeds up browning.
This recipe has been adapted and simplified from the original version by heynutritionlady. We’ve refined the steps for a smoother cooking experience and added helpful notes, nutrition insights, and essential kitchen tools to make it even easier for home cooks.