
This Tuna Melt recipe stands out for its perfect balance of simplicity, flavor, and nutrition.
Using high-quality albacore tuna, it delivers a hearty dose of protein—29 grams per serving—that supports muscle repair and sustained energy.
The inclusion of mayonnaise and optional avocado adds healthy fats, making each bite satisfyingly creamy without excessive saturated fat.
The recipe is quick and approachable, taking just 10 minutes from start to finish, which makes it ideal for busy weekdays or a nourishing meal prep option.
The versatility to customize with different cheeses, breads, and toppings like tomato or jalapeños adds an exciting twist while keeping it fiber-rich and well-rounded.
It’s a nutritious, comforting classic that feels indulgent but is grounded in wholesome ingredients.
Must-Have Tools for Perfect Results
Nonstick Skillet
Essential for toasting the sandwich evenly without sticking, ensuring golden crusts and melted cheese every time. A versatile skillet also handles sautéing, frying, and more.
Mixing Bowl
Perfect for combining tuna and seasonings thoroughly. A durable, easy-to-clean bowl is invaluable for prepping salads, batters, and dressings.
Spatula
Ideal for flipping delicate sandwiches without breaking them apart. A heat-resistant spatula is a multi-use tool for mixing, folding, and scraping.
Measuring Spoons
Ensure precise seasoning and ingredient ratios, which is critical for flavor balance. Accurate measurements help keep recipes consistent and delicious.
Butter Knife
Used to spread butter evenly on bread, promoting a crisp, golden toast. A good butter knife can also double for spreading jams or soft cheeses.
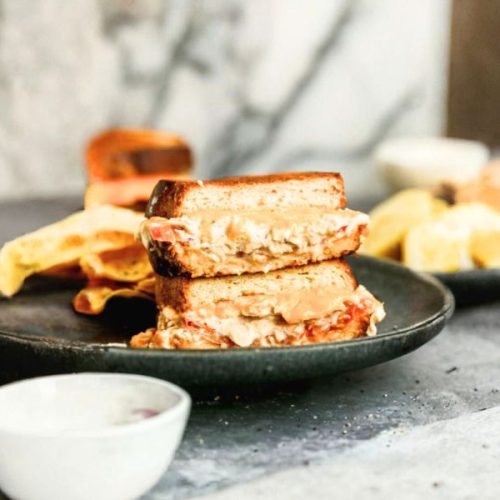
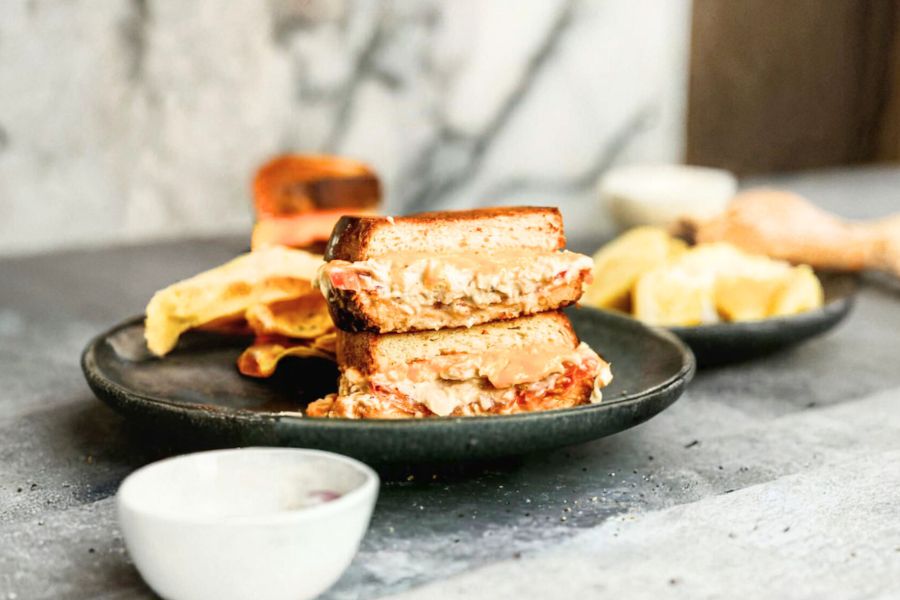
10-Minute Tuna Melt Sandwich
Equipment
- 1 Nonstick Skillet
- 1 Mixing Bowl
- 1 Spatula
- Measuring spoons (set)
- 1 Butter Knife
Ingredients
- 12 ounces canned albacore tuna drained well, packed in water
- 1/3 cup mayonnaise or half mayo, half plain Greek yogurt for a lighter option
- 2 tablespoons finely diced red onion
- 2 teaspoons freshly squeezed lemon juice
- A pinch of dried oregano
- Salt and freshly ground black pepper to taste
- 4 slices thick-cut sandwich bread white, wheat, sourdough, or your choice
- 4 slices cheese cheddar, provolone, Swiss, or preferred variety
- Optional: sliced avocado for creaminess
- Optional: sliced tomato for freshness
Instructions
- Prepare the Tuna Mixture: In a medium mixing bowl, combine the drained tuna with mayonnaise, diced red onion, lemon juice, and oregano. Stir well until all ingredients are evenly incorporated. Adjust the texture by adding more mayonnaise if you prefer a creamier filling. Season the mixture with salt and pepper according to your taste preferences.
- Assemble the Sandwiches: Lightly butter one side of each bread slice. On the unbuttered side of two slices, spread the prepared tuna mixture evenly. Layer a slice of cheese over the tuna, then add any optional toppings such as avocado or tomato slices. Place another slice of cheese on top of the toppings, and finish by covering with the remaining bread slices, buttered side facing out.
- Cook the Tuna Melts: Heat a skillet over medium-low heat. Carefully place the assembled sandwiches into the skillet. Cook until the bottom slice of bread turns golden brown and the cheese begins to melt, about 3-4 minutes. Flip the sandwiches gently and cook the other side until it is also toasted and the cheese is fully melted, approximately another 3-4 minutes.
Notes
- Tuna Quality: Use premium canned albacore tuna packed in water for a mild, flaky texture. Ensure it is thoroughly drained to prevent soggy sandwiches.
- Cheese Options: Feel free to experiment with your favorite cheese varieties such as pepper jack for a spicy kick, or classic American for creaminess.
- Bread Choices: Any thick-cut bread will work well; sourdough and rye add extra flavor complexity.
- Topping Variations: Keep it simple or get creative by adding bacon, sprouts, jalapeños, or a dash of hot sauce to elevate your melt.
- Alternate Cooking Methods: For an open-faced version, omit the top bread slice and broil until bubbly and golden. Alternatively, use an air fryer at 370°F for 2-3 minutes per side for a quicker, crispy finish.
- Make-Ahead Tips: The tuna mixture can be prepared in advance and refrigerated for up to 4 days, perfect for meal prepping lunches.
Chef’s Secrets for Perfect Tuna Melts
Creating the ultimate tuna melt is all about attention to detail.
Choosing good-quality canned albacore tuna packed in water ensures a clean, mild flavor and flaky texture.
Don’t skip the step of draining the tuna thoroughly—excess moisture can make your sandwich soggy.
Mixing in fresh lemon juice brightens the filling and balances the richness of the mayonnaise.
When spreading the mixture, keep it evenly thin so the sandwich holds together and toasts evenly.
Buttering the bread’s outer sides is essential for a golden, crispy crust and prevents sticking during cooking.
Cooking on medium-low heat allows the cheese to melt perfectly without burning the bread, giving you that ideal contrast between crunchy exterior and creamy inside.
For an extra flavor boost, try adding finely chopped pickles or a pinch of smoked paprika to the tuna mix.
Serving Suggestions to Complement Tuna Melts
Tuna melts are satisfying on their own but shine when paired with fresh, vibrant sides.
A crisp green salad tossed with lemon vinaigrette adds a refreshing, light counterbalance to the sandwich’s richness.
Tomato soup is a classic companion, offering comforting warmth and acidity that complements the cheese and tuna.
For more texture, serve with oven-roasted potato wedges or crunchy pickles for a satisfying contrast.
Adding sliced avocado or tomato inside the sandwich can enhance freshness and creaminess.
For casual entertaining, slice the melts into smaller portions and serve with assorted dips or a simple slaw.
A chilled drink such as iced tea, sparkling water, or a light white wine pairs beautifully with the meal’s flavors.
Storage Tips for Tuna Melt Ingredients
Prepping the tuna salad filling ahead of time is a great way to save time during busy days.
Store the mixture in an airtight container in the fridge for up to four days, making it easy to assemble fresh sandwiches anytime.
Keep the bread separate until just before cooking to maintain its texture and prevent it from becoming soggy.
If you have leftovers of the assembled sandwiches, wrap them tightly in foil or plastic wrap and store in the fridge, then reheat gently in a skillet or oven to retain crispness.
Avoid microwaving as it tends to make bread chewy or soggy.
When using avocado or tomato as toppings, add them fresh at serving to keep the sandwich vibrant and fresh-tasting.
Frequently Asked Questions About Tuna Melts
Can I use different types of tuna?
Absolutely! While albacore tuna is preferred for its mild flavor and firm texture, you can use chunk light tuna or yellowfin if that’s what you have on hand. Just make sure to drain it well to avoid soggy filling.
What cheese works best for melting?
Cheddar, Swiss, provolone, and American cheeses are excellent choices because they melt smoothly and add rich flavor. For a spicier twist, pepper jack cheese also works wonderfully.
How can I make the tuna melt healthier?
Try substituting half or all of the mayonnaise with plain Greek yogurt to cut calories and add protein. Using whole grain or sprouted bread adds fiber, and adding veggies like tomato or avocado boosts nutrition.
Can I freeze the tuna melt sandwiches?
It’s best to freeze the tuna filling separately rather than the assembled sandwich. Freezing assembled sandwiches can affect the bread’s texture. When ready to eat, thaw the filling overnight and assemble fresh.
What’s the best way to reheat leftovers?
To maintain the sandwich’s crispy crust and melted cheese, reheat leftovers in a skillet over low heat or in an oven at 350°F for 10 minutes. Avoid the microwave to prevent soggy bread.
This recipe has been adapted and simplified from the original version by tastesbetterfromscratch. We’ve refined the steps for a smoother cooking experience and added helpful notes, nutrition insights, and essential kitchen tools to make it even easier for home cooks.