
This 7-Ingredient Key Lime Pie stands out for its delightful balance of tangy citrus and creamy sweetness, anchored by a uniquely nutty graham cracker macadamia crust.
Beyond its irresistible flavor, this pie offers nutritional perks—macadamia nuts contribute heart-healthy monounsaturated fats and essential minerals, while egg yolks provide a rich source of protein and vital vitamins.
The use of full-fat sweetened condensed milk adds creamy texture and a satisfying richness that makes each bite indulgent yet simple.
Perfect for everyday cooking, this recipe is quick to prepare and doesn’t require complicated ingredients, making it a great go-to dessert for both casual family dinners and special occasions.
Its straightforward process also lends well to meal prep, as it can be assembled ahead and refrigerated or frozen, ensuring fresh, crowd-pleasing results whenever you need them.
Must-Have Tools for Perfect Results
Food Processor or Chopper
Essential for pulsing graham crackers and macadamia nuts into a perfectly coarse, sandy crust. This versatile tool speeds up prep and handles everything from chopping veggies to making dough.
9-Inch Pie Dish
Designed to shape and bake your pie flawlessly, its size and material ensure even heat distribution for a golden crust and well-set filling. A staple for any home baker’s collection.
Citrus Juicer
Extracts fresh lime juice efficiently, maximizing flavor with minimal effort. Beyond this recipe, it’s perfect for fresh juices, cocktails, and dressings.
Whisk
Crucial for combining filling ingredients smoothly, ensuring a creamy, lump-free texture. A durable whisk is indispensable for baking, cooking, and emulsifying sauces.
Glass Mixing Bowl
Non-reactive and easy to clean, ideal for mixing acidic ingredients like lime juice without altering flavor. Its transparency helps monitor mixing progress and adds versatility for countless kitchen tasks.
Easy Key Lime Pie
Equipment
- 1 food Processor or Chopper
- 1 9-inch Pie Dish
- 1 Citrus Juicer
- 1 Whisk
- 1 Glass Mixing Bowl
Ingredients
For the Macadamia Graham Cracker Crust
- 11 whole graham cracker sheets about 160g
- ½ cup 62g roasted salted macadamia nuts
- 2 tablespoons 25g granulated sugar
- 5 tablespoons 71g unsalted butter, melted
- For the Filling & Topping
- 28 ounces two 14-ounce cans / 793g sweetened condensed milk (full-fat)
- 1 cup 240ml freshly squeezed key lime juice
- 4 large egg yolks
- 1 teaspoon finely grated key lime zest
Optional Garnishes
- Extra lime zest
- Lime wedges
- Additional macadamia nuts
- Whipped cream or meringue topping
Instructions
- Prepare Your Oven and Gather Ingredients: Start by preheating your oven to 350°F (177°C). This ensures the oven reaches the ideal temperature while you prepare the crust. Gather all your ingredients and kitchen tools—having everything at hand will make the process smooth and efficient.
- Pulse Graham Crackers and Macadamia Nuts: Place the whole graham cracker sheets and roasted salted macadamia nuts into your food processor or chopper. Pulse several times until the mixture breaks down into coarse crumbs. It’s okay if some nut pieces remain slightly larger—they add delightful texture. Avoid over-processing into a fine powder; you want a sandy, crumbly consistency with some chunkiness.
- Combine Crust Ingredients: Transfer the crumb mixture into a medium-sized bowl.Add the granulated sugar and stir to distribute evenly. Pour in the melted unsalted butter, and mix thoroughly with a spatula or spoon until all crumbs are moistened and the mixture holds together when pressed. The consistency should be thick and sandy but cohesive enough to form a crust.
- Press the Crust into the Pie Dish: Pour the crust mixture into an ungreased 9-inch pie dish. Using your fingers or the bottom of a flat measuring cup, gently press the crumbs firmly and evenly across the bottom and up the sides of the dish. Apply medium pressure—not too light to avoid crumbling, but not so hard that the crust becomes overly compacted. Aim for a rounded corner where the bottom meets the edge, which helps prevent the crust from cracking when slicing.
- Pre-Bake the Crust: Place the pie dish on the middle rack of your preheated oven. Bake for 8 minutes, just enough to set and lightly toast the crust. This step prevents sogginess once the filling is added. When the timer goes off, carefully remove the crust from the oven, but leave the oven on for baking the filling next.
- Whisk Together Filling Ingredients: In a clean mixing bowl, combine the full-fat sweetened condensed milk, freshly squeezed key lime juice, and large egg yolks. Use a whisk (or an electric mixer on low speed) to beat everything together until fully incorporated and smooth. Add the finely grated key lime zest and give it a final whisk to evenly distribute the bright citrus flavor throughout the filling.
- Pour Filling into Warm Crust: Immediately pour the prepared filling mixture into the warm, pre-baked crust. Gently tap the pie dish on the counter a few times to release any air bubbles and help the filling settle evenly.
- Bake the Pie to Set the Filling: Return the pie dish to the oven and bake for 18 to 20 minutes. Watch closely—the filling should be mostly set but still have a slight jiggle in the center when gently shaken. This ensures a creamy texture that firms up perfectly after chilling.
- Cool Completely at Room Temperature: Remove the pie from the oven and place it on a wire cooling rack. Allow it to cool completely to room temperature—this may take about 1 to 2 hours. Cooling gradually helps prevent cracking and prepares the pie for refrigeration.
- Chill the Pie for Optimal Texture: Once cooled, cover the pie loosely with plastic wrap or foil and refrigerate for at least 1 hour, though up to 3 days is fine. Chilling fully firms the filling, allowing clean slices and intensifying the tart key lime flavor.
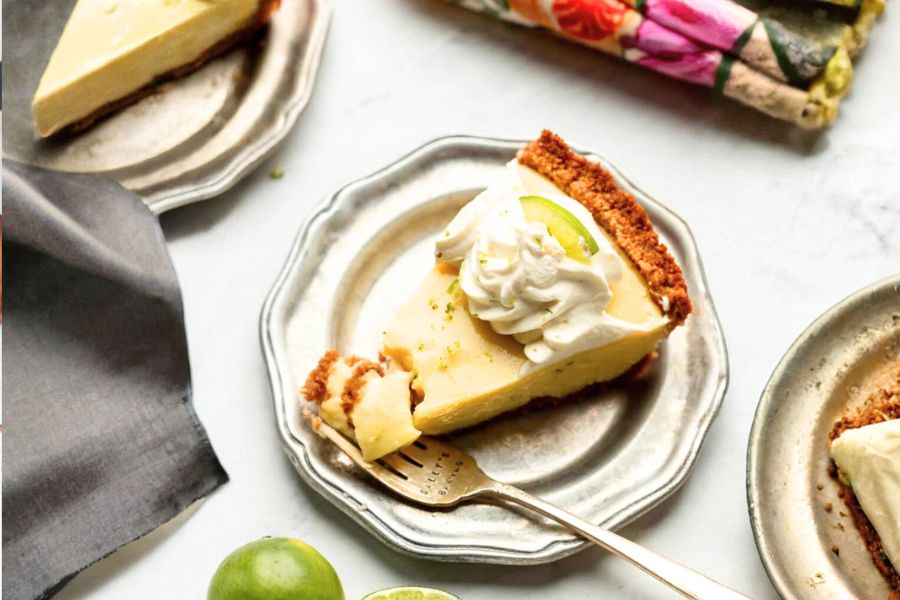
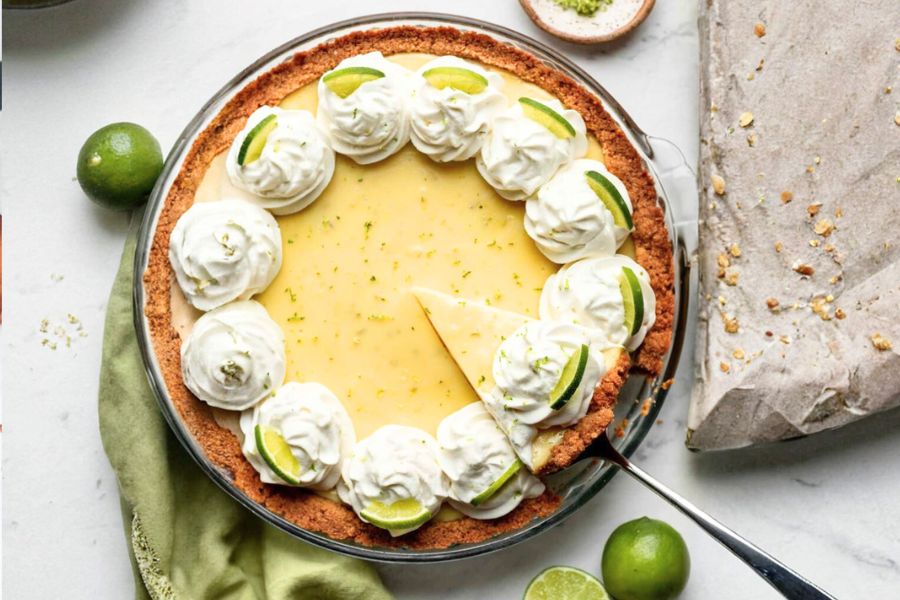
- Garnish and Serve: Before serving, decorate the pie with your choice of garnishes: extra lime zest, lime wedges, whole or chopped macadamia nuts, whipped cream, or a fluffy meringue topping. These additions add visual appeal and complementary flavors.
- Storage and Leftovers: Store any leftover pie covered in the refrigerator for up to one week. If you want to freeze the pie, wrap it tightly and freeze for up to 3 months. Thaw overnight in the refrigerator before serving.
Notes
- Advance Prep: The crust can be prepared and baked up to 3 days before assembling. Store it covered at room temperature. The filling mixture can also be made ahead and refrigerated for a couple of days before baking.
- Freezing: Fully baked and chilled pie freezes well for up to 3 months. Thaw overnight in the refrigerator for best texture.
- Crust Variations: If you prefer to skip the nuts, use 1⅓ cups (160g) of graham cracker crumbs and pre-bake for 8 minutes. For non-US locations, substitute with 180g ground digestive biscuits plus an extra tablespoon (12g) of sugar; bake for 10 minutes.
- Lime Juice Alternatives: Store-bought key lime juice is a convenient substitute if fresh key limes aren’t available. A recommended brand is Nellie & Joe’s. Regular lime juice and zest work well too.
- Egg Whites: Save leftover egg whites to use in other recipes or whip into a meringue topping for this pie.
Chef’s Expert Tips for Success
Achieving the perfect key lime pie is all about balancing texture and flavor.
When pulsing your crust ingredients, aim for a crumbly mixture with a few larger nut pieces to add pleasant crunch without compromising structure.
Don’t skip pre-baking the crust — this step locks in crispness and prevents sogginess from the moist filling.
For the filling, whisk gently but thoroughly to combine egg yolks and lime juice without creating bubbles that could cause cracking during baking.
Baking until the filling is just slightly jiggly ensures a creamy, custard-like texture after chilling.
Lastly, chilling the pie for at least an hour is crucial; it allows the filling to set fully and intensifies the lime flavor.
Use a rounded-edge tool to press the crust in, which helps the crust hold together better when slicing. These small details elevate your pie from good to show-stopping.
Delicious Serving and Pairing Ideas
This key lime pie shines on its own but can be beautifully enhanced with thoughtful accompaniments.
For a classic presentation, garnish with a dollop of freshly whipped cream and a sprinkle of lime zest to add lightness and extra citrus aroma.
Toasted macadamia nuts sprinkled on top provide a satisfying crunch and nutty contrast.
For an indulgent twist, serve with a side of coconut sorbet or a drizzle of passion fruit coulis to complement the tropical notes.
If you want to add texture, fresh berries like raspberries or blueberries offer a subtle tartness and vibrant color.
Pair your slice with a chilled glass of dry Riesling or sparkling water with lime for a refreshing finish. This pie works wonderfully as a bright ending to summer meals or festive celebrations.
Best Practices for Storage Longevity
To maintain the pie’s fresh flavor and creamy texture, proper storage is essential. After baking and cooling, always cover the pie tightly with plastic wrap or store it in an airtight container before refrigerating.
This prevents the pie from absorbing other fridge odors and keeps the crust from becoming soggy.
The pie stays fresh in the refrigerator for up to one week—perfect for making ahead for gatherings or enjoying leftovers.
If you need longer storage, freeze the whole pie or individual slices wrapped tightly in foil and placed in a freezer-safe bag.
Frozen pie retains its quality for up to three months. Thaw slowly overnight in the fridge before serving to preserve the texture and flavor.
Avoid leaving the pie at room temperature for more than two hours to ensure food safety.
Common Questions and Expert Answers
1. Can I use regular lime juice instead of key lime?
Yes! While key lime juice offers a distinctive tang, regular lime juice and zest are excellent substitutes and still yield a delicious pie with slightly different citrus notes.
2. What can I do with leftover egg whites?
Egg whites can be saved for other recipes like meringues, angel food cake, or egg-white omelets. Alternatively, whip them into a fluffy meringue topping for this pie for added flair.
3. Is it necessary to pre-bake the crust?
Pre-baking the crust is important because it sets the structure and prevents sogginess caused by the wet filling. It ensures a crisp and sturdy base for your pie.
4. How do I prevent the filling from cracking?
Avoid overbaking and whisk the filling gently to minimize air bubbles. Baking until the center is slightly jiggly and allowing gradual cooling helps prevent cracks.
5. Can I make this pie dairy-free or vegan?
This recipe relies on sweetened condensed milk and eggs, which are dairy and animal products. For a dairy-free or vegan version, consider using coconut condensed milk alternatives and egg replacers, though texture and taste may vary.
This recipe has been adapted and simplified from the original version by sallysbakingaddiction. We’ve refined the steps for a smoother cooking experience and added helpful notes, nutrition insights, and essential kitchen tools to make it even easier for home cooks.