

This Chocolate Lava Cake recipe stands out for its perfect balance of rich indulgence and simple elegance.
Using just six ingredients, it delivers a decadent dessert with a molten chocolate center that’s sure to impress any crowd.
While not a health-focused treat, the recipe includes quality semi-sweet chocolate and eggs, providing a modest boost of antioxidants and protein.
The cake’s minimal flour and sugar keep it lighter than many traditional desserts.
Quick and straightforward, it’s ideal for everyday cooking—ready in just 25 minutes from start to finish—making it a great choice for spontaneous celebrations or a special weeknight treat.
Plus, the flexibility of ramekins or muffin pans makes this recipe accessible and adaptable to what you have on hand.

Its satisfying richness makes it a memorable finish without requiring hours in the kitchen.
Must-Have Tools for Perfect Results:
6-Ounce Ramekins
Essential for shaping the classic molten center, these small ceramic dishes ensure even cooking and easy release of each cake. Their versatility extends beyond desserts, perfect for custards, soufflés, and individual servings.
Silicone Spatula
Ideal for folding delicate batters and scraping every bit from bowls, this tool is heat-resistant and flexible, making it indispensable for all baking and cooking tasks.
Microwave-Safe Heatproof Bowl
Perfect for melting chocolate and butter safely and evenly. A versatile kitchen staple for quick melting, reheating, and mixing.
Nonstick Cooking Spray
Ensures flawless cake release from ramekins or muffin pans, saving time and preventing frustration. It’s a must-have for greasing pans without adding extra fat.
Baking Sheet
Provides a stable base for ramekins in the oven, ensuring even heat distribution and easy handling. Also doubles for roasting, baking, and freezing.
25-Minute Chocolate Lava Cake
Equipment
- 1 6-ounce ramekins (or half of a 12-count muffin pan)
- 1 microwave-safe heatproof bowl
- 1 Silicone Spatula
- 1 Whisk
- 1 Baking Sheet
Ingredients
- 170 grams 6 ounces high-quality semi-sweet chocolate
- 113 grams ½ cup or 8 tablespoons unsalted butter
- 31 grams ¼ cup all-purpose flour, lightly spooned and leveled
- 60 grams ½ cup powdered sugar
- A pinch about ⅛ teaspoon of salt
- 2 large whole eggs
- 2 additional large egg yolks
- Optional garnishes: fresh berries vanilla ice cream, or chocolate drizzle
Instructions
- Prepare Your Baking Vessels: Begin by thoroughly greasing your baking vessels to ensure the cakes release easily after baking. If using 6-ounce ramekins, spray each one generously with a nonstick cooking spray, making sure to coat every inch of the interior surface. Next, dust the inside of each ramekin lightly with cocoa powder—tilt and rotate the ramekin so the powder coats the bottom and sides evenly. Tap out any excess cocoa powder. This layer acts as a nonstick barrier and enhances the chocolate flavor of your cakes. If you don’t have ramekins, you can use a muffin tin—spray and dust at least six of the muffin cups following the same process.
- Preheat the Oven: Set your oven temperature to 425°F (218°C). This high heat is essential to create the perfect crust on the outside of the cakes while leaving the center molten and gooey. Allow the oven to fully preheat before placing your cakes inside to ensure even cooking.
- Melt the Chocolate and Butter: Coarsely chop your semi-sweet chocolate into small, even pieces for quicker melting. Place the unsalted butter in a microwave-safe, heatproof bowl, then add the chopped chocolate on top. Microwave the mixture in short 10-second intervals on high power. After each interval, remove the bowl and stir gently with a silicone spatula to combine and prevent the chocolate from scorching. Repeat this process until the chocolate and butter are completely melted and the mixture is smooth and glossy. If you prefer, melt the butter and chocolate using a double boiler method by placing the bowl over simmering water, stirring until melted.
- Mix Dry Ingredients: In a separate small bowl, whisk together the all-purpose flour, powdered sugar, and salt until fully combined. This ensures that the dry ingredients are evenly distributed, which helps create a consistent batter texture.
- Whisk the Eggs and Yolks: In another bowl, combine the two whole eggs and two extra egg yolks. Whisk them together vigorously until the mixture is uniform and slightly frothy. This aeration helps give the cakes a tender crumb and lift during baking.
- Combine All Components into Batter: Slowly pour the dry ingredient mixture into the melted chocolate and butter bowl. Follow with the whisked eggs and yolks. Using a silicone spatula or wooden spoon, gently fold the ingredients together. Stir carefully until the batter is smooth and thick, but do not overmix. If you encounter any lumps, use a whisk to gently smooth them out without deflating the batter.
- Fill the Ramekins or Muffin Cups: Evenly distribute the batter into your prepared ramekins or muffin cups, filling each about three-quarters full. This portioning allows room for the cakes to rise without spilling over. Place the filled vessels on a baking sheet for easy handling.
- Bake Until Perfect: Transfer the baking sheet with ramekins or muffin cups into your preheated oven. Bake ramekins for approximately 12 to 14 minutes. For muffin tins, reduce the time to about 8 to 10 minutes since the cakes will be smaller and bake faster. The cakes are done when the edges appear firm and set, but the centers remain soft and slightly jiggly when gently nudged.
- Rest and Invert the Cakes: Remove the baking sheet from the oven and let the cakes cool for about 1 minute. This brief rest allows the cakes to set just enough to hold their shape when flipped. Wearing oven mitts, place a plate upside down over each ramekin and carefully invert them to release the cakes onto the plate. For muffin cups, gently run a spoon or knife around the edges before flipping to loosen the cakes.
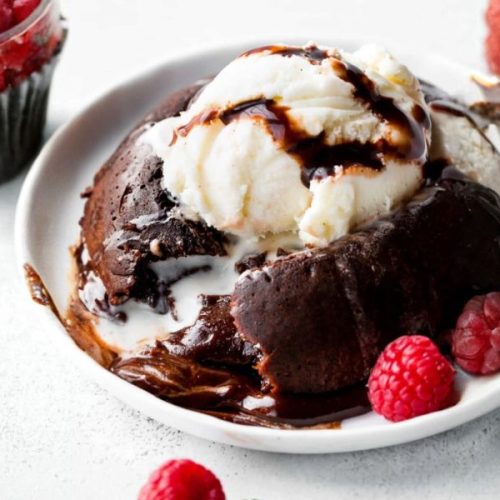
- Serve Immediately with Toppings: Serve your molten chocolate lava cakes immediately to enjoy the warm, gooey centers at their best. Add optional toppings such as a scoop of vanilla ice cream, fresh berries, or a drizzle of chocolate syrup for contrast and extra indulgence.
Notes
- To ensure smooth cake removal, generously grease your ramekins or muffin cups with nonstick spray and dust with cocoa powder. This step helps maintain the cake’s delicate shape when inverted.
- If you don’t have ramekins, use a muffin tin—this will yield six smaller cakes and reduce baking time slightly.
- When melting the chocolate and butter, use short bursts in the microwave and stir frequently to avoid overheating or burning. Alternatively, use a double boiler for gentle melting.
- The batter should be thick but smooth; if you notice lumps, gently whisk until combined without overmixing.
- Cakes are ready when the edges look set but the center remains soft and slightly jiggly — this is the signature molten texture.
- Serve immediately for the best experience, topped with your choice of ice cream or fresh fruit for contrast.
Chef’s Secrets for Molten Perfection
Achieving the perfect molten center in a lava cake requires precise timing and temperature control.
Always preheat your oven fully to 425°F (218°C) before baking, as this high heat creates a firm outer crust while keeping the inside gooey.
When melting chocolate and butter, use gentle heat and stir often to avoid burning or seizing.
Greasing ramekins thoroughly and dusting with cocoa powder not only prevents sticking but adds a subtle chocolate flavor that complements the cake beautifully.
Don’t overmix the batter—fold ingredients just until combined—to maintain a tender crumb and light texture.
Finally, timing is key: bake just until the edges are set and the center jiggles slightly, signaling a perfectly molten core.
Serving Suggestions to Impress Guests
Chocolate lava cakes are best enjoyed fresh and warm to savor their molten centers.
Pair them with classic vanilla ice cream for a creamy contrast that balances the rich chocolate flavor.
Fresh berries such as raspberries or strawberries add a pop of acidity and freshness that cuts through the sweetness.
For an elegant touch, drizzle with homemade chocolate or caramel sauce and garnish with a sprig of mint.
These cakes also pair wonderfully with a bold espresso or a glass of dessert wine, like a late harvest port, to enhance the dessert experience.
Storage Tips for Best Freshness
Chocolate lava cakes are best eaten immediately for that signature molten texture.
If you need to prepare ahead, bake the cakes but reduce the baking time by 2-3 minutes, then cool completely before refrigerating in an airtight container.
When ready to serve, reheat gently in a 350°F (175°C) oven for 5-7 minutes to warm through without overcooking.
Avoid microwaving, as it can cause uneven heating and toughen the cake edges.
Leftovers can be stored refrigerated for up to 2 days but will lose their gooey center. These cakes are not ideal for freezing, as the delicate texture is compromised.
Frequently Asked Questions Answered Clearly
1. Can I use dark chocolate instead of semi-sweet?
Yes, dark chocolate works well but may yield a slightly more bitter flavor. Adjust sugar levels if needed to balance sweetness.
2. What if I don’t have ramekins or muffin pans?
You can use small oven-safe custard cups or even silicone muffin molds. Just ensure they are greased and dusted properly.
3. How do I know when the cakes are done?
Look for firm edges with a soft, slightly jiggly center when you gently shake the baking tray. Overbaking will result in a cakey center, not molten.
4. Can I make the batter ahead of time?
It’s best to prepare the batter right before baking for optimal texture, but you can refrigerate it for a few hours if tightly covered.
5. Are there any gluten-free substitutions?
Yes, you can substitute the all-purpose flour with a gluten-free flour blend, but results may vary slightly. Make sure to choose a blend that includes xanthan gum for structure.
This recipe has been adapted and simplified from the original version by sallysbakingaddiction. We’ve refined the steps for a smoother cooking experience and added helpful notes, nutrition insights, and essential kitchen tools to make it even easier for home cooks.