
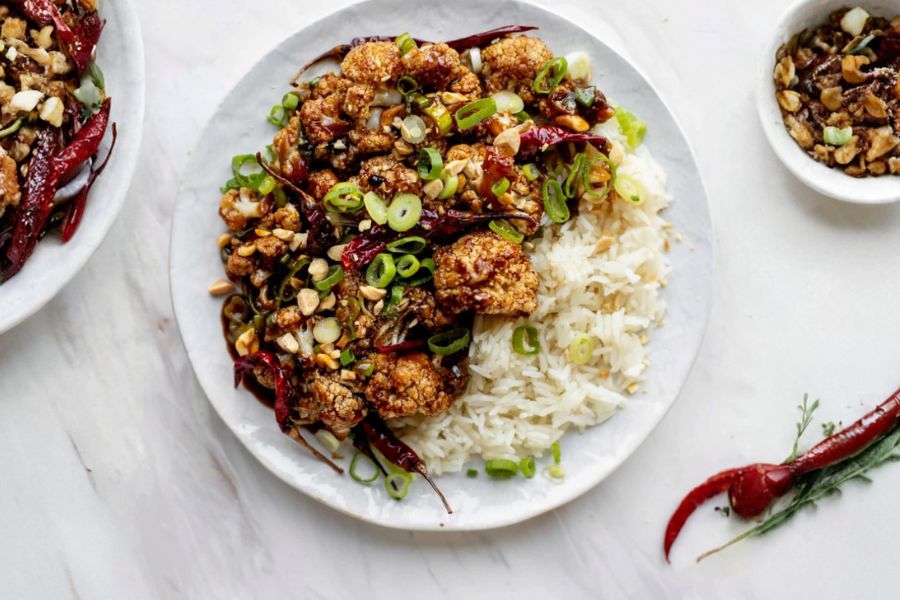
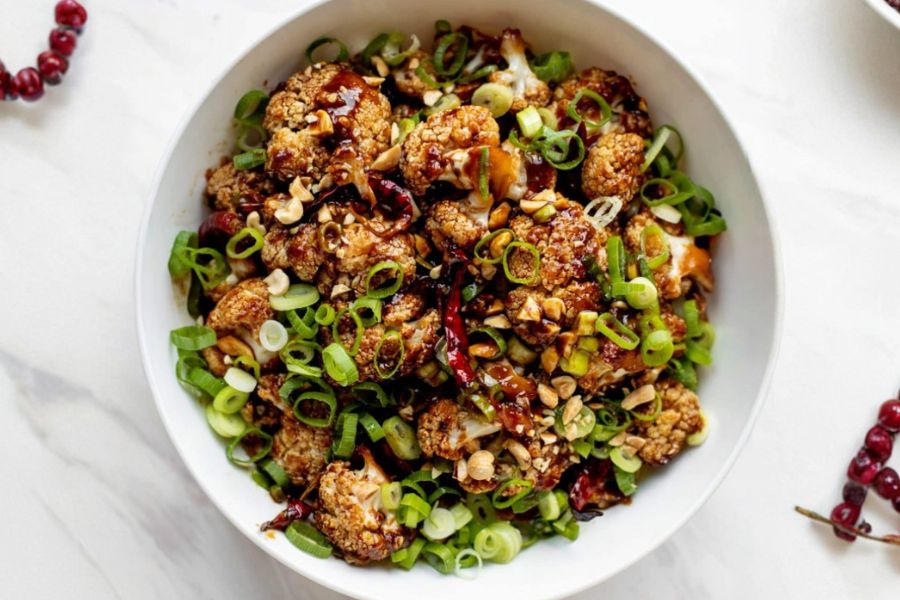
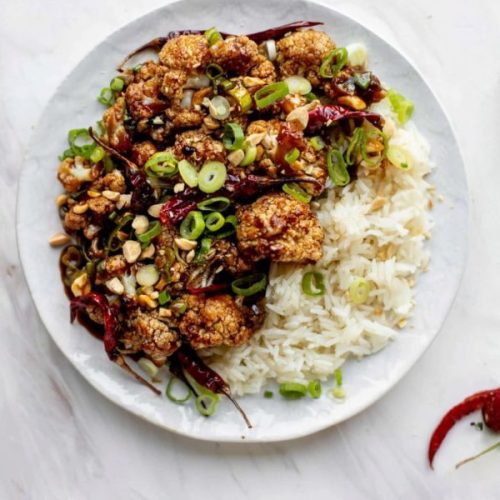
This Kung Pao Cauliflower recipe transforms a humble vegetable into a vibrant, flavor-packed dish that rivals any takeout.
Roasting the cauliflower brings out a natural sweetness and creates a satisfying crisp-tender texture, while the bold sauce—made with soy, hoisin, garlic, ginger, and chiles—delivers a perfect balance of sweet, tangy, and spicy notes.
Beyond its irresistible flavor, this dish is a nutritional powerhouse: cauliflower is naturally high in fiber and vitamins, while peanuts and sesame oil add plant-based protein and heart-healthy fats.
Low in saturated fat and carbs, this recipe is ideal for health-conscious eaters or anyone seeking a balanced, plant-forward meal.
Its one-pan preparation makes it an easy weeknight dinner or a convenient option for meal prep, and it pairs beautifully with jasmine rice or quinoa for a complete, satisfying meal.
Must-Have Tools for Perfect Results
Nonstick Baking Sheet
Essential for roasting cauliflower evenly without sticking. Beyond this recipe, it’s perfect for cookies, sheet-pan dinners, and roasted vegetables.
Whisk
Ensures smooth, lump-free sauces and dressings. A versatile tool for baking, sauces, and vinaigrettes.
Measuring Spoons & Cups
Provides precise ingredient amounts, critical for consistent flavor. Indispensable in any kitchen for baking and cooking.
Sharp Chef’s Knife
Makes cutting cauliflower florets effortless and safe. A high-quality knife speeds prep for vegetables, proteins, and herbs.
Mixing Bowl
Perfect for tossing vegetables with sauce or seasoning. Useful for salads, marinating proteins, and mixing batters.
flavorful Kung Pao Cauliflower
Equipment
- 1 nonstick baking sheet
- 1 Whisk
- Measuring spoons & cups
- 1 Chef’s Knife
- 1 Mixing Bowl
Ingredients
- 1 head cauliflower cut into florets (≈3–4 cups)
- Olive oil spray as needed
- Pinch sea salt
- Freshly ground black pepper to taste
- 2 tbsp low-sodium soy sauce
- 2 tbsp hoisin sauce
- 2 tbsp sherry vinegar
- 1 tbsp toasted sesame oil
- 2 tsp brown sugar
- 2 tsp cornstarch
- 2 garlic cloves minced
- 2 tsp freshly grated ginger
- 1 handful chiles de árbol
- ⅓ cup peanuts chopped
- 4 green onions thinly sliced
- Jasmine rice for serving
Instructions
- Preheat and Prepare the Oven: Begin by setting your oven to 425°F (220°C) to ensure it reaches the perfect roasting temperature for crisping cauliflower.While it heats, prepare a nonstick baking sheet by lightly spraying it with olive oil to prevent sticking and enhance caramelization during roasting. This step guarantees even cooking and a beautifully golden texture.
- Roast the Cauliflower: Place the cauliflower florets evenly on the prepared baking sheet, making sure they aren’t overcrowded to allow for proper browning. Lightly spray with olive oil and season with a pinch of sea salt and freshly ground black pepper, tossing to coat each piece. Roast in the oven for 15 minutes until the edges begin to crisp and the florets are tender but still firm.
- Whisk the Sauce: While the cauliflower roasts, prepare the sauce by combining soy sauce, hoisin, sherry vinegar, toasted sesame oil, brown sugar, cornstarch, minced garlic, and freshly grated ginger in a medium mixing bowl. Whisk thoroughly until smooth and free of lumps, ensuring the flavors will fully coat the cauliflower and thicken evenly during the second roasting stage.
- Combine Cauliflower and Sauce: After the initial 15-minute roast, remove the baking sheet from the oven and sprinkle the chiles over the cauliflower. Pour the prepared sauce evenly over the florets, then use a spatula or tongs to toss gently, making sure every piece is coated in the flavorful mixture. This ensures each bite is intensely savory, slightly sweet, and delightfully spicy.
- Roast to Perfection: Return the sauced cauliflower to the oven and continue roasting for an additional 15–20 minutes, stirring and tossing every 5–10 minutes. Keep an eye on the edges to prevent burning, while allowing the sauce to thicken and cling beautifully to the florets. The result should be glossy, sticky, and slightly caramelized cauliflower.
- Finish with Toppings: Once the cauliflower is perfectly roasted and coated, remove it from the oven and immediately sprinkle with chopped peanuts and thinly sliced green onions. Serve the dish hot, either on its own as a side or atop steamed jasmine rice for a complete, satisfying meal that balances crunch, spice, and savory depth.
Notes
- For extra crispiness, make sure cauliflower florets are evenly sized to ensure uniform roasting.
- Adjust chiles de árbol to control heat; remove seeds for a milder version.
- Cornstarch helps thicken the sauce—whisk well to avoid lumps.
- This dish is naturally gluten-free if using tamari instead of soy sauce.
- Leftover cauliflower can be reheated in the oven to maintain texture rather than microwaving.
Chef’s Secrets To Flavor Boost
To elevate the flavor of your Kung Pao Cauliflower, always roast at a high temperature to achieve caramelization, which deepens the natural sweetness of the cauliflower.
Toasting the peanuts lightly in a dry skillet before adding them enhances their nutty aroma.
When whisking the sauce, ensure cornstarch is fully dissolved to prevent gritty textures and allow for a glossy, thick coating.
Fresh garlic and ginger are key—pre-grating or mincing them right before use maximizes aroma and heat.
Lastly, giving the cauliflower a gentle toss midway during roasting ensures each floret absorbs the sauce evenly, resulting in a perfectly balanced flavor in every bite.
Serving Suggestions For Maximum Enjoyment
Serve Kung Pao Cauliflower over steamed jasmine rice or quinoa for a complete, satisfying meal.
It pairs beautifully with stir-fried greens like bok choy, broccoli, or snap peas for extra nutrition and crunch.
For a low-carb alternative, cauliflower rice or spiralized zucchini noodles work well. Garnish with extra chopped peanuts or sesame seeds to add texture, and drizzle a bit of sriracha if you love a spicier kick.
This dish is versatile—it works as a main, side, or even a flavorful topping for grain bowls.
Storage Tips For Best Freshness
Store leftover Kung Pao Cauliflower in an airtight container in the refrigerator for up to 3–4 days.
To maintain crispiness, reheat in a 375°F (190°C) oven for 8–10 minutes instead of microwaving, which can make it soggy.
The sauce may thicken in the fridge—add a splash of water or soy sauce when reheating to restore the perfect consistency.
For longer storage, cauliflower can be frozen after roasting without sauce; add the sauce fresh when ready to serve.
This makes it ideal for meal prepping or batch cooking.
Frequently Asked Questions Answered Clearly
1. Can I make this dish vegan?
Yes! The recipe is already plant-based. Ensure your hoisin sauce is vegan, as some brands may contain honey.
2. Can I use other vegetables instead of cauliflower?
Absolutely. Broccoli, Brussels sprouts, or even a mix of bell peppers work well. Adjust roasting times for each vegetable.
3. How spicy is this recipe?
The heat depends on the chiles de árbol. For mild spice, reduce the amount or remove seeds; for more heat, add extra chiles or a dash of chili flakes.
4. Can I make this recipe ahead of time?
Yes. You can prep cauliflower florets and sauce ahead. Keep them separate until roasting to prevent sogginess, then combine and roast just before serving.
5. What can I serve it with?
It pairs perfectly with jasmine rice, quinoa, or cauliflower rice for a low-carb option. You can also serve it alongside stir-fried greens or in grain bowls for a wholesome meal.
This recipe has been adapted and simplified from the original version by howsweeteats. We’ve refined the steps for a smoother cooking experience and added helpful notes, nutrition insights, and essential kitchen tools to make it even easier for home cooks.