
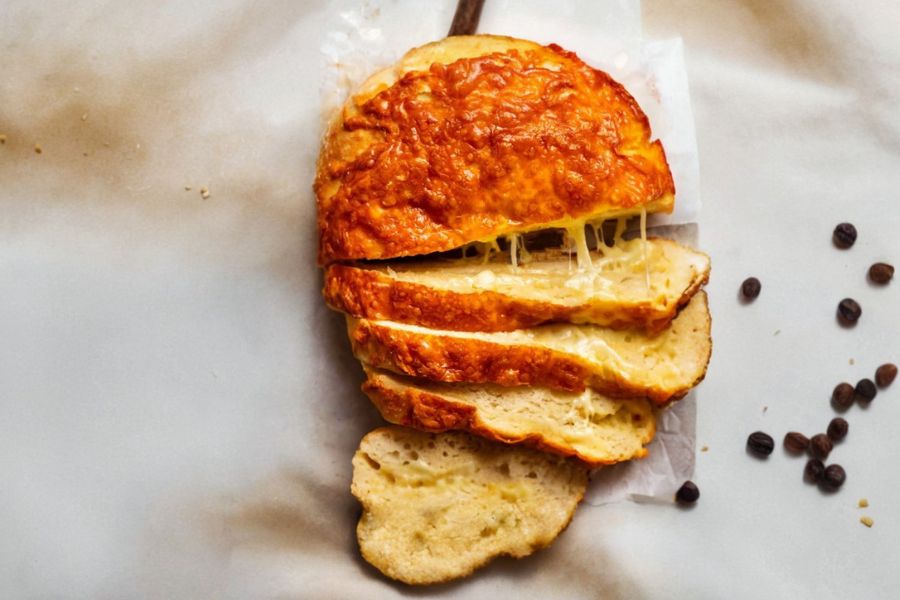
This no-knead cheese bread combines simplicity with indulgence, making it a standout for home bakers who crave freshly baked artisan-style bread without the effort of traditional kneading.
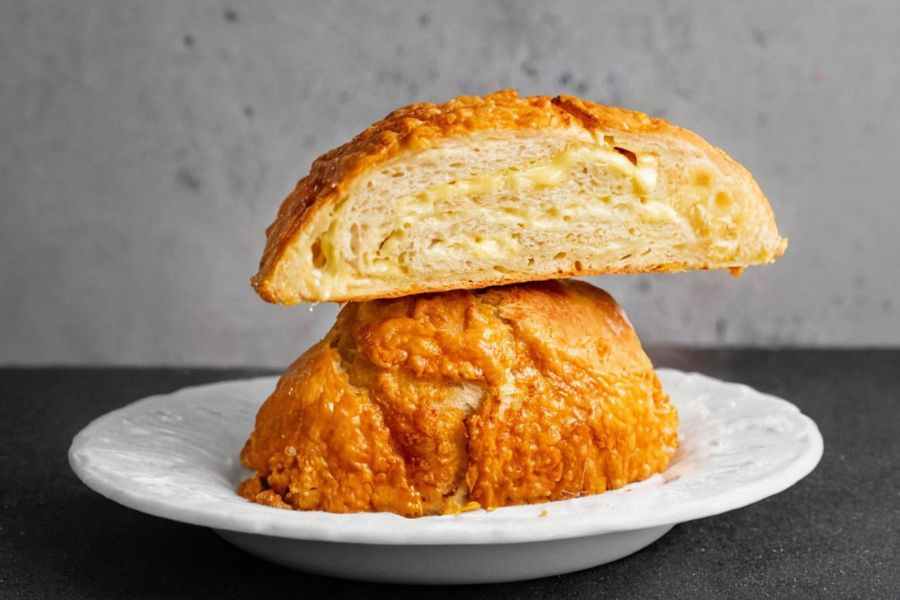
Its soft, airy interior enriched with gooey, melty cheese creates an irresistible texture and flavor, perfect for breakfast, lunch, or as a snack.
Nutritionally, the bread is a good source of protein from cheese, offering roughly 13g per slice, and contains moderate healthy fats that keep you satisfied.
With minimal sugar and a high protein-to-carb ratio compared to many store-bought breads, it’s a slightly more nutrient-conscious choice while still being incredibly comforting.
The recipe’s forgiving nature—quick assembly, no kneading, and straightforward baking—makes it a great option for everyday cooking or meal prep.
It’s perfect for busy bakers looking for a reliable, flavorful, and versatile bread that pairs well with soups, salads, or as a stand-alone cheesy treat.
Must-Have Tools for Perfect Results
Dutch Oven or Heavy-Bottomed Pot
Essential for baking this bread, it traps steam to create a crisp, golden crust while ensuring the interior remains soft. Beyond this recipe, it’s perfect for soups, stews, and braises.
Large Mixing Bowl
Used to combine the flour, yeast, salt, and water efficiently. A spacious bowl prevents spills and allows the dough to rise fully, making it versatile for mixing salads, batters, and doughs.
Rubber Spatula
Ideal for folding and mixing sticky dough without deflating it. This flexible tool is also perfect for scraping bowls clean, folding ingredients, or spreading batters.
Parchment Paper
Makes transferring sticky dough effortless and prevents sticking in the pot. It’s reusable and excellent for roasting vegetables, baking cookies, and lining trays.
Kitchen Scale (Optional but Recommended): Ensures precise ingredient measurements for consistent results. It’s a versatile tool for accurate baking, portioning, and meal prep.
Quick Cheese Bread
Equipment
- 1 Large Mixing Bowl
- 1 Rubber spatula
- 1 Heavy-Bottomed Pot/Dutch Oven (24–28 cm / 4.5–8 quart)
- 1 Sheet Parchment Paper
- 1 Kitchen Scale (optional, for precise measurement)
Ingredients
- 3 cups bread flour or all-purpose flour
- 2 tsp instant yeast
- 1 ½ tsp kosher or cooking salt
- 1 ½ cups very warm water
- 2 ½ cups shredded Colby cheese or any melty cheese of choice
Instructions
- Prepare the Magic Dough: In a large mixing bowl, combine the bread flour, instant yeast, and salt. Gradually pour in the very warm water and use a rubber spatula to stir until all the flour is absorbed and the dough forms a sticky, shaggy mass; it should not be pourable like cake batter but too soft to knead by hand. Scrape down the sides of the bowl to ensure all ingredients are evenly incorporated.
- First Rise – Let Dough Bloom: Cover the bowl loosely with cling film or a clean kitchen towel and place in a warm, draft-free area for 2–3 hours, until the dough has visibly doubled in size. The surface should appear bubbly, and a gentle shake of the bowl should make the dough jiggle slightly, signaling it’s ready for shaping.
- Preheat the Baking Pot: About 30 minutes before shaping, place a heavy-bottomed Dutch oven or oven-safe pot with its lid in the oven and preheat to 240°C/450°F (220°C fan). Preheating ensures the bread receives an immediate burst of heat, creating a crisp, golden crust.
- Shape the Dough – Pat and Flatten: Lightly flour a clean work surface and turn the risen dough onto it. Gently pat it into an approximately 20cm (8-inch) round disc, taking care not to deflate the air bubbles completely, which give the bread its light texture.
- Layer the Cheese – First Layer: Set aside one-third of the shredded cheese for topping later. Sprinkle half of the remaining cheese evenly over the dough disc, ensuring every section is covered for a consistent cheesy interior.
- Fold the Dough – Cheese Stuffing: Using a dough scraper or spatula, fold the edges of the dough inward four times, enclosing the cheese as you go. After each fold, sprinkle more cheese between layers, leaving the topmost layer free for a final cheesy crown.
- Transfer to Parchment Paper: Carefully flip the shaped dough onto a sheet of parchment paper so the seam side is mostly facing down. Tidy the edges if desired, then pile the reserved cheese on top to create a golden, bubbling crown during baking.
- Bake Covered – Initial Cooking: Remove the preheated pot from the oven and, using the parchment paper, transfer the dough gently into the pot. Cover with the lid and bake for 35 minutes, allowing the trapped steam to create a crisp crust while keeping the interior soft.
- Bake Uncovered – Final Browning: After 35 minutes, remove the lid carefully and bake an additional 10 minutes. This final step ensures the crust develops a deep golden color and the cheese on top melts and browns beautifully.
- Cool Before Slicing: Remove the pot from the oven, transfer the bread onto a cooling rack, and peel away the parchment. Allow the bread to cool for at least 10 minutes before slicing, which lets the interior set fully and prevents a gummy texture.
Notes
- Flour Choice Matters: Bread flour gives a chewy, artisan-style texture; all-purpose flour works fine but produces a slightly softer crumb.
- Yeast Options: Instant yeast mixes directly into dry ingredients; active dry yeast should be dissolved in a small amount of warm water first.
- Water Temperature: Use very warm water (around 35°C/95°F). Too hot kills the yeast; too cool slows the rise.
- Cheese Selection: Freshly shredded cheese melts more evenly and prevents a greasy bread. Cheddar, Colby, Monterey Jack, or Gruyère are ideal.
- Warm Rising Spot: A cozy, draft-free area like a warm oven or a gently running dryer works perfectly for dough proofing.
- Shaping Simplified: Dough can be roughly shaped; folding helps trap cheese but precise shaping isn’t essential due to oven spring.
- No Dutch Oven Hack: Use a metal pan with boiling water in the oven for a steam effect if a Dutch oven isn’t available.
- Rest Before Slicing: Cooling for at least 10 minutes ensures the bread finishes cooking and avoids a gummy interior.
- Fresh Is Best: Bread is ideal within 24–36 hours; older slices are delicious toasted with butter.
Chef’s Secrets For Perfect Bread
The secret to this no-knead cheese bread lies in minimal handling combined with high heat baking.
The long, slow rise allows gluten to develop naturally, giving a light, airy crumb without kneading.
Folding the dough with cheese trapped inside creates pockets of gooey melted goodness in every bite.
Using freshly shredded cheese ensures it melts smoothly without weighing down the dough.
Preheating a heavy pot or Dutch oven ensures an immediate burst of oven spring, giving the bread a crisp, golden crust that rivals bakery-quality loaves.
Serving Suggestions For Every Meal
This cheese bread is incredibly versatile and pairs wonderfully with soups, stews, and salads.
Serve warm for a gooey, comforting experience or slice and toast for sandwiches or breakfast.
It’s perfect as a standalone snack with a spread of butter or alongside fresh dips like roasted red pepper hummus or creamy spinach dip.
For a party platter, cube the bread and serve with assorted cheeses and charcuterie.
Its rich, cheesy flavor also complements tomato-based sauces and hearty pasta dishes beautifully.
Storage Tips To Keep Fresh
To store, wrap the cooled bread tightly in plastic wrap or place in an airtight container at room temperature for up to 36 hours.
For longer storage, slice and freeze in a sealed freezer bag for up to 2 months.
When ready to eat, thaw at room temperature and reheat in a 180°C/350°F oven for 5–10 minutes to refresh the crust.
Avoid refrigerating, as this can dry out the bread and make it stale faster.
Toasting slices brings back the fresh-baked texture and enhances the cheesy flavor.
Frequently Asked Questions About Recipe
1. Can I use all-purpose flour?
Yes, all-purpose flour works fine. The texture will be slightly softer than bread flour, but the flavor remains delicious.
2. What cheeses melt best for this bread?
Colby, Cheddar, Monterey Jack, and Gruyère are excellent choices. Freshly shredded cheese ensures even melting and prevents heaviness.+
3. How do I make this without a Dutch oven?
Use a metal baking pan with boiling water placed in the oven to create steam. Bake the bread on parchment paper beside the pan for a similar crust.
4. Can I make this ahead of time?
You can shape the dough and refrigerate it overnight. Allow it to rise at room temperature before baking to enhance flavor and texture.
5. How should I slice it without crushing?
Use a serrated bread knife and let the bread cool completely or slightly warm. Slice gently with a sawing motion to maintain the airy crumb.
This recipe has been adapted and simplified from the original version by recipetineats. We’ve refined the steps for a smoother cooking experience and added helpful notes, nutrition insights, and essential kitchen tools to make it even easier for home cooks.