

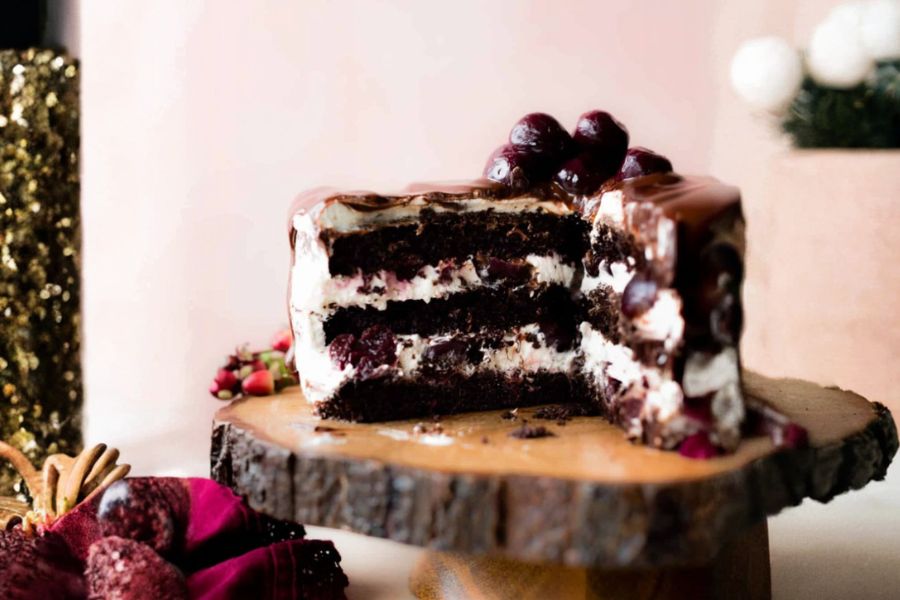
This Black Forest Cake elevates a classic dessert into an indulgent yet approachable treat, combining moist chocolate layers with luscious whipped cream, rich chocolate ganache, and sweet, spiked cherries.
What sets this recipe apart is its balance of textures and flavors: the light, airy cake is perfectly complemented by creamy, smooth layers and a hint of cherry liquor.
Beyond its decadent taste, this cake offers nutritional highlights—sour cream and heavy cream contribute good fats and calcium, while eggs provide high-quality protein.
Using cocoa powder adds antioxidants, and incorporating cherries introduces fiber and essential vitamins.
Despite its gourmet appearance, the recipe is surprisingly straightforward, making it ideal for weekend baking, special occasions, or even prepping ahead.
It’s a satisfying dessert that delivers both flavor and versatility, bringing joy to everyday cooking with manageable steps and reliable results.
Must-Have Tools for Perfect Results
Stand Mixer (e.g., KitchenAid Artisan)
Ideal for combining wet ingredients and whipping cream effortlessly. A stand mixer ensures smooth, lump-free batter and stable whipped cream every time, saving time and reducing manual effort in your kitchen.
9-Inch Cake Pans
Essential for even baking and perfect layer formation. High-quality pans distribute heat evenly and prevent sticking, making them indispensable for all your layered cake creations.
Serrated Cake Knife or Leveler
Helps create flat, uniform cake layers, ensuring professional-looking results. This tool also doubles as a versatile slicer for bread or layered desserts.
Small Saucepan: Perfect for reducing cherry syrup and gently heating cream for ganache. A reliable saucepan is a multipurpose kitchen staple, ideal for sauces, custards, and other liquid-based recipes.
Bench Scraper/Icing Spatula
Provides smooth, clean edges when frosting cakes. Beyond cake decorating, it’s useful for chopping, transferring ingredients, and maintaining a tidy work surface.
Irresistible Black Forest Cake
Equipment
- 1 Stand Mixer
- 3 9-inch cake pans
- 1 Serrated cake knife or leveler
- 1 Small Saucepan
- 1 Bench scraper or icing spatula
Ingredients
Chocolate Cake
- 1 ¾ cups 219 g all-purpose flour
- ¾ cup 65 g unsweetened cocoa powder
- 1 ¾ cups 350 g granulated sugar
- 2 tsp baking soda
- 1 tsp baking powder
- 1 tsp salt
- 2 tsp espresso powder optional
- ½ cup 120 ml canola or vegetable oil
- 2 large eggs room temperature
- ¾ cup 180 g full-fat sour cream, room temperature
- ½ cup 120 ml buttermilk, room temperature
- 2 tsp pure vanilla extract
- ½ cup 120 ml hot water or coffee
- 2 15 oz cans dark sweet cherries in heavy syrup
- 2 tbsp cherry liquor kirsch
Chocolate Ganache
- 1 cup 240 ml heavy cream
- 2 bars 4 oz / 226 g each semi-sweet chocolate, finely chopped
- 1 tbsp light corn syrup optional
Whipped Cream
- 2 cups 480 ml cold heavy cream
- ¼ cup 30 g confectioners’ sugar
- 1 tsp pure vanilla extract
Instructions
- Preheat & Prepare Pans: Preheat your oven to 350°F (177°C) to ensure even baking, then grease three 9-inch cake pans with butter or nonstick spray. Cut parchment paper rounds to fit the bottoms of the pans, place them inside, and lightly grease the parchment to prevent the cakes from sticking. This careful preparation guarantees smooth cake release and flawless layers for assembly.
- Mix Dry Ingredients: In a large bowl, whisk together all-purpose flour, cocoa powder, granulated sugar, baking soda, baking powder, salt, and optional espresso powder until evenly combined. Whisking thoroughly removes lumps, evenly distributes leavening agents, and ensures a consistent chocolate flavor in every bite.
- Combine Wet Ingredients: In a separate bowl or the bowl of a stand mixer, beat together canola oil, room-temperature eggs, sour cream, buttermilk, and vanilla extract until fully blended. Mixing on medium speed ensures a smooth, glossy batter while preventing overmixing, which can make cakes dense.
- Integrate Wet & Dry Mixtures: Gradually add the dry ingredients to the wet mixture, alternating with hot water or coffee, and gently mix until fully incorporated. The hot liquid helps bloom the cocoa, intensifying the chocolate flavor and producing a moist, tender crumb.
- Divide & Bake Batter: Evenly pour the batter into the three prepared cake pans, smoothing the tops with a spatula for uniform thickness. Bake in the preheated oven for 21–25 minutes, checking doneness with a toothpick inserted in the center—when it comes out clean, the cakes are perfectly baked.
- Cool Cake Layers: Allow cakes to cool in the pans for 30 minutes on a wire rack to prevent cracking when removed. Then carefully lift the layers out and place them on a cooling rack until completely at room temperature, which makes trimming and decorating easier.
- Prepare Cherry Syrup: Drain the canned cherries, reserving ¾ cup of syrup. In a small saucepan, simmer the syrup with cherry liquor over low heat until reduced to approximately ¼ cup, then set aside. This syrup will soak into the cake layers, infusing them with sweet, boozy cherry flavor.
- Slice & Reserve Cherries: Cut the drained cherries in half, leaving some whole for garnish. This step ensures even distribution of cherries throughout the layers and adds visual appeal when decorating the finished cake.
- Make Chocolate Ganache: Place finely chopped chocolate and optional corn syrup in a medium bowl. Heat heavy cream in a small saucepan until it begins to gently simmer, then pour over the chocolate. Let sit 2–3 minutes before stirring slowly until smooth and glossy. This rich ganache will add a decadent, silky chocolate layer atop the cake.
- Whip Cream: Using a stand mixer with a whisk attachment, whip cold heavy cream, confectioners’ sugar, and vanilla on medium-high speed until soft peaks form, approximately 3 minutes. Properly whipped cream should hold its shape but remain light and airy, perfect for layering between cake layers.
- Assemble Cake Layers: Place one cake layer on a serving plate or turntable. Spread a generous cup of whipped cream evenly over the top, sprinkle half the halved cherries, and drizzle with some reduced syrup. Repeat with the second layer, then place the third layer on top, lightly covering the sides with remaining whipped cream for a smooth finish.
- Apply Ganache & Garnish: Pour the cooled chocolate ganache over the top of the assembled cake, spreading it to the edges so it gently drips down the sides. Top with reserved whole cherries for a professional, visually stunning presentation.
- Chill & Serve: Refrigerate the finished cake for at least 30 minutes to allow flavors to meld and the ganache to set. Slice with a sharp knife, serve, and enjoy a perfectly balanced, moist, and indulgent Black Forest Cake.
Notes
- Use room-temperature eggs and dairy for smoother batter and more even baking.
- Parchment paper rounds in cake pans prevent sticking and simplify layer removal.
- Hot coffee or water enhances chocolate flavor without adding bitterness.
- Optional espresso powder deepens the chocolate richness for a more intense taste.
- Whip cream just until soft peaks form—overwhipping can make it grainy.
- Let ganache cool slightly before pouring to avoid melting the whipped cream.
- Reserve a few whole cherries for elegant decoration on top.
- The cake can be made a day ahead, allowing flavors to meld beautifully.
Chef’s Secrets For Perfect Cakes
The key to a flawless Black Forest Cake lies in balancing moisture, flavor, and texture.
Always measure flour using the spoon-and-level method to avoid dense cake layers.
Using hot coffee or water helps bloom the cocoa, intensifying chocolate flavor without making the cake bitter.
When trimming the layers, slice slowly with a serrated knife or cake leveler to ensure flat, even layers.
Lightly soaking each layer with cherry syrup adds subtle sweetness and prevents dryness.
Finally, assemble the cake when layers are fully cooled to prevent whipped cream from melting, and chill briefly after ganache application for a polished finish.
Serving Suggestions For Maximum Enjoyment
Serve this Black Forest Cake slightly chilled to maintain the cream’s structure and ganache’s shine.
Pair each slice with a scoop of vanilla ice cream or a dollop of lightly sweetened whipped cream to complement the chocolate-cherry flavor.
For an elegant touch, sprinkle chocolate shavings or toasted almond slivers around the edges.
This cake also works beautifully as a centerpiece dessert for birthdays, holiday gatherings, or weekend celebrations, offering a visually stunning and indulgent treat that delights both adults and children.
Storage Tips To Preserve Freshness
Store leftover Black Forest Cake in an airtight container in the refrigerator for up to one week.
To prevent the whipped cream from absorbing fridge odors, cover the cake lightly with plastic wrap or a cake dome.
For longer storage, individual slices can be frozen for up to three months; thaw in the refrigerator overnight before serving.
Avoid leaving the cake at room temperature for more than a day, as the cream layers may soften and the ganache can lose its sheen.
Common Questions About Ingredients
1. Can I use fresh cherries instead of canned?
Yes! Fresh cherries can replace canned, but you may need to simmer them with sugar and cherry liquor to create syrup for soaking layers.
2. Is there a dairy-free version?
Absolutely—substitute heavy cream with coconut cream, and use plant-based sour cream and butter alternatives. The texture will remain rich and creamy.
3. Can I make this cake ahead of time?
Yes, assemble up to one day in advance and refrigerate. The flavors deepen beautifully, but avoid freezing fully assembled cakes with whipped cream.
4. How do I prevent the whipped cream from deflating?
Use cold cream and chill your mixing bowl and whisk. Whip just until soft peaks form and gently fold when spreading.
5. Can I make a smaller or larger cake?
You can adjust the ingredient quantities proportionally, but baking time will vary. Keep an eye on the cake and test with a toothpick for doneness.
This recipe has been adapted and simplified from the original version by sallysbakingaddiction. We’ve refined the steps for a smoother cooking experience and added helpful notes, nutrition insights, and essential kitchen tools to make it even easier for home cooks.