
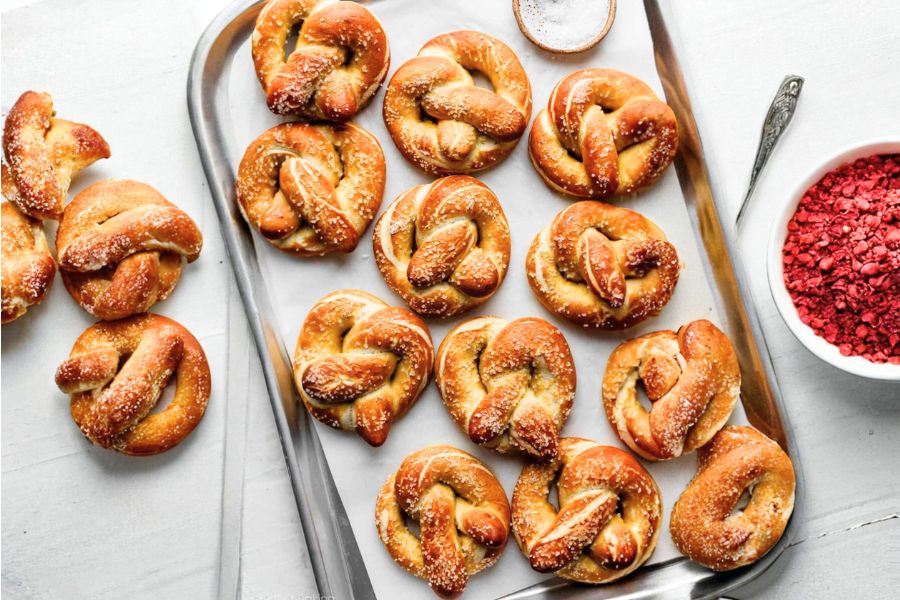
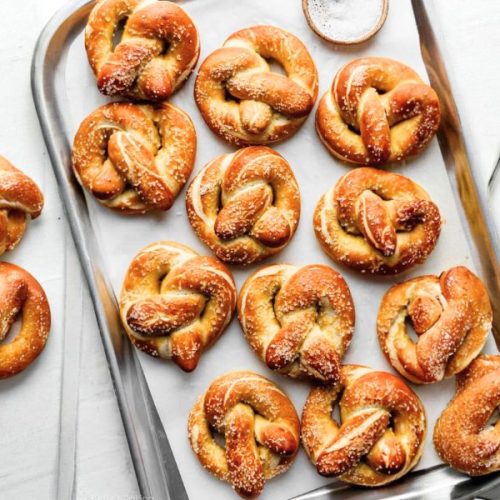
Soft pretzels are a comforting, versatile snack, and this homemade version elevates the experience with a tender, chewy interior and golden-brown exterior.
What sets this recipe apart is its approachable process: minimal resting time, a simple baking soda bath for authentic flavor, and foolproof shaping instructions make it beginner-friendly yet satisfying for seasoned bakers.
Beyond taste, this recipe offers nutritional perks: using whole ingredients like all-purpose flour and minimal butter keeps it relatively low in saturated fat while providing plant-based protein and fiber for digestive support.
The dough’s flexibility and quick prep make it perfect for everyday cooking, meal prepping, or a weekend baking project, while the option to customize toppings—coarse salt or cinnamon sugar—adds a fun, family-friendly twist.

These pretzels deliver warmth, flavor, and wholesome satisfaction in every bite.
Must-Have Tools for Perfect Results
Stand Mixer with Dough Hook
Effortlessly kneads dough to the ideal soft yet elastic texture, saving time and effort compared to hand kneading. Its versatility makes it perfect for bread, pizza dough, and even cookie batters.
Large Pot
Essential for boiling pretzels in a baking soda bath, which creates their signature chewy crust. A heavy-duty pot also doubles for pasta, soups, and stews.
Silicone Baking Mats
Provide a nonstick surface for baking, preventing sticking and promoting even browning. Reusable mats are eco-friendly and perfect for cookies, pastries, and roasting vegetables.
Pizza Cutter or Sharp Knife
Ensures uniform dough sections, enabling consistent pretzel sizes and even baking. Also invaluable for cutting pizza, pastries, or homemade pasta.
Slotted Spatula
Ideal for safely lifting pretzels from boiling water while draining excess liquid. Its design is equally handy for flipping delicate foods or removing poached items from water.
Easy Homemade Soft Pretzels
Equipment
- 1 Stand Mixer with Dough Hook (optional but recommended)
- 1 Large Pot
- 3 Baking Sheets
- Silicone Baking Mats or Parchment Paper
- 1 Pizza Cutter or Sharp Knife
- 1 Slotted Spatula
Ingredients
For the Dough:
- 2 ¼ tsp 7 g instant or active dry yeast
- 1 Tbsp brown or granulated sugar
- 1 ½ cups 360 ml warm water
- 1 Tbsp 14 g unsalted butter, melted
- 1 tsp salt
- 3 ¾ –4 cups 469–500 g all-purpose flour
- Coarse salt for sprinkling
For the Baking Soda Bath:
- ½ cup 120 g baking soda
- 9 cups 2.13 L water
Optional Toppings:
- Cinnamon sugar mixture: 3/4 cup 150 g granulated sugar + 1 ½ tsp cinnamon
- Melted butter for brushing
Instructions
- Activate the Yeast: Begin by warming your water until it feels comfortably lukewarm, around 100°F (38°C). In a medium-sized mixing bowl, whisk together the warm water, yeast, and sugar until the yeast is fully dissolved. Cover the bowl loosely with a clean kitchen towel and let it sit for about 1–2 minutes. This brief rest allows the yeast to “wake up” and start creating bubbles, signaling that it’s active and ready to leaven the dough. You should notice a few small bubbles forming on the surface.
- Combine Wet Ingredients: Once the yeast is activated, whisk in the melted butter and salt until fully incorporated. The melted butter should be slightly cooled, so it doesn’t kill the yeast. This mixture forms the flavorful liquid base of your dough and ensures a tender, soft texture in the finished pretzels.
- Incorporate Flour and Form Dough: Add 3 cups (375 g) of flour to the wet mixture.Using a wooden spoon, rubber spatula, or stand mixer fitted with a dough hook, stir until a shaggy dough forms. Gradually add an additional ¾ cup (94 g) of flour. If the dough is still sticky, sprinkle in up to 1/4 cup (31 g) more flour, a tablespoon at a time, until the dough becomes slightly tacky but pulls away from the sides of the bowl. Test by gently poking the dough—if it slowly bounces back, it’s ready for kneading.
- Knead the Dough: Transfer the dough to a lightly floured surface or keep it in your stand mixer.Knead by hand for 3–5 minutes or mix with the dough hook for the same amount of time. The dough should feel soft, elastic, and slightly tacky, but not sticky. Sprinkle small amounts of flour if necessary to prevent sticking. For a more precise check, perform the windowpane test: tear off a golfball-sized piece of dough and gently stretch it. If light passes through without tearing, your dough is perfectly kneaded.
- Rest and Rise the Dough: Shape the kneaded dough into a smooth ball. Place it in a lightly greased or floured bowl and cover loosely with a kitchen towel. Allow the dough to rest for 10–30 minutes. This short resting period relaxes the gluten, making it easier to shape the dough into pretzels later. While the dough rests, you can start preparing your baking soda bath.
- Preheat Oven and Prepare Baking Sheets: Preheat your oven to 400°F (204°C). Line two baking sheets with silicone baking mats or parchment paper. If using parchment, lightly grease it to prevent sticking. This ensures that your pretzels bake evenly and develop a golden-brown crust.
- Portion the Dough: After resting, divide the dough into 75 g portions, which is roughly 1/3 cup per piece. Use a kitchen scale for accuracy or estimate visually. This ensures each pretzel is similar in size and bakes evenly.
- Shape the Pretzels: Roll each portion into a rope approximately 20–22 inches long. Form a circle by bringing the ends together, then twist the ends once or twice and press them back down toward the base of the circle to create the classic pretzel shape.Be gentle but firm to maintain a neat form.
- Prepare Baking Soda Bath: In a large pot, bring 9 cups (2.13 L) of water and ½ cup (120 g) baking soda to a rolling boil. The baking soda bath is essential for that signature chewy texture and slightly tangy flavor.
- Boil the Pretzels: Using a slotted spatula, gently lower 1–2 pretzels at a time into the boiling baking soda water. Boil for 20–30 seconds—any longer may result in a metallic taste. Remove the pretzels carefully and let excess water drip off. Place each boiled pretzel onto the prepared baking sheet.
- Add Toppings: Immediately sprinkle the tops of the pretzels with coarse salt while they’re still wet from the bath. For a sweet variation, skip the salt and instead brush warm pretzels with melted butter, then dip in a cinnamon-sugar mixture (¾ cup sugar + 1 ½ tsp cinnamon).
- Bake the Pretzels: Bake the pretzels in the preheated oven for 12–15 minutes, or until they reach a deep golden-brown color. Keep an eye on them toward the end to avoid over-browning. The finished pretzels should be soft inside with a chewy exterior.
- Serve or Store: Remove the pretzels from the oven and allow them to cool slightly. Serve warm with your favorite dipping sauces, such as mustard or cheese. Leftover pretzels can be stored at room temperature for up to 3 days. To reheat, microwave briefly or bake at 350°F (177°C) for 5 minutes.
- Make-Ahead Options: The dough can be refrigerated for up to 24 hours or frozen for 2–3 months. For frozen dough, thaw overnight in the refrigerator and allow it to rise slightly before shaping. Baked pretzels can also be frozen; brush with water and add salt before reheating.
Notes
- Baking Soda Bath is Essential: Boiling the pretzels in a baking soda solution before baking creates that signature chewy texture and deep golden-brown crust. Skipping this step will result in softer, less traditional pretzels.
- Flour Adjustments: Dough stickiness may vary depending on humidity and flour type. Add extra flour 1 tablespoon at a time to achieve a soft, elastic dough. Avoid over-flouring to prevent dry pretzels.
- Make-Ahead Tips: Dough can be shaped and refrigerated for up to 24 hours or frozen for 2–3 months. Baked pretzels can also be frozen and reheated directly from frozen.
- Cinnamon-Sugar Variation: Skip the salt and egg wash if making sweet pretzels. Brush baked pretzels with melted butter and coat with cinnamon sugar immediately for best results.
- Toppings Variety: Beyond coarse salt or cinnamon sugar, consider sesame seeds, poppy seeds, or everything bagel seasoning for creative flavor options.
Chef’s Secrets For Perfect Pretzels
The key to irresistibly soft pretzels lies in controlling dough texture and the baking soda bath.
Always knead the dough until it’s smooth, slightly tacky, and passes the windowpane test.
A short resting period before shaping helps the dough relax for uniform pretzel shapes.
Use lukewarm water for yeast activation; water that’s too hot can kill the yeast, while cold water slows fermentation.
Boiling the pretzels in the baking soda bath for just 20–30 seconds ensures a golden crust without introducing a metallic flavor.
For a shiny finish, lightly brush with melted butter after baking.
Small tweaks, like slightly longer resting times or a gentle sprinkle of salt, elevate both appearance and flavor.
Serving Suggestions For Maximum Enjoyment
Soft pretzels are best enjoyed warm, straight from the oven, either as a snack or alongside hearty meals.
Pair them with tangy mustard, spicy cheese sauce, or a creamy ranch dip for a fun appetizer.
For a sweet twist, try cinnamon-sugar pretzels with hot cocoa or coffee.
They also work beautifully for lunchboxes or picnics, and sliced pretzel pieces can add crunch to salads or soups.
Soft pretzels are a crowd-pleaser at parties, sports events, or casual movie nights.
Don’t hesitate to experiment with toppings like shredded cheese, everything seasoning, or seeds to create your own signature flavor.
Storage Tips For Longevity
Soft pretzels are best eaten fresh, but they can be stored efficiently to extend enjoyment.
Keep leftover pretzels in an airtight container at room temperature for up to three days.
For longer storage, freeze baked pretzels in a zip-top bag or freezer-safe container for up to three months.
To reheat, brush with water and sprinkle with coarse salt before baking at 350°F (177°C) for 20 minutes, or microwave for short bursts until warm.
Prepared dough can also be refrigerated for up to 24 hours or frozen for 2–3 months; thaw overnight in the refrigerator and allow the dough to puff slightly before shaping and boiling.
Proper storage ensures you always have fresh, soft pretzels ready to enjoy.
Frequently Asked Questions About Pretzels
1. Can I use all-purpose flour substitutes?
Yes, bread flour can be used for a chewier texture, while whole wheat flour adds nutty flavor and extra fiber. If using whole wheat, slightly increase water to maintain soft dough.
2. Is the baking soda bath absolutely necessary?
While optional, the baking soda bath creates the traditional pretzel flavor and chewy crust. If skipped, brush shaped dough with egg wash and sprinkle salt before baking for best results.
3. How do I know the dough is kneaded enough?
Perform the windowpane test: stretch a small piece of dough until it’s thin enough to see light through without tearing. This ensures gluten is developed for structure and chewiness.
4. Can I make pretzels ahead of time?
Yes! Shaped pretzels can be boiled and refrigerated for up to 24 hours before baking. You can also freeze unbaked dough or fully baked pretzels for up to three months.
5. What are creative topping ideas?
Beyond coarse salt, try cinnamon sugar, sesame seeds, poppy seeds, everything bagel seasoning, or grated cheese. Brush sweet or savory toppings with butter or egg wash to help them stick.
This recipe has been adapted and simplified from the original version by sallysbakingaddiction. We’ve refined the steps for a smoother cooking experience and added helpful notes, nutrition insights, and essential kitchen tools to make it even easier for home cooks.