

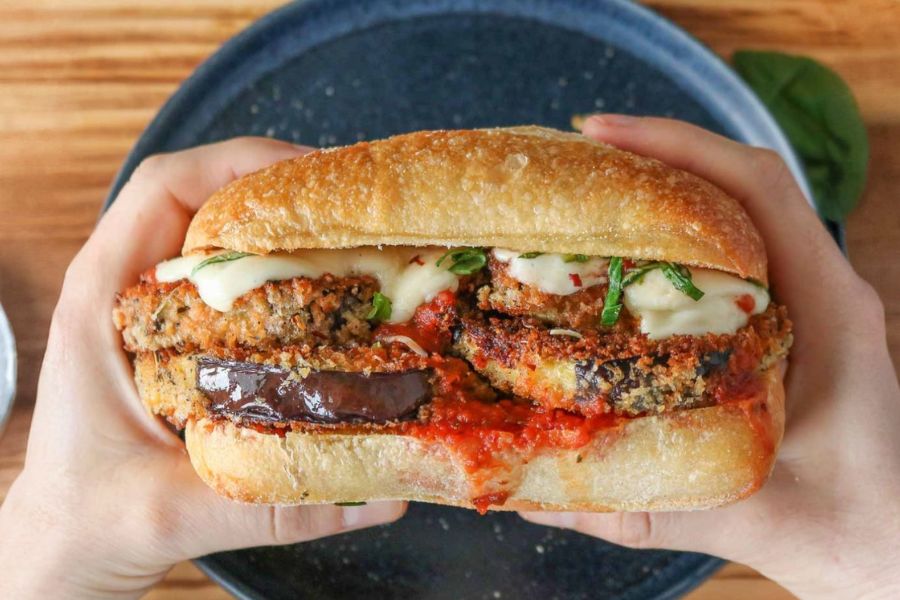
This Eggplant Parmesan Sandwich elevates a classic Italian favorite into a hearty, satisfying meal perfect for any lunch or dinner.
The crispy, golden-breaded eggplant provides a fiber-rich, plant-based protein boost, while fresh mozzarella and Parmesan add melty indulgence without excessive saturated fat.
Using olive oil for frying contributes heart-healthy monounsaturated fats, and fresh herbs like basil, oregano, and rosemary bring antioxidant-rich flavor.
The recipe balances indulgence and nutrition, offering a satisfying, veggie-forward option that works for everyday cooking, meal prep, or casual gatherings.
Its step-by-step approach ensures even novice cooks achieve a crisp, flavorful sandwich every time, making it a dependable go-to for easy, crowd-pleasing meals.
Must-Have Tools for Perfect Results
Nonstick Frying Pan
Ideal for crisping eggplant rounds evenly with minimal oil. Beyond this recipe, it’s perfect for sautéing vegetables, pan-searing proteins, or cooking eggs without sticking.
Cooling Rack
Elevates cooked eggplant, allowing excess oil to drain and maintaining a crispy texture. A versatile tool for baking, roasting, or air-drying foods.
Sheet Pan
Essential for catching drips from draining eggplant and toasting buns evenly. It doubles as a workhorse for roasting vegetables, baking cookies, or sheet pan dinners.
Shallow Dishes for Dredging
Used for coating eggplant in flour, egg, and seasoned panko. These dishes streamline breading processes for meats, tofu, or veggies.
Oven-Safe Baking Dish (Optional)
Melts cheese over the sandwich evenly in the oven, also perfect for gratins, casseroles, or finishing baked dishes with a golden top.

Crispy Eggplant Parmesan Sandwich
Equipment
- 2-inch Nonstick Frying Pan
- 1Cooling Rack
- 1Sheet Pan
- 2Shallow Dishes
- 3Oven-Safe Baking Dish
- 1 (optional)
Ingredients
- 2.5 pounds eggplant peeled or partially peeled, cut into ½-inch rounds
- 1¾ teaspoons salt divided
- 1 cup all-purpose flour
- 3 large eggs whisked
- 3 cups unseasoned panko breadcrumbs
- 1 cup grated Parmesan cheese
- 2 teaspoons crushed red pepper flakes
- 2 teaspoons garlic powder
- 2 teaspoons onion powder
- 2 teaspoons dried rosemary
- 2 teaspoons dried oregano
- 2 teaspoons dried basil
- 1 teaspoon freshly ground black pepper
- Olive oil for frying
- 6 ciabatta buns 6-inch
- 6 tablespoons garlic butter
- 1.5 cups pasta sauce
- 8 ounces fresh mozzarella sliced or shredded
- 6 tablespoons grated Parmesan cheese
- ½ teaspoon crushed red pepper flakes optional
- 12 –15 fresh basil leaves thinly sliced
Instructions
- Prep Eggplant: Begin by washing and drying your eggplant thoroughly. Peel fully or partially, depending on preference, then slice into uniform ½-inch rounds. Arrange the slices on a cooling rack over a sheet pan and sprinkle evenly with ¾ teaspoon salt to draw out excess moisture.Let them rest for about an hour to ensure a firmer, crispier texture when cooked.
- Set Up Dredging Station: Prepare three shallow dishes for breading: one with flour, one with whisked eggs, and one with seasoned panko. To the panko, add Parmesan cheese, crushed red pepper flakes, garlic powder, onion powder, rosemary, oregano, basil, remaining salt, and black pepper, mixing thoroughly. This station ensures each eggplant slice is evenly coated and bursting with flavor.
- Bread Eggplant: Take each eggplant round and first coat it lightly in flour, shaking off the excess. Dip into the whisked eggs, ensuring full coverage, then press into the seasoned panko mixture until completely coated. Place the breaded slices on a plate while repeating this process for all the eggplant rounds, maintaining a neat, organized workflow.
- Fry Eggplant: Heat enough olive oil to cover the bottom of a 12-inch nonstick frying pan over low to medium-low heat. Cook the eggplant in batches for 4–5 minutes per side until golden brown and crispy, adding more oil between batches if necessary. Transfer cooked slices to a cooling rack set over a sheet pan to drain excess oil and maintain crunchiness.
- Toast Buns: Preheat the oven to 400°F (200°C). Slice ciabatta buns in half and spread garlic butter generously on each cut side. Place the buns on a sheet pan and toast in the oven for 8–10 minutes until golden and aromatic, creating a sturdy, flavorful base for the sandwich layers.
- Assemble Sandwiches: Spread approximately ¼ cup pasta sauce on the bottom half of each toasted bun. Layer 4–5 slices of fried eggplant, then drizzle an additional 2 tablespoons of pasta sauce on top. Add slices of mozzarella and a sprinkle of Parmesan, ensuring even coverage for melting.
- Melt Cheese: Place the assembled sandwiches (without top buns) on a sheet pan and bake in the oven just until the cheese melts, about 3–5 minutes. Keep a close eye to avoid overcooking, and ensure the cheese is gooey, soft, and perfectly melded with the eggplant.
- Garnish and Serve: Carefully remove sandwiches from the oven, then sprinkle with crushed red pepper flakes for a hint of heat and top with fresh basil leaves. Place the top half of the bun on each sandwich and serve immediately for a warm, indulgent, yet veggie-packed meal.
Notes
- Use firm, fresh eggplant for best texture and less bitterness.
- Partially peeling the eggplant retains nutrients and a rustic texture.
- Toasting ciabatta buns enhances flavor and prevents sogginess from sauce.
- Adjust crushed red pepper flakes to control spiciness.
- Prep the dredging station in batches to prevent panko clumping.
- Store-bought pasta sauce works well, but homemade sauce boosts flavor depth.
- Recipe yields six sandwiches; halve for smaller servings or meal prep.
Chef’s Secrets For Crispy Eggplant
The key to perfectly crispy eggplant lies in salting and draining it beforehand.
Letting the slices sit on a rack with salt draws out excess moisture, preventing soggy results.
Using a combination of panko and Parmesan in the breading adds both crunch and flavor.
Fry over medium-low heat to ensure the eggplant cooks evenly without burning.
For extra crispiness, a light pat of additional panko before frying can make a difference.
Fresh herbs in the breading elevate the taste profile, giving a restaurant-quality flavor at home
Serving Suggestions With Flavor Boost
Serve these sandwiches hot for maximum melt and texture.
Pair with a side salad of arugula, cherry tomatoes, and balsamic glaze for a fresh contrast.
Oven-roasted potatoes or a light soup make great accompaniments.
For casual gatherings, cut the sandwiches into smaller sliders.
A glass of crisp white wine or sparkling water with lemon complements the cheesy, herbaceous flavors perfectly.
Garnishing with extra fresh basil or a sprinkle of Parmesan just before serving adds visual appeal and flavor punch.
Storage Tips For Freshness Retention
Cooked eggplant sandwiches store well for up to 2 days in an airtight container in the refrigerator.
Keep sauce, cheese, and fresh basil separate if storing to prevent sogginess.
Reheat in a 350°F oven to restore crispiness rather than microwaving.
For longer storage, freeze individual sandwich components separately—eggplant, sauce, and cheese—then assemble and bake fresh before serving.
Always cool fried eggplant before storing to avoid condensation, which can soften the breading.
Frequently Asked Questions Answered Clearly
1. Can I bake instead of fry?
Yes! Coat the eggplant in breading and bake at 425°F for 20–25 minutes, flipping halfway. This reduces oil use while still achieving a golden, slightly crispy exterior.
2. Can I use gluten-free ingredients?
Absolutely. Substitute all-purpose flour with a gluten-free flour blend and use gluten-free panko breadcrumbs. The sandwich remains delicious without compromising texture.
3. How do I prevent soggy sandwiches?
Salting the eggplant, using a cooling rack, and toasting the buns are key steps. Assemble just before serving and keep extra sauce separate if making ahead.
4. Can this recipe be made vegan?
Yes! Replace mozzarella and Parmesan with plant-based cheeses and use a flax or chickpea “egg” for dredging. Olive oil and breading flavors remain the same.
5. Can I make this ahead for meal prep?
Eggplant slices can be fried in advance and stored in the fridge. Assemble sandwiches on the day you plan to serve for optimal freshness and texture.
This recipe has been adapted and simplified from the original version by girlheartfood. We’ve refined the steps for a smoother cooking experience and added helpful notes, nutrition insights, and essential kitchen tools to make it even easier for home cooks.