
This Swedish limpa bread is a wholesome twist on classic Scandinavian baking, offering a balance of rich flavor and nourishing ingredients.
Made with hearty rye flour and naturally sweet molasses, it provides fiber to support digestion and steady energy throughout the day.
Anise seeds add a subtle aromatic note, making every slice feel special.
With its low saturated fat and plant-based protein from grains, this bread is both satisfying and nourishing.
Easy to prepare and perfect for everyday meals, it’s excellent for sandwiches, snacking, or meal-prep staples.
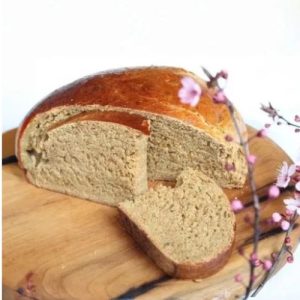
Easy Swedish Limpa Bread
Equipment
- 1 Large mixing bowl
- 1 wooden spoon or dough whisk
- 1 lightly floured surface or pastry board
- 1 greased baking sheet
- 1 kitchen towel (for covering dough)
- 1 pastry brush (for egg wash, optional)
- 1 oven thermometer (optional, but helpful)
Ingredients
- 2 ¼ tsp active dry yeast
- 2 ½ cups 600 ml warm water
- ¾ cup 180 ml molasses
- 1 Tbsp granulated sugar
- 1 tsp salt
- 1 Tbsp anise seeds
- ⅓ cup 80 ml shortening
- 2 cups 240 g rye flour
- 5 –6 cups 600–720 g bread flour
- 1 egg beaten (optional, for glaze)
Instructions
- Activate the Yeast: Begin by pouring the warm water (around 105–110°F / 40–43°C, comfortably warm but not hot) into a large mixing bowl. Sprinkle the active dry yeast over the surface of the water and let it sit for 5 minutes. The yeast will dissolve and start to foam slightly, which shows it’s alive and ready to work. If no bubbles form, your yeast may be inactive and should be replaced.
- Blend in Sweeteners and Flavorings: Once the yeast has dissolved, stir in the molasses, granulated sugar, and salt until fully combined. The molasses will not only give the bread its characteristic dark color but also add subtle sweetness and depth. Next, sprinkle in the anise seeds for a mild, licorice-like aroma that balances beautifully with the richness of molasses.
- Incorporate the Fat and Rye Flour: Add the shortening to the bowl and stir until it breaks down into small pieces. Then, gradually mix in the rye flour, stirring with a wooden spoon or dough whisk. At this stage, the dough will look sticky and thick, but that’s completely normal—rye flour tends to create a denser base for bread.
- Build the Dough with Bread Flour: Now, start adding the bread flour one cup at a time. Stir well after each addition until the dough begins to pull away from the sides of the bowl. Once the dough is cohesive but still slightly tacky, transfer it onto a lightly floured surface. Sprinkle a little extra flour on top if it’s sticking too much to your hands.
- Knead for Strength and Texture: Knead the dough by pressing it with the heels of your hands, folding it over itself, and giving it a quarter turn. Repeat this rhythm for about 8–10 minutes. The dough should gradually become smooth, elastic, and easy to shape, while still retaining a slight tackiness from the rye. Kneading develops gluten, which helps the bread hold its structure and rise properly.
- First Rise (Bulk Fermentation): Shape the kneaded dough into a ball and place it in a lightly greased bowl. Turn the dough over once so that the entire surface is coated with oil—this prevents drying. Cover the bowl with a clean kitchen towel and let it rest in a warm, draft-free spot for 1 ½ to 2 hours, or until the dough has doubled in size. This slow rise allows the yeast to build flavor and volume.
- Punch Down and Rest: Once the dough has risen, gently press down with your fist to release trapped air bubbles. Turn the dough onto a floured surface, reshape it into a smooth ball, and let it rest uncovered for about 1 hour. This step relaxes the gluten, making the dough easier to handle for shaping later.
- Shape into Loaves: After resting, divide the dough into three equal portions. Shape each portion into a round loaf by tucking the edges underneath until the surface looks smooth and tight. Place the loaves onto a greased baking sheet, leaving some space between them to expand. Cover lightly with a towel and allow them to rise again for about 1 hour, or until they’ve puffed up noticeably.
- Optional Egg Wash for Shine: If you prefer a glossy, golden-brown finish, beat one egg in a small bowl and lightly brush it over the tops of the risen loaves using a pastry brush. This step is optional but gives the bread an attractive bakery-style look.
- Bake to Perfection: Preheat your oven to 350°F (175°C). Place the loaves on the center rack and bake for 30–40 minutes.The bread is ready when the crust is deep brown, the bottoms sound hollow when tapped, and the internal temperature reaches 190–200°F (88–93°C). If the crust begins to darken too quickly, tent the loaves with aluminum foil for the remainder of the bake.
- Cool and Serve: Remove the loaves from the baking sheet and place them on a wire rack to cool completely before slicing. This cooling period allows the interior crumb to set properly, preventing a gummy texture. Once cooled, slice and enjoy with cheese, smoked salmon, prosciutto, or simply a pat of butter.
Notes
- Rye flour gives the bread its distinct, hearty texture and slightly tangy flavor.
- Anise seeds add a subtle licorice-like aroma, but you can reduce or omit if preferred.
- Molasses provides natural sweetness and moisture; dark or light molasses can be used depending on your taste.
- The bread dough will be slightly tacky even after kneading—that’s normal and helps retain moisture.
- Egg wash is optional but gives a shiny, golden crust.
Chef’s Secrets For Perfect Bread
For a beautifully soft, flavorful loaf, the key is gentle handling of the dough. Avoid over-flouring, as it can make the bread dense.
Let the dough rise in a warm, draft-free environment to encourage even fermentation.
Using a combination of rye and bread flour balances density and lightness—rye adds richness, while bread flour helps the loaf rise well.
If you like a deeper flavor, let the dough rest slightly longer for the first rise, which develops more complex aromas.
Serving Suggestions For Every Occasion
Swedish Limpa Bread is versatile and pairs well with both savory and sweet toppings.
Try it with smoked salmon, cream cheese, or thin slices of prosciutto for a sophisticated snack.
Butter and a drizzle of honey make a comforting breakfast or tea-time treat.
For an everyday sandwich, layer it with roast vegetables, cheese, and leafy greens.
Its slightly sweet, aromatic flavor also complements hearty soups, stews, or a simple cheese platter, making it ideal for both casual and special meals.
Storage Tips To Keep Fresh
To maintain freshness, store the loaves in a bread box or airtight container at room temperature for up to 3 days.
For longer storage, slice the bread and freeze individual portions in freezer bags.
This allows you to toast or thaw slices as needed without sacrificing texture.
Avoid refrigeration, as it can dry the bread quickly.
If reheating, wrap the loaf in foil and warm in a 300°F (150°C) oven for 10–15 minutes to refresh the crust and crumb.
Frequently Asked Questions About Limpa
1. Can I make this bread without anise seeds?
Yes, the anise seeds are optional. Omitting them will slightly reduce the signature aroma, but the bread will still be delicious and slightly sweet from the molasses.
2. Can I use whole wheat flour instead of bread flour?
You can substitute part of the bread flour with whole wheat flour, but the bread may be denser. Using at least 70% bread flour helps maintain a light, airy texture.
3. How do I know when the bread is fully baked?
The bread is done when it is golden brown, sounds hollow when tapped on the bottom, and reaches an internal temperature of 190–200°F (88–93°C).
4. Can I make the dough in a stand mixer?
Absolutely! Use the dough hook attachment on medium speed, mixing until the dough is smooth and elastic. Then proceed with rising and shaping as usual.
5. How long does this bread stay fresh after baking?
At room temperature in an airtight container, the bread stays fresh for 2–3 days. Sliced and frozen, it can last up to 2 months.