
This homemade bagel recipe stands out for its authentic preparation method, which includes an overnight fermentation that develops rich flavor and chewy texture typical of classic New York-style bagels.
The combination of bread flour and a gentle yeast proofing process creates a sturdy yet tender crumb, while boiling the bagels before baking ensures a signature glossy crust.
Health-wise, these bagels offer a good source of complex carbohydrates and moderate protein from the bread flour, with minimal saturated fats, especially if you skip the optional egg wash.
Using natural sweeteners like maple syrup adds subtle depth without refined sugars.
The recipe is ideal for everyday cooking due to its make-ahead flexibility — prepare the dough the night before and bake fresh in the morning.
This approach saves time while delivering fresh, warm bagels, making it a satisfying and practical choice for breakfast or brunch.
Plus, the option to customize toppings adds versatility, catering to various tastes.
Must-Have Tools for Perfect Results
Stand Mixer with Dough Hook
Essential for mixing and kneading this stiff bagel dough effortlessly to achieve a smooth, elastic texture. Beyond bagels, it’s invaluable for bread, pizza dough, and other baked goods.
Kitchen Scale
Ensures precise flour measurement for consistent dough hydration and prevents dryness or heaviness, critical in baking. A scale is a must-have for all precise cooking and baking tasks.
Large Pot
Necessary for boiling the bagels in water with baking soda to create that distinctive chewy crust. It also serves multiple kitchen functions, from boiling pasta to making soups.
Baking Sheets with Parchment Paper
Provides a non-stick surface for proofing and baking bagels, ensuring easy release and cleanup. Parchment paper is versatile for roasting, baking, and cooking delicate items.
Pastry Brush
Used for applying egg wash to bagels, enhancing browning and helping toppings stick. A pastry brush is handy for glazing, basting, and spreading sauces in many recipes.
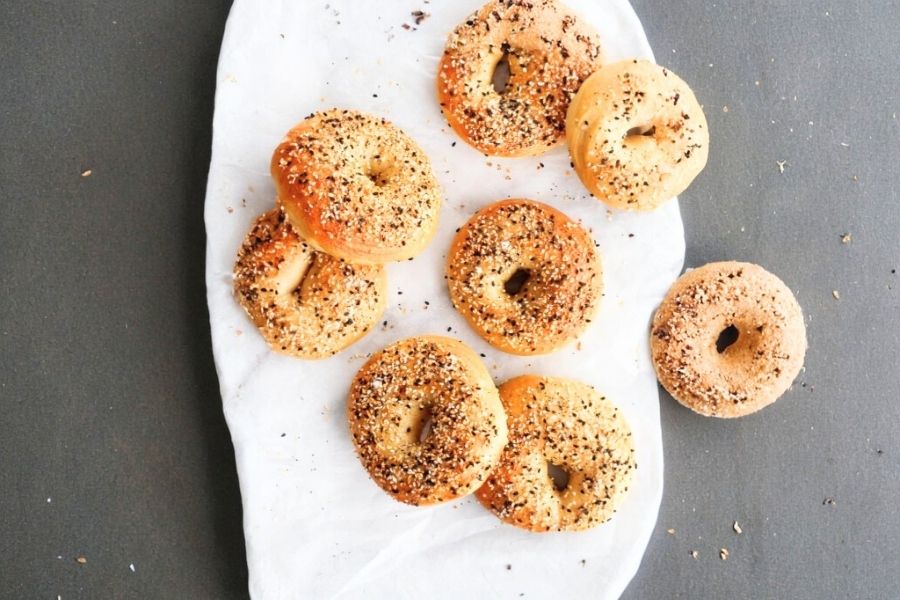
Irresistible Soft Bagels
Equipment
- 1 Stand mixer with dough hook attachment
- 1 Kitchen scale
- 1 Large pot (for boiling)
- 2 Baking sheets lined with parchment paper
- 1 Pastry brush
Ingredients
For the Dough:
- 1 tablespoon maple syrup or barley malt syrup
- 2¼ teaspoons 1 packet active dry yeast
- 1¼ cups warm water about 100–110°F / 38–43°C
- 540 grams bread flour approximately 4 1/3 cups, or all-purpose flour as an alternative
- 2 teaspoons sea salt
For the Boiling Liquid:
- 1½ tablespoons maple syrup
- 2 teaspoons baking soda
- ½ tablespoon salt
For the Topping (optional):
- 1 egg white
- 1 tablespoon water
- Everything bagel seasoning or other preferred toppings
Instructions
- Activate the Yeast: In a small bowl, stir together the maple syrup, warm water, and yeast. Let it sit for about 5 minutes until it becomes bubbly and frothy, indicating the yeast is active.
- Make the Dough: Attach the dough hook to your stand mixer. Add the bread flour and sea salt to the mixing bowl, then pour in the yeast mixture. Mix on medium-low speed for 5 to 7 minutes. The dough should come together firmly around the hook but still be slightly tacky; if it feels too dry after a few minutes, add a tablespoon of water gradually.
- Knead and Proof: Turn the dough out onto a clean surface and knead by hand for 2 to 3 minutes until it becomes smooth and slightly sticky. Shape it into a ball, place it in a lightly greased bowl, and cover with plastic wrap. Let it rise in a warm spot for 1 to 1.5 hours, until nearly doubled in size.
- Shape the Bagels: Prepare two baking sheets by lining them with parchment paper and lightly oiling them. Turn the dough onto a clean surface without flour. Divide the dough into 8 equal portions. Roll each portion into a tight ball by cupping your hand and rolling the dough on the countertop. Keep unused dough covered with plastic wrap to prevent drying.
- Form the Rings: Lightly moisten the countertop with a few drops of water. Roll each dough ball into a rope about 9 inches long. Fold the rope in half over your fingers so the ends overlap by about 2 inches. Flip your hand over and gently roll the dough on the surface to seal the ends together, forming a bagel shape. Place the shaped bagels on the prepared baking sheets. Lightly dust with flour and cover tightly with plastic wrap. Refrigerate overnight.
- Morning Proof: Remove the bagels from the fridge and allow them to rest at room temperature for 1 hour to warm up and proof further. Preheat your oven to 450°F (230°C).
- Test the Dough: Drop one bagel into a bowl of water. If it sinks, give the dough an extra 30 minutes of proofing at room temperature until it floats, indicating it’s ready to boil.
- Prepare the Boiling Solution: In a large pot, bring about 2 quarts (8 cups) of water to a boil. Add the maple syrup, baking soda, and salt. Stir well.
- Boil the Bagels: Gently add 3 bagels at a time to the boiling water. Boil each side for 1 minute. Remove with a slotted spoon and place back on the baking sheets, flipping so the smooth side is on top. Repeat with the remaining bagels.
- Add Toppings: Whisk together the egg white and water in a small bowl. Brush this mixture over each bagel for a shiny crust and better seasoning adherence. Sprinkle everything bagel seasoning or your choice of toppings generously. If preferred, skip the egg wash and dip the bagel tops directly into the seasoning.
- Bake: Place the bagels in the preheated oven and bake for 14 to 18 minutes until they turn a light golden brown.
Notes
- For the best texture, weigh your flour using a kitchen scale, as measuring by volume can lead to dry or dense dough.
- Bread flour is preferred for a chewier bagel, but all-purpose flour can be used for a slightly softer result.
- The overnight refrigeration step is key to flavor development and texture, but if pressed for time, allow the shaped dough to proof for 2–3 hours at room temperature instead.
- Use barley malt syrup instead of maple syrup for a more traditional bagel flavor.
- The egg wash is optional but recommended to help toppings stick and give the bagels a beautiful glossy finish.
Chef’s Secrets for Perfect Bagels
Achieving bakery-quality bagels at home starts with understanding the key steps that develop their signature texture and flavor.
The overnight refrigeration of the shaped dough is essential—it allows the yeast to slowly ferment, resulting in a richer taste and chewier crumb.
Don’t skip the boiling step, as it gelatinizes the starch on the surface and forms that iconic glossy crust and dense chewiness.
Using bread flour is recommended because its higher protein content strengthens gluten development, giving bagels their characteristic bite.
When shaping the dough, ensure the ends are well sealed to prevent them from opening during boiling and baking. For extra flavor, consider experimenting with barley malt syrup instead of maple syrup in both the dough and the boiling water.
Finally, lightly dusting bagels with flour before refrigeration prevents sticking to the plastic wrap, preserving their delicate shape.
Serving Suggestions to Elevate Bagels
Fresh homemade bagels are wonderfully versatile and pair beautifully with a range of toppings and spreads.
Classic options include cream cheese, smoked salmon, capers, and thinly sliced red onion for a traditional deli-style experience.
For a hearty breakfast, try topping bagels with scrambled eggs, avocado, and a sprinkle of chili flakes.
They also make excellent sandwich bases—fill them with deli meats, cheeses, and fresh veggies for a satisfying lunch.
Don’t hesitate to experiment with sweet toppings like honey butter, jam, or nut butters for a comforting snack.
Bagels can be sliced and toasted to bring out their aroma and crispness, making every bite more enjoyable. Serve them warm and fresh for best flavor, or lightly toast leftovers to revive their texture.
Storage Tips to Keep Freshness
To maintain the freshness of your homemade bagels, let them cool completely before storing.
For short-term storage, place them in an airtight container or resealable plastic bag at room temperature—this will keep them fresh for up to 2 days.
If you want to store bagels longer, freeze them individually wrapped in plastic wrap or foil, then place them in a freezer bag.
When ready to eat, thaw at room temperature or toast them straight from frozen for a quick, warm treat.
Avoid refrigerating bagels, as this can cause them to stale faster due to moisture loss.
To restore a bagel’s softness after storage, briefly heat it in the oven wrapped in foil or in a toaster oven to revive its chewiness and aroma.
Frequently Asked Questions Answered Clearly
1. Can I make this recipe without a stand mixer?
While a stand mixer with a dough hook is highly recommended to handle the stiff dough easily, you can knead by hand. Expect to knead for about 10-15 minutes on a lightly oiled surface until the dough is smooth and elastic, but it will require more effort.
2. What if my bagels sink during the floating test?
If the bagels sink when dropped into water before boiling, they likely need more proofing time. Let the dough rest at room temperature for an additional 30 minutes to an hour, then try the float test again before boiling.
3. Can I use all-purpose flour instead of bread flour?
Yes, all-purpose flour can be used, but your bagels will have a slightly softer texture and less chew compared to bread flour. The protein content in bread flour develops stronger gluten, which is ideal for bagels.
4. Why is boiling bagels necessary?
Boiling the bagels briefly sets their shape and creates a chewy crust by gelatinizing the starch on the dough’s surface. Skipping this step results in a softer, less traditional texture.
5. Can I prepare the dough on the same day and skip overnight refrigeration?
Yes, you can skip the overnight rest and proof the shaped bagels for 2–3 hours at room temperature instead. However, the flavor and texture won’t be quite as developed as with the slow, cold fermentation.
This recipe has been adapted and simplified from the original version by loveandlemons. We’ve refined the steps for a smoother cooking experience and added helpful notes, nutrition insights, and essential kitchen tools to make it even easier for home cooks.