
This no-knead baguette recipe stands out for its simplicity and impressive results, delivering a classic French-style loaf with minimal effort.
Using just four basic ingredients, it creates a naturally airy and crusty bread perfect for everyday meals.
The slow fermentation process not only develops rich flavor but also enhances digestibility.
While bread isn’t typically high in protein or fiber, using bread flour provides a moderate amount of plant-based protein and a satisfying texture.
This recipe avoids added fats and keeps saturated fat low, making it a cleaner, wholesome choice.
It’s ideal for busy home cooks because it requires minimal hands-on time, no kneading, and straightforward shaping, making it both accessible and rewarding.
Plus, the long resting time allows flexibility in meal prep, so you can bake fresh baguettes when it suits your schedule.
Must-Have Tools for Perfect Results:
Baguette Pan:
Specially designed with grooves to shape and support the dough, this pan ensures your baguettes bake evenly with authentic ridges and a perfect crust. Beyond baguettes, it’s great for any long loaves or breadsticks, enhancing your baking precision.
Measuring Cups + Spoons:
Precise measurement tools guarantee the perfect balance of flour, yeast, salt, and water every time, ensuring consistent dough quality and baking success. These are essential in any kitchen for accuracy in all cooking and baking.
Mixing Bowls:
Large and durable bowls provide ample space for mixing ingredients and allowing dough to rise comfortably. Their versatility extends to salads, marinating, and general prep work.
Parchment Paper:
Non-stick and heat-resistant, parchment paper prevents the dough from sticking during baking and simplifies cleanup. It’s a kitchen staple for roasting, baking, and even steaming.
Bread Knife:
A serrated bread knife lets you slice your baguettes cleanly without crushing the crumb, preserving that airy texture. It’s invaluable for all bread types and sandwiches.
Quick & Healthy Baguette
Equipment
- 1 Baguette Pan
- Measuring Cups & Spoons
- Mixing Bowls
- Parchment Paper
- Bread Knife
Ingredients
- ngredients List:
- 3 cups bread flour
- 1 teaspoon active dry yeast about half a packet
- 1 teaspoon salt
- 1½ cups warm water between 100–110°F / 37–43°C
- Additional bread flour for dusting about 1 cup
- 1 large ice cube for creating steam in the oven
Instructions
- Combine Dry Ingredients: In a large mixing bowl, add 3 cups of bread flour, 1 teaspoon of salt, and 1 teaspoon of active dry yeast (about half a packet). Use a whisk, wooden spoon, or your clean hands to thoroughly mix these dry ingredients until evenly combined. This step ensures that the yeast and salt are well distributed throughout the flour, which is key for even fermentation and flavor.
- Add Warm Water and Form Dough: Measure 1½ cups of warm water, making sure it is between 100°F and 110°F (37°C to 43°C). This precise temperature range activates the yeast without killing it. Pour the water slowly into the dry mixture while stirring continuously with a spatula or wooden spoon. Keep mixing until the ingredients come together to form a very sticky dough. The dough should be wetter and more tacky than traditional bread dough, which helps develop a light, airy crumb.
- Initial Rest and Fermentation: Cover the bowl tightly with plastic wrap or place a clean kitchen towel over it.Set the bowl in a warm, draft-free location — ideal spots include inside a microwave, a cupboard, or a turned-off oven. Let the dough rest undisturbed for a minimum of 5 hours, but preferably overnight (up to 12 hours). During this time, the yeast will ferment, causing the dough to rise and develop complex flavors. You will notice the dough approximately triples in size.
- Prepare for Shaping: Once the dough has risen fully, preheat your oven to 450°F (230°C). Remove the plastic wrap and generously flour your work surface. Pour the sticky dough out onto the floured countertop, being gentle to preserve the air bubbles inside. Sprinkle additional bread flour liberally on top of the dough to prevent sticking as you work.
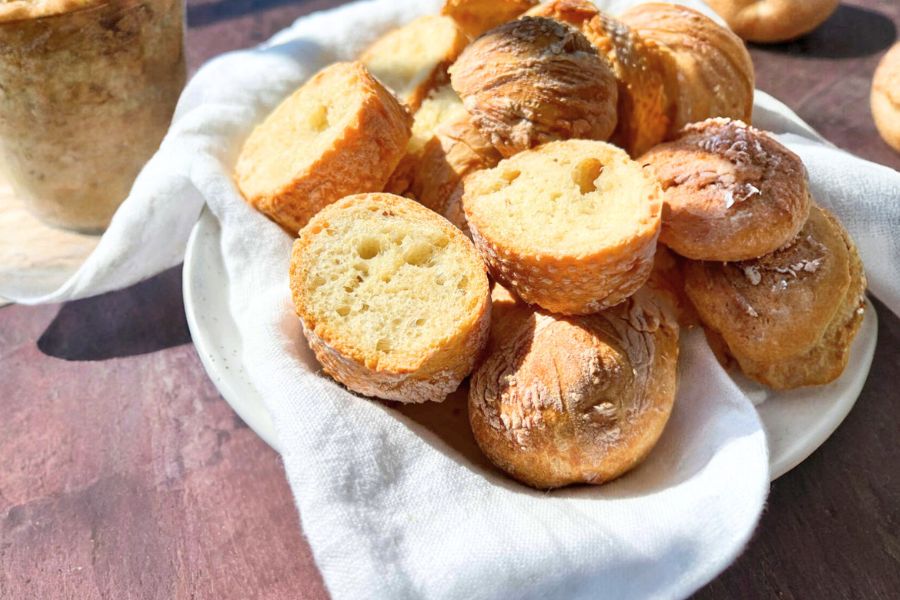
- Divide the Dough: Using a bench scraper or your hands, divide the dough into two equal portions for two large baguettes, or into four smaller portions if you prefer smaller loaves. Dust the dough lightly with flour if it feels too sticky to handle easily.
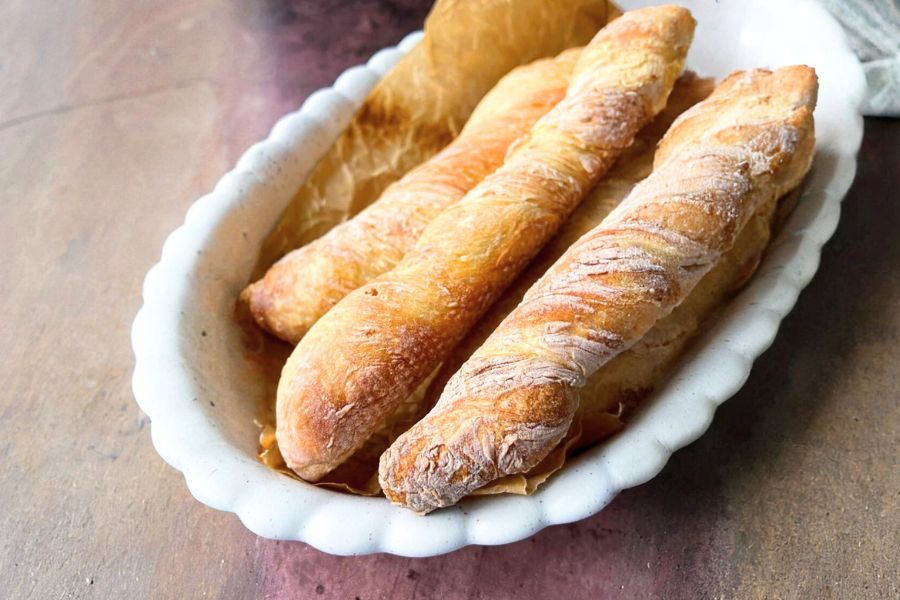
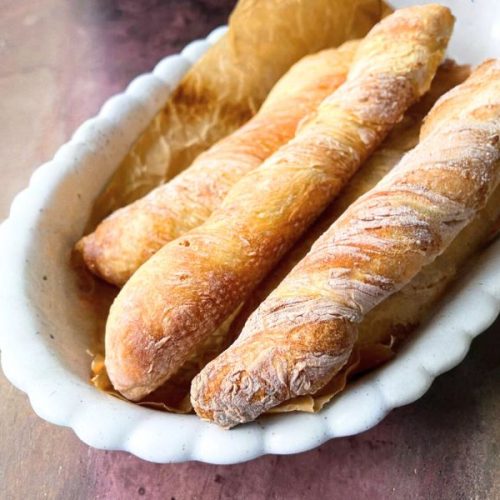
- Shape the Baguettes: Take one portion of dough and gently form it into a long, even cylinder about 12–14 inches in length. Using both hands, twist one end of the dough in the opposite direction from the other end. This subtle twist gives the baguette its signature shape without the need for kneading. Repeat this process with the remaining dough portions.
- Arrange for Baking: Line a baguette pan or a baking sheet with parchment paper to prevent sticking. Place each shaped dough piece onto the pan or sheet, making sure they are spaced evenly to allow for expansion during baking.
- Create Steam for Crust: Place a large ice cube on the bottom of your preheated oven just before sliding the baguettes inside. The melting ice will create steam, which helps form a thin, crisp crust by keeping the surface moist in the initial baking minutes.
- Bake the Baguettes: Put the pan or baking sheet with the dough into the oven. Immediately close the oven door to trap the steam. Bake for approximately 40 to 45 minutes. Keep a close eye on the loaves; you want a deep golden-brown color with a firm, crisp crust. The baking time may vary depending on your oven, so checking toward the end of baking is important.
- Cool Before Serving: Once baked, remove the baguettes from the oven and transfer them to a wire rack to cool completely before slicing. This resting allows the crumb to set, ensuring a perfect texture inside and a crispy crust outside
Notes
Chef’s Secrets for Perfect Baguettes
Achieving bakery-quality baguettes at home comes down to a few key techniques that elevate this simple recipe.
First, water temperature is crucial—too hot and it kills the yeast, too cold and it won’t activate properly.
Using warm water between 100°F and 110°F guarantees a lively rise. Second, the long, slow fermentation period not only develops flavor but also creates an open, airy crumb.
Resist the urge to rush this step for best results.
When shaping, handle the dough gently to preserve air pockets and avoid kneading, which can make the bread dense.
Finally, adding steam to the oven by placing an ice cube or water tray helps form a crisp, golden crust.
Don’t skip this step as it transforms the texture and appearance of your baguettes, making them truly authentic.
Serving Suggestions to Impress Guests
Freshly baked baguettes are incredibly versatile and can enhance almost any meal.
Serve warm slices alongside a cheese board with brie, camembert, or sharp cheddar for an elegant appetizer.
For a simple yet satisfying lunch, slice the baguette lengthwise and layer with deli meats, fresh greens, tomatoes, and a spread of Dijon mustard or aioli.
These baguettes also make perfect toast for breakfast—top with smashed avocado, poached eggs, or honey and ricotta for a delicious start to your day.
For dinner, accompany soups, stews, or salads with crusty baguette pieces for dipping.
The light crumb and crunchy crust add texture and flavor that complement a wide range of dishes.
Storage Tips to Keep Bread Fresh
To maintain the baguette’s signature crust and fluffy interior, it’s best to store it properly after baking.
If you plan to eat it within a day, keep the baguette at room temperature, loosely wrapped in a paper bag or wrapped in a clean kitchen towel to prevent it from becoming soggy while allowing some airflow.
For longer storage, slice the baguette and freeze the pieces in an airtight freezer bag. When ready to eat, reheat slices directly in the oven or toaster to restore crispness.
Avoid storing bread in plastic at room temperature, as this traps moisture and makes the crust soft and chewy instead of crisp.
Frequently Asked Questions Answered Clearly
- Can I use all-purpose flour instead?
Yes, all-purpose flour can be used, but bread flour has higher protein content, which helps create a chewier texture and better gluten structure, leading to a lighter crumb and crustier exterior. - Do I have to knead the dough?
No kneading is required in this recipe. The long resting period allows the gluten to develop naturally, producing a light and airy baguette without the effort of kneading. - Why do I need to add an ice cube to the oven?
The ice cube creates steam inside the oven, which prevents the crust from hardening too quickly and helps form a crisp, shiny crust by keeping the dough surface moist during the initial baking minutes. - Can I bake smaller baguettes?
Absolutely! Dividing the dough into four smaller portions will yield smaller baguettes, perfect for individual servings or sandwiches. Adjust baking time slightly, checking for a golden crust and hollow sound when tapped. - How long can I store the baguettes?
Fresh baguettes are best eaten within 1-2 days. For longer storage, freezing is recommended. Properly wrapped in freezer bags, baguettes can be stored up to three months without significant loss of quality.
This recipe has been adapted and simplified from the original version by themodernnonna. We’ve refined the steps for a smoother cooking experience and added helpful notes, nutrition insights, and essential kitchen tools to make it even easier for home cooks.