
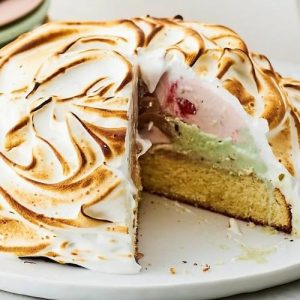
Baked Alaska is a show-stopping dessert that combines the creamy indulgence of ice cream with a tender, buttery cake base, all encased in fluffy, lightly toasted meringue.
Despite its impressive presentation, this treat is surprisingly approachable for home cooks.
Packed with protein from egg whites and dairy, it offers a satisfying boost, while the cake provides fiber and energy-sustaining carbohydrates.
With options to customize flavors, this dessert balances indulgence with nutritional benefits and is perfect for special occasions or everyday celebrations, making it both fun and practical to prepare.
Classic Baked Alaska
Equipment
- 1 × 3-quart mixing bowl
- Plastic wrap1 × 9-inch round cake pan
- Parchment Paper
- Stand mixer or hand mixer
- Paddle attachment
- Whisk attachment
- Offset spatula
- Rimmed baking sheet or broiler-safe plate
Ingredients
Ice Cream Center:
- 3 pints ice cream any flavor
- Cooking spray
Cake Base:
- 8 tablespoons unsalted butter room temperature
- Cooking spray
- 1 cup granulated sugar
- 2 large eggs
- 1 teaspoon vanilla extract
- 1½ cups all-purpose flour
- ½ teaspoon baking powder
- ¼ teaspoon kosher salt
- ½ cup whole milk
Meringue:
- 6 large egg whites room temperature
- ¼ teaspoon cream of tartar
- 1 cup granulated sugar
Instructions
- Prepare the Ice Cream Dome: Start by selecting a 3-quart glass or metal mixing bowl. Generously coat the inside with cooking spray to prevent sticking. Line the bowl with plastic wrap, leaving about a 6-inch overhang for easy removal later. Begin layering the ice cream: use alternating scoops of your chosen flavors to create a visually appealing, multicolored pattern. It’s okay if the ice cream softens slightly while scooping—this helps it mold into the bowl. Once filled, smooth the top with an offset spatula, fold the plastic wrap over the ice cream to seal, and place the bowl in the freezer. Let it freeze until completely firm, at least 2 hours, for a stable center.
- Preheat the Oven and Prepare the Cake Pan: While the ice cream chills, position a rack in the middle of your oven and preheat to 350°F (175°C). Select a 9-inch round cake pan and coat it thoroughly with cooking spray. Line the bottom of the pan with parchment paper to prevent sticking. This preparation ensures the cake bakes evenly and can be easily removed later.
- Cream Butter and Sugar: In a mixing bowl, combine 8 tablespoons of softened unsalted butter with 1 cup granulated sugar. Using the paddle attachment on a stand mixer (or a hand mixer if needed), beat the mixture on medium-high speed for 2–3 minutes until light, fluffy, and pale in color. This aeration step is crucial for creating a tender, spongy cake texture.
- Incorporate Eggs and Vanilla: Add 2 large eggs, one at a time, along with 1 teaspoon of pure vanilla extract. Continue mixing on medium speed until the batter is smooth and fully blended. The mixture should appear creamy and slightly lighter in color, which indicates that air has been incorporated, essential for a soft, airy cake.
- Mix Dry Ingredients: Turn off the mixer. In a separate bowl, whisk together 1½ cups all-purpose flour, ½ teaspoon baking powder, and ¼ teaspoon kosher salt. Gradually add this dry mixture to the butter and sugar mixture. Mix on low speed just until incorporated to avoid overmixing, which can make the cake dense.
- Add Milk for Smooth Batter: With the mixer running on low, slowly pour in ½ cup whole milk. Continue mixing for 2–3 minutes, scraping down the sides of the bowl halfway through, until the batter is completely smooth, glossy, and free of lumps. The batter should have a slightly thick but pourable consistency.
- Bake the Cake: Transfer the batter into the prepared cake pan, spreading it evenly with a spatula. Place the pan in the preheated oven and bake for 25–30 minutes, or until the cake is lightly golden on top and a toothpick inserted in the center comes out clean. Once baked, set the pan on a wire rack and allow the cake to cool completely while still in the pan.
- Prepare the Meringue: Ensure your mixing bowl and whisk attachment are completely clean and dry. Add 6 large room-temperature egg whites and ¼ teaspoon cream of tartar to the bowl. Whip on medium-high speed until the mixture becomes foamy, about 1–2 minutes. Increase the speed to high, gradually adding 1 cup granulated sugar. Beat until the meringue is thick, glossy, and forms stiff peaks when the whisk is lifted. .Stiff peaks ensure the meringue will hold its shape on the ice cream dome.
- Assemble the Baked Alaska: Remove the cake from the pan and discard the parchment paper. Place the cooled cake on a rimmed baking sheet or broiler-safe plate. Take the frozen ice cream dome out of the freezer and carefully remove the plastic wrap. Gently invert the ice cream onto the cake, ensuring it is centered. Use an offset spatula to spread a thick layer of meringue evenly over the ice cream and cake, completely covering the surface. Create decorative peaks with the spatula tips, which will brown beautifully under heat.
- Brown the Meringue: Option 1 – Broiler Method: Preheat the oven broiler and position a rack about 12 inches below the heating element. Place the assembled cake on a foil-lined baking sheet and broil for 3–4 minutes, watching carefully to prevent burning, until the meringue turns golden brownOption 2 – Kitchen Torch Method: For more control, lightly brown the meringue peaks with a kitchen torch, moving evenly over the surface until all peaks are golden and lightly crisped.
- Serve and Enjoy: Transfer the completed Baked Alaska to a serving plate if needed. Slice carefully with a sharp knife, wiping the blade between cuts to maintain clean edges. Serve immediately for the best contrast between the warm, fluffy meringue, the soft cake, and the cold, creamy ice cream center.
- Make-Ahead Tips: The cake can be baked in advance, wrapped tightly, and refrigerated for up to 1 day or frozen for up to 1 month. Thaw overnight in the refrigerator before assembling with ice cream and meringue. This flexibility makes Baked Alaska an excellent choice for party prep or special occasions.
Notes
- Use any favorite ice cream flavors to customize your Baked Alaska; layering different colors makes it visually striking.
- Room-temperature eggs and butter are essential for proper aeration in the cake and smooth meringue.
- Make sure the mixing bowl and whisk attachment are completely clean and dry before whipping egg whites to ensure stiff peaks.
- The cake can be baked ahead and stored, making assembly on the day of serving faster and easier.
- Monitor meringue closely under the broiler to avoid burning; a kitchen torch provides more control for browning.
Chef’s Secrets For Perfect Dessert
Creating the ideal Baked Alaska requires attention to detail at every stage.
Always allow the ice cream to freeze completely so it maintains its shape during assembly.
When whipping the meringue, begin at medium speed and gradually increase; adding sugar slowly ensures a smooth, glossy texture that will hold peaks perfectly.
Using an offset spatula allows for precise shaping of the meringue, creating dramatic peaks that brown beautifully.
Finally, handle the ice cream gently during inversion to prevent cracking or uneven layers.
Serving Suggestions To Impress Guests
Baked Alaska is a visual centerpiece, so presentation matters.
Serve on a large platter to accommodate easy slicing, and consider adding a garnish such as fresh berries, mint leaves, or a drizzle of chocolate sauce around the base.
Pair this dessert with a light, sparkling wine or a cup of freshly brewed coffee to balance the sweetness.
For a colorful twist, layer multiple ice cream flavors inside, giving each slice a striking appearance that will impress both kids and adults alike.
Storage Tips For Long-Term Freshness
If preparing ahead, bake the cake and wrap it tightly in plastic wrap; it can be refrigerated for up to one day or frozen for up to a month.
Freeze the ice cream dome separately until firm.
Once assembled with meringue, Baked Alaska should be served immediately, as the meringue begins to soften at room temperature.
Leftovers can be stored in an airtight container in the freezer, but note that the meringue texture may change slightly.
Thaw in the refrigerator for several hours before serving again.
Frequently Asked Questions About Recipe
1. Can I use store-bought cake instead of baking?
Yes! You can substitute a pre-baked sponge or pound cake to save time. Make sure it’s slightly firm and cooled completely before adding the ice cream dome and meringue.
2. What types of ice cream work best?
Any flavor works, but firmer ice creams freeze better and hold shape during assembly. Avoid soft-serve or low-fat versions that may melt too quickly. Layering contrasting colors or flavors adds visual and taste appeal.
3. Can I prepare meringue in advance?
It’s best to prepare meringue just before assembling the dessert. Pre-made meringue can deflate or weep if left for too long, compromising the fluffy texture and structure of the peaks.
4. How do I prevent the meringue from burning?
Broil on a high rack for only 3–4 minutes, keeping a close watch. For more control, use a kitchen torch to brown peaks evenly without overheating the ice cream.
5. Can I make this dairy-free or vegan?
Yes! Use plant-based ice cream and non-dairy butter, and replace egg whites with aquafaba (chickpea water) for the meringue. Texture may vary slightly, but the final dessert remains impressive and delicious.