
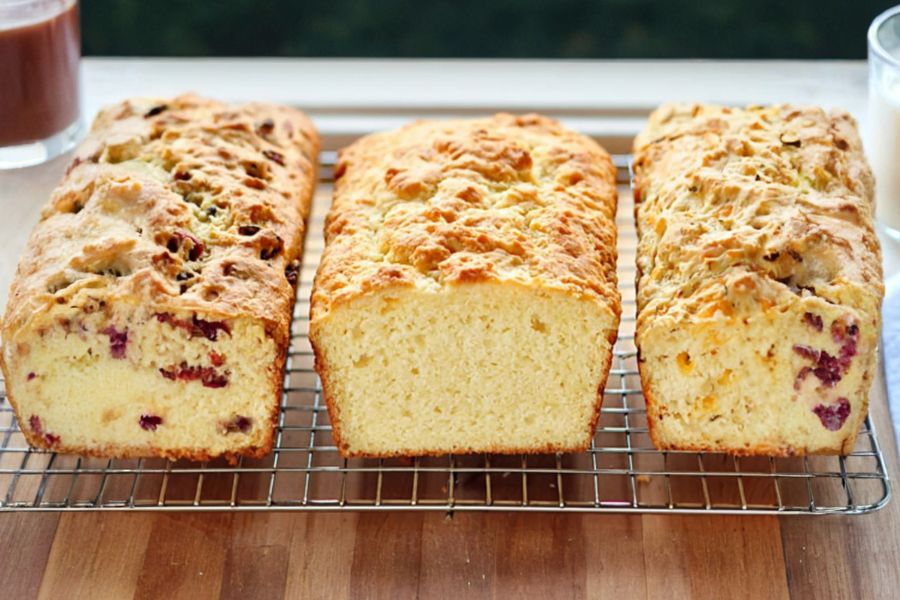
This buttermilk quick bread is a versatile kitchen favorite, combining simplicity with rich flavor and a tender, moist crumb.
Its balanced ingredients provide a source of high-quality protein from the egg and buttermilk, while the moderate amount of healthy fats from butter or oil contributes to satiety without excess saturated fat.
Using all-purpose flour keeps it fiber-rich and nourishing, and the recipe’s adaptable nature allows for the addition of fruits, nuts, or herbs, boosting both nutritional value and flavor variety.
Quick to prepare and forgiving for beginners, this loaf is perfect for weekday breakfasts, snacks, or even as a side for dinner.
With minimal hands-on time and a straightforward bake, it makes meal prep effortless while delivering satisfying results that feel homemade.
Must-Have Tools for Perfect Results
9×5-Inch Loaf Pan
Ensures even baking and a uniform, golden crust. Beyond this recipe, it’s ideal for pound cakes, meatloaf, and layered desserts.
Mixing Bowls (Medium and Large):
Essential for whisking dry and wet ingredients separately, providing control over consistency. Perfect for everyday meal prep, salads, and batters.
Whisk
Helps fully incorporate ingredients without overmixing, giving a light, tender crumb. A versatile tool for sauces, eggs, and dressings.
Spatula
Scrapes every bit of batter into the pan and folds ingredients gently, minimizing waste. Also great for frosting cakes, mixing dough, and sautéing.
Toothpicks or Cake Tester
Ensures perfectly baked bread by checking doneness in the center. Multipurpose for baked goods, roasting, and even grilling.
Homemade Buttermilk Bread
Equipment
- 1 Medium Mixing Bowl
- 1 Large mixing bowl
- 1 Whisk1 Spatula1 9×5-Inch Loaf Pan
Ingredients
- 2 cups all-purpose flour 10 oz
- 1/2 cup white sugar 4 oz
- 1 1/2 tsp baking powder
- 1/2 tsp baking soda
- 1 tsp salt
- 1 cup buttermilk 8 oz
- 1 large egg
- 1/4 cup unsalted butter olive oil, or vegetable oil (2 oz)
Instructions
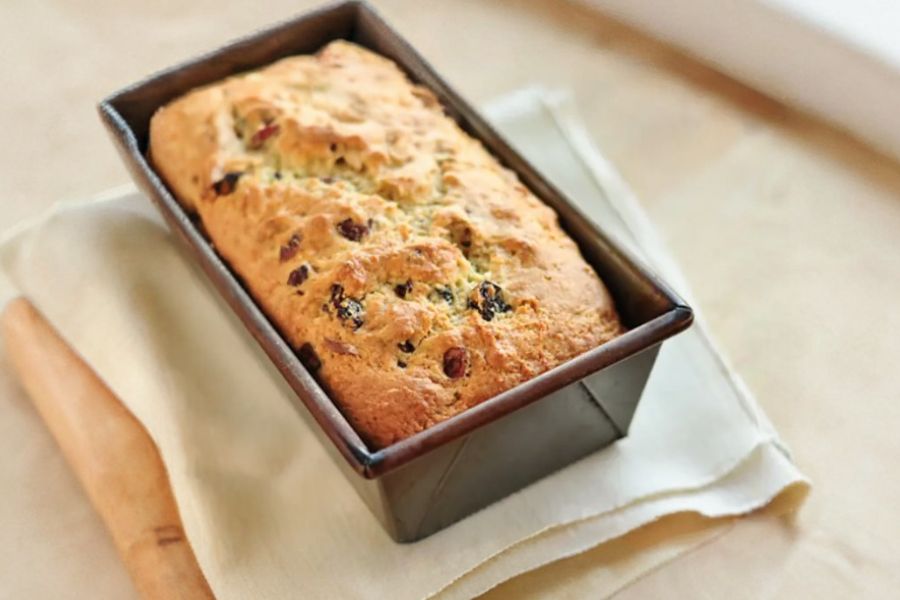
- Preheat & Prepare Pan: Begin by heating your oven to 350°F (175°C). Grease a standard 9×5-inch loaf pan with butter, oil, or nonstick spray, ensuring every corner is coated. .This prevents sticking and promotes an even golden crust while giving your bread a professional finish.
- Mix Dry Ingredients: In a medium mixing bowl, whisk together the all-purpose flour, sugar, baking powder, baking soda, and salt until evenly combined. This step distributes the leavening agents and salt thoroughly, ensuring your loaf rises consistently and has balanced flavor throughout.
- Combine Wet Ingredients: In a separate bowl, melt the butter if using, then whisk it together with the buttermilk and the egg until smooth. This creates a uniform liquid mixture that will gently interact with the dry ingredients to produce a tender, moist crumb.
- Fold Batter: Pour the wet mixture over the dry ingredients and gently fold them together with a spatula until no streaks of flour remain. Take care not to overmix—overworking can create a dense, tough texture. The final batter should be slightly shaggy, wet, and thick.
- Bake & Cool: Transfer the batter into the prepared loaf pan, spreading it evenly and patting it into the corners. Bake for 45–50 minutes, until the top is domed and golden and a toothpick inserted in the center comes out clean. Allow the bread to cool in the pan for 15 minutes before removing, slicing, or storing, which helps it hold its shape and improves texture.
Notes
- Sugar can be reduced for a more savory loaf, making it ideal for herb or cheese variations.
- Up to half of the all-purpose flour can be replaced with whole wheat, oat, or alternative flours to increase fiber and nutrients.
- Buttermilk can be swapped with a mixture of yogurt and milk or milk with a splash of lemon for a similar tangy texture.
- Add up to 1 ½ cups of mix-ins such as fruits, nuts, olives, or cheese for variety and added nutrients.
- Herbs and spices (1–3 teaspoons) can be incorporated into the dry ingredients to create savory or aromatic flavor profiles.
Chef’s Secrets For Perfect Loaf
To achieve a light and fluffy crumb, always sift your dry ingredients or whisk them thoroughly to remove lumps.
Gently fold the wet and dry ingredients together rather than stirring vigorously; this prevents overdeveloping the gluten, which can make the bread dense.
Allow the butter to cool slightly before combining with eggs and buttermilk, as hot butter can curdle the mixture.
For an extra golden top, brush the loaf lightly with milk before baking.
Experimenting with mix-ins and zest ensures consistent flavor without compromising texture.
Serving Suggestions To Delight Everyone
This loaf is versatile enough for breakfast, snacks, or even a side at dinner.
Slice and serve warm with a pat of butter, a drizzle of honey, or a smear of nut butter for a satisfying morning start.
For brunch or a light lunch, pair slices with fresh fruit, cheese, or smoked meats.
Savory variations like herbed cheese or jalapeño cheddar complement soups and salads beautifully.
Toasted slices are perfect for sandwiches or as a crunchy base for spreads and dips.
Storage Tips For Freshness Longer
Once cooled, wrap the loaf tightly in plastic wrap to keep it soft at room temperature for up to 3 days.
For longer storage, wrap in both plastic and aluminum foil and freeze for up to three months.
When freezing, slice beforehand to allow convenient, single-serving defrosting.
Thaw overnight in the refrigerator or at room temperature, then warm briefly in the oven or toaster for a freshly baked texture.
Always store away from direct sunlight or humid areas to prevent spoilage.
Frequently Asked Questions Answered Clearly
1. Can I use alternative flours?
Yes! Up to half of the all-purpose flour can be replaced with whole wheat, oat, or gluten-free flour blends. Adjust liquids slightly if the batter feels too thick.
2. Can I make it dairy-free?
Absolutely. Replace buttermilk with almond milk or soy yogurt, and use plant-based butter or oil instead of dairy butter. The texture will remain tender and moist.
3. How do I prevent the loaf from sticking?
Grease the pan thoroughly and consider lining it with parchment paper for an easy release. Nonstick spray alone works, but parchment ensures a smooth removal.
4. How do I check doneness perfectly?
Insert a toothpick or cake tester in the center. If it comes out clean or with a few crumbs, the bread is done. Avoid opening the oven too early to prevent collapsing.
5. Can I add fruits or nuts?
Yes, up to 1 ½ cups of fruits, nuts, or other mix-ins can be folded into the batter. Gently incorporate them to avoid overmixing and affecting the texture.
This recipe has been adapted and simplified from the original version by thekitchn. We’ve refined the steps for a smoother cooking experience and added helpful notes, nutrition insights, and essential kitchen tools to make it even easier for home cooks.