
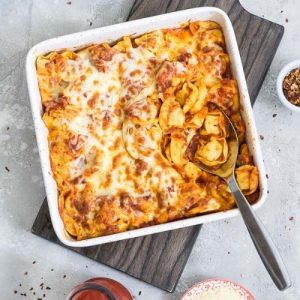
This Cheesy Tortellini Bake is a quick, comforting, and satisfying dinner that transforms simple ingredients into a crowd-pleasing meal.
With protein-rich tortellini and a generous layer of melty mozzarella cheese, it provides a balanced combination of protein and carbs to fuel your day.
The fresh tomato-based marinara adds fiber and nutrients, making this dish both wholesome and indulgent.
Perfect for busy weeknights or casual family dinners, it’s effortless to prepare, meal-prep friendly, and guaranteed to become a go-to recipe in your kitchen.
Creamy Cheesy Tortellini Casserole
Equipment
- 1 medium saucepan (for boiling pasta)
- 1 colander or strainer
- 1 8×8 or 11×7 baking dish
- Measuring cups and spoons
- Wooden spoon or spatula
Ingredients
- 1 package 1 ½ lbs tortellini, fresh or frozen, any flavor
- 2 cups marinara sauce
- 2 cups freshly grated mozzarella cheese
Optional: Mix mozzarella with Parmesan for extra flavor.
Instructions
- Preheat the Oven and Prepare Baking Dish: Start by preheating your oven to 350°F (175°C). This ensures that the oven is ready for the tortellini bake as soon as your ingredients are combined. Lightly grease your baking dish (8×8 or 11×7 inches) with a small amount of oil or nonstick spray to prevent sticking and make cleanup easier. Preparing the oven and dish first sets you up for smooth, stress-free cooking.
- Boil the Tortellini: Fill a medium saucepan with water and bring it to a rolling boil over high heat. Add a pinch of salt to the water to enhance the flavor of the pasta. Once the water is boiling, add your package of tortellini (fresh or frozen). Cook the tortellini according to the package instructions or until they float to the surface, usually 6–8 minutes for fresh tortellini and slightly longer if frozen. Stir occasionally to prevent the pasta from sticking together.
- Drain and Prepare the Pasta: Once the tortellini are cooked, carefully drain them using a colander or strainer. Allow the pasta to sit for 1–2 minutes to ensure all excess water drains away. This prevents the casserole from becoming watery when combined with the sauce. Gently shake the colander to remove any remaining liquid and make sure the tortellini are not clumped together.
- Combine Pasta with Marinara Sauce: Transfer the drained tortellini into your prepared baking dish. Pour 2 cups of marinara sauce evenly over the pasta, making sure every piece is coated. Use a wooden spoon or spatula to gently fold the sauce into the tortellini, ensuring the sauce reaches the bottom of the dish and fully surrounds the pasta. Even coating guarantees a flavorful, cohesive bake.
- Top with Mozzarella Cheese: Sprinkle 2 cups of freshly grated mozzarella cheese evenly over the top of the sauced tortellini. For extra richness and depth of flavor, you can mix in a handful of Parmesan cheese or layer a few slices of provolone. The cheese will melt during baking, creating a golden, bubbly topping that adds a creamy, indulgent texture to every bite.
- Bake the Tortellini Casserole: Place the baking dish in the preheated oven and bake uncovered for 20–25 minutes, or until the cheese is completely melted and begins to bubble around the edges. Baking allows the flavors to meld and the sauce to slightly thicken, while the cheese creates a luscious, golden crust.
- Optional Broil for Golden Finish: For a perfectly browned top, switch your oven to broil for 5–6 minutes. Keep a close eye on the casserole to prevent burning. This final step gives the cheese a lightly crisp, golden-brown finish and enhances the visual appeal of your dish.
- Serve Immediately: Remove the tortellini bake from the oven and allow it to rest for 2–3 minutes before serving. This short resting period allows the sauce to set slightly, making it easier to portion out. Serve warm with a fresh side salad, garlic bread, or roasted vegetables. Each serving will be creamy, cheesy, and packed with comforting flavors.
- Store Leftovers Safely: Leftover tortellini bake can be stored in an airtight container in the refrigerator for 3–4 days. Reheat gently in the oven or microwave, covering with foil to prevent the cheese from drying out. For longer storage, the baked tortellini can also be frozen in portions and reheated when needed.
Notes
- Use either fresh or frozen tortellini; adjust cooking time slightly if using frozen.
- Grate your own mozzarella for a creamier, melty topping; pre-shredded cheese may contain anti-caking agents that affect melting.
- Try mixing mozzarella with Parmesan or provolone for extra flavor depth.
- Ensure tortellini is drained well to prevent a watery casserole.
- You can add vegetables such as spinach, mushrooms, or roasted peppers for added fiber and nutrients.
- For added protein, incorporate cooked chicken, sausage, or tofu.
- Keep the casserole loosely covered with foil if baking at higher temperatures to prevent cheese from burning.
Chef’s Secrets for Perfect Bake
The secret to a perfect tortellini bake lies in timing and layering.
Cook the tortellini just until tender to avoid overcooking during baking.
Mix the pasta thoroughly with the sauce so every piece is coated and flavorful.
Grate your own mozzarella for a creamier texture that browns beautifully under the broiler.
For additional richness, layering a small amount of sauce, pasta, and cheese in alternating layers can enhance flavor and ensure even melting.
Finally, broiling at the end adds a golden, slightly crisp finish for a restaurant-quality look.
Serving Suggestions and Pairings
Serve your cheesy tortellini bake with a crisp green salad tossed in lemon vinaigrette or balsamic dressing to balance the richness of the cheese.
Garlic bread, breadsticks, or roasted vegetables complement the creamy texture and add variety.
For a protein boost, pair with grilled chicken or baked sausage on the side.
Garnish with fresh herbs such as basil or parsley to enhance both aroma and presentation.
This dish is ideal for casual weeknight dinners or a cozy weekend meal with family or friends.
Storage Tips for Leftovers
Store any leftover tortellini bake in an airtight container in the refrigerator for 3–4 days.
Reheat gently in the oven at 325°F (165°C) covered with foil to prevent the cheese from drying out, or microwave individual portions for convenience.
For longer-term storage, freeze the bake in individual portions or the full dish for up to 2 months.
Thaw overnight in the refrigerator before reheating. Always sprinkle a little extra shredded cheese on top before reheating to refresh the cheesy topping.
Frequently Asked Questions
1. Can I use frozen tortellini?
Yes! Frozen tortellini works perfectly. Just cook slightly longer in boiling water and ensure it’s fully drained before mixing with sauce.
2. Can I make this dish vegetarian?
Absolutely! Use a cheese-only tortellini and add vegetables like spinach, zucchini, or mushrooms for extra flavor and nutrition.
3. Can I add more cheese or different types?
Yes, feel free to combine mozzarella with Parmesan, provolone, or cheddar for a more complex flavor. Just adjust the topping to your preference.
4. Can I prepare this ahead of time?
Yes, you can assemble the casserole and refrigerate it for a few hours before baking. Add a few extra minutes to the bake time if coming from cold.
5. How can I prevent the cheese from burning?
Cover the casserole loosely with foil while baking, then remove the foil during the last 5 minutes or switch to broil briefly for a golden finish. Always monitor closely under the broiler.