
This vibrant Zucchini Chickpea Curry is a quick, one-pot meal that’s perfect for busy weeknights or meal prep.
Packed with plant-based protein from chickpeas and fiber from zucchini and tomatoes, it’s both satisfying and nourishing.
Creamy coconut milk adds rich, heart-healthy fats without excess saturated fat, while aromatic spices bring depth and warmth.
Naturally vegan and gluten-free, this curry is light yet hearty, making it a wholesome option for everyday cooking.
Ready in just 30 minutes, it’s flavorful, simple, and family-friendly.
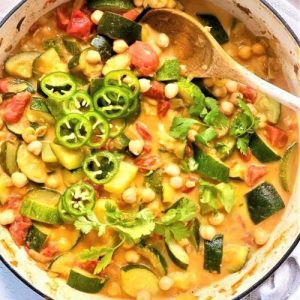
Chickpea and Zucchini Curry
Equipment
- 1 Large Frying Pan or Skillet
- 1 wooden spoon or spatula
- 1 Measuring Cup
- 1 Knife and Chopping Board
Ingredients
- 1 tbsp Olive Oil or coconut oil
- 2 large Zucchini cut into bite-sized pieces
- 1 medium Onion diced
- 2 cloves Garlic minced
- 1 inch Fresh Ginger peeled and minced
- 1 tsp Garam Masala
- 1 tbsp Tomato Purée or tomato paste
- ½ cup Vegetable Stock or chicken stock
- 1 can 15½ oz Chickpeas, drained
- 1 can 15½ oz Diced Tomatoes
- 1 cup Coconut Milk
- Sea Salt and Black Pepper to taste
- Optional Garnishes:
- Fresh Cilantro leaves
- Sliced Jalapeño Peppers
Instructions
- Prepare Your Vegetables: Begin by washing the zucchini thoroughly and trimming off the ends. Cut the zucchini into bite-sized pieces so that they cook evenly. Dice the onion into small, uniform pieces to ensure they sauté evenly. Peel and finely mince the garlic and ginger—these aromatics will form the flavor base of the curry. Having all ingredients prepped before you start cooking will make the process smooth and stress-free.
- Heat the Oil: Place a large frying pan, skillet, or Dutch oven over medium-high heat. Add 1 tablespoon of olive oil (or coconut oil for a richer flavor) and let it warm for about 30 seconds. The oil should shimmer but not smoke. Properly heated oil helps the zucchini and onions sauté without sticking to the pan, enhancing their natural sweetness.
- Sauté the Zucchini and Onion: Add the chopped zucchini and diced onion to the hot pan. Season lightly with a pinch of sea salt and black pepper to bring out their natural flavors. Stir occasionally for about 8–10 minutes, until the zucchini starts to soften and the onions turn translucent with golden edges. This stage develops the base flavor and adds a subtle caramelized sweetness to the curry.
- Cook the Aromatics and Spices: Once the zucchini and onion are lightly browned, stir in the minced garlic and ginger. Immediately add 1 teaspoon of garam masala to the pan. Cook this mixture for 1–2 minutes, stirring constantly, until fragrant. The spices will bloom in the hot oil, releasing their warm, aromatic notes, which will form the signature flavor of the curry. Be careful not to burn the garlic, as it can turn bitter.
- Incorporate Tomato Purée and Stock: Add 1 tablespoon of tomato purée to the pan and stir thoroughly to coat the vegetables. Pour in ½ cup of vegetable stock (or chicken stock if not vegan). Stir everything together to combine. Season with an additional pinch of salt and black pepper to taste. Bring the mixture to a gentle boil over medium heat. The stock and tomato purée create the curry sauce’s liquid base, allowing the flavors to meld together as it simmers.
- Add Chickpeas and Diced Tomatoes: Drain and rinse the canned chickpeas to remove excess sodium, then add them to the pan along with the canned diced tomatoes. Stir gently to incorporate the ingredients, ensuring the chickpeas are fully submerged in the sauce. Reduce the heat slightly to maintain a gentle simmer. This step allows the chickpeas to absorb the spices and tomato flavors, creating a hearty and satisfying texture.
- Simmer the Curry: Allow the curry to simmer uncovered for approximately 15 minutes. Stir occasionally to prevent sticking and encourage even cooking. During this time, the sauce will thicken slightly, the zucchini will become tender, and the flavors will intensify. Simmering is key to blending the spices, vegetables, and chickpeas into a harmonious, flavorful curry.
- Finish with Coconut Milk: Gently pour 1 cup of coconut milk into the curry, stirring to fully incorporate it into the sauce. Allow the curry to return to a gentle simmer over medium heat for 2–3 minutes. The coconut milk enriches the curry with a creamy texture and adds subtle sweetness, balancing the spices and creating a luscious, velvety sauce.Taste and adjust seasoning with additional salt and black pepper if needed.
- Plate and Garnish: Once the curry is heated through and well combined, turn off the heat. Serve the curry hot in bowls, and garnish with fresh cilantro leaves and sliced jalapeño peppers for a fresh, vibrant finish. The cilantro adds a burst of herbal brightness, while the jalapeño provides optional heat for spice lovers.
- Serving Suggestions: For a complete meal, serve this curry alongside steamed basmati rice, brown rice, or warm naan bread to soak up the sauce. You can also serve it with cauliflower rice for a lower-carb option. This curry can be enjoyed immediately or stored for meal prep—its flavors often deepen and improve when reheated the next day.
Notes
- Use zucchini of any color or size; adjust quantities based on your preference.
- Canned chickpeas save time, but if using dried, soak overnight and boil before adding.
- For a creamier curry, substitute part of the coconut milk with coconut cream.
- Adjust the heat level with fresh chilies, chili flakes, or chili powder to suit your taste.
- Curry can be made ahead and tastes even better the next day as flavors meld.
- Fresh herbs like cilantro or parsley brighten the finished dish just before serving.
- This recipe is naturally vegan and gluten-free—just check your vegetable stock for hidden gluten.
Chef’s Secrets For Ultimate Flavor
The key to an exceptionally flavorful zucchini chickpea curry lies in layering your ingredients carefully.
Start by sautéing the onions and zucchini slowly over medium heat until lightly golden, which brings out their natural sweetness.
Blooming the garlic, ginger, and garam masala in hot oil intensifies the spice aromas without burning.
Allow the curry to simmer long enough for the chickpeas and zucchini to absorb the flavors fully.
For an extra depth of taste, try adding a squeeze of lime juice or a teaspoon of maple syrup to balance acidity just before serving.
Serving Suggestions For Every Occasion
This zucchini chickpea curry is versatile and pairs beautifully with a variety of sides.
Serve it with fluffy basmati or brown rice to soak up the creamy sauce.
For a lower-carb option, try cauliflower rice, which adds texture without overwhelming the flavors.
Warm naan or flatbreads make a perfect accompaniment for scooping and enjoying the curry.
You can also add lightly sautéed greens like spinach, kale, or chard directly into the curry at the last minute to boost nutrition and color.
Garnish with fresh herbs and sliced chilies for added freshness and spice.
Storage Tips For Best Results
Leftover curry can be stored safely in the refrigerator for up to 4 days.
Allow the curry to cool completely before transferring it into an airtight container to preserve flavor and texture.
For longer-term storage, freeze in a freezer-safe container for up to 3 months.
When reheating, do so gently on the stovetop over low to medium heat, stirring occasionally and adding a splash of water or stock if the sauce has thickened.
Freezing in single portions is ideal for quick, ready-to-eat meals later.
Frequently Asked Questions Answered
1. Can I peel the zucchini before cooking?
There’s no need to peel zucchini. Most of the nutrients and fiber are found in the skin, which also helps the vegetable hold its shape during cooking. Simply wash well and chop as desired.
2. Can I add meat to this vegan curry?
Yes, you can incorporate protein like diced chicken or cooked shredded roast chicken. Add it after sautéing the aromatics, and allow it to simmer with the sauce to absorb the curry flavors.
3. What other vegetables work in this curry?
Cauliflower, sweet potato, butternut squash, green beans, or eggplant all work beautifully. Chop vegetables into similar-sized pieces for even cooking and add according to their cooking times.
4. How can I make this curry spicier?
Increase the heat by adding fresh chopped chilies, chili flakes, or a pinch of cayenne powder when cooking the aromatics. Adjust gradually to suit your preferred spice level.
5. Can I make this curry ahead of time?
Absolutely! This curry is perfect for meal prep. It actually tastes better the next day as the flavors continue to meld. Simply store it in an airtight container in the fridge and reheat gently when ready to serve.