
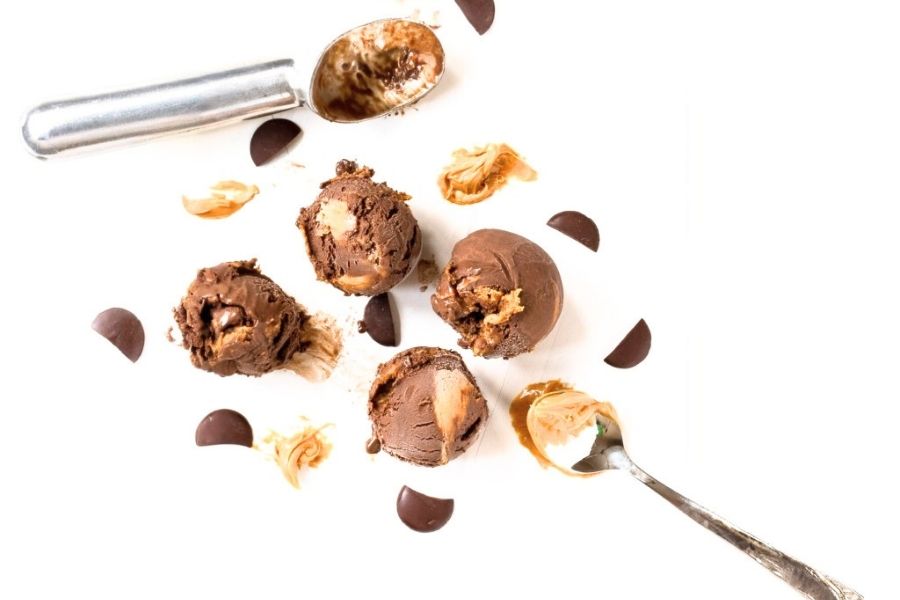
This Chocolate Peanut Butter Ice Cream recipe is a decadent yet thoughtfully crafted dessert that combines rich, smooth chocolate with the creamy, nutty goodness of peanut butter.
What makes this recipe truly special is its balance of deep chocolate flavor, enhanced by Dutch cocoa and optional espresso powder, swirled with a luscious peanut butter cream.
Despite being indulgent, it contains quality ingredients like whole milk and heavy cream, offering good fats that provide satisfying richness without artificial additives.
With 108 grams of protein and 40 grams of fiber per quart, this ice cream stands out as a more nutrient-dense treat than typical ice creams, making it an occasional but worthwhile indulgence.
It’s also a great choice for everyday cooking enthusiasts who appreciate a rewarding homemade dessert that doubles as an impressive showstopper.
While it requires some time for refrigeration and churning, the hands-on prep is straightforward, making it ideal for meal prepping or entertaining.
Must-Have Tools for Perfect Results:
Digital Kitchen Thermometer
Essential for precisely heating the custard to 185°F, ensuring perfect texture without curdling. Beyond this recipe, it guarantees accuracy in cooking meats, candy-making, and baking.
3-Quart Saucepan
The ideal size for gently heating the ice cream base and mixing ingredients evenly. A versatile piece for soups, sauces, and custards in everyday cooking.
Whisk (or Electric Mixer with Whisk Attachment)
Crucial for whipping egg yolks and sugar into a thick, pale mixture that creates a smooth, creamy base. Also perfect for baking, emulsifying dressings, and whipping cream.
Fine Mesh Strainer
Used to remove any lumps or cooked egg bits from the custard, ensuring a silky texture. Great for sifting dry ingredients or straining sauces and custards in other recipes.
Ice Cream Maker
The star tool for churning the ice cream to creamy perfection, transforming the chilled custard into a luscious frozen dessert. A must-have for homemade frozen treats year-round.
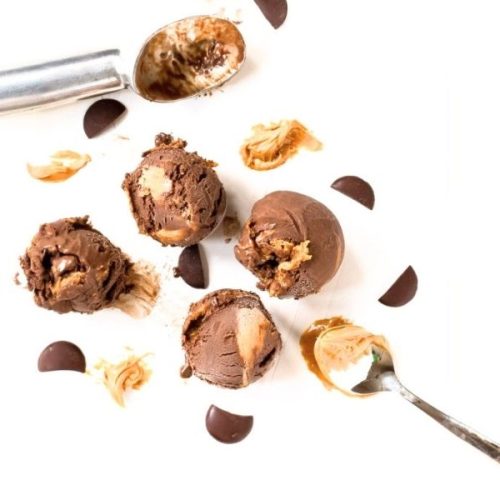
Creamy Chocolate Peanut Butter Swirl Ice Cream
Equipment
- 1 large bowl (for ice bath)
- 1 heatproof bowl (for melting chocolate)
- 1 3-quart saucepan
- 1 fine mesh strainer
- Whisk or electric mixer with whisk attachment
- Ice Cream Maker
Ingredients
Chocolate Ice Cream Base:
- 6 oz 170 g semi-sweet or dark chocolate, chopped
- 2 cups plus 2 tbsp 550 g whole milk
- 1 cup plus 1 tbsp 255 g heavy cream
- ¾ cup 150 g granulated sugar, divided
- ½ cup 43 g Dutch process cocoa powder
- 1 tsp espresso powder optional, for enhanced chocolate flavor
- 6 large egg yolks
- 2 tsp pure vanilla extract
- ¼ tsp fine sea salt
Peanut Butter Swirl:
- ¾ cup 195 g smooth peanut butter
- 1 tbsp heavy cream
- Pinch of fine sea salt
Instructions
- Prepare the Ice Bath: Fill a large bowl about halfway with ice and add cold water until it reaches roughly two-thirds full. Place a second, clean bowl on top, creating a double boiler-like setup for cooling your custard later.
- Melt the Chocolate: Set a heatproof bowl over a pot of simmering water (double boiler). Add the chopped chocolate and stir frequently until it is completely melted and smooth. Remove from heat and wipe the bowl’s bottom to prevent water droplets from falling into your ice cream base.
- Heat the Dairy and Cocoa Mixture: In a 3-quart saucepan, combine the whole milk, heavy cream, half of the sugar, cocoa powder, and espresso powder if using. Warm over medium-low heat, stirring occasionally, until the sugar dissolves and the mixture just starts to simmer. Remove from heat and let it rest for a minute.
- Whisk Egg Yolks and Sugar: In a separate bowl, vigorously whisk the egg yolks with the remaining sugar until the mixture becomes thick, pale yellow, and ribbons form when the whisk is lifted. Using an electric mixer is fine if preferred.
- Temper the Eggs: Slowly pour half of the hot cocoa mixture into the yolk mixture, whisking constantly to avoid scrambling the eggs. Then transfer this combined mixture back to the saucepan with the remaining dairy mixture.
- Cook the Custard: Return the saucepan to low heat and stir continuously with a wooden spoon until the mixture thickens enough to coat the back of the spoon and reaches 185°F (85°C). This should take just a few minutes. Remove from heat immediately to avoid curdling.
- Incorporate Chocolate and Flavorings: Whisk in the melted chocolate, vanilla extract, and salt until the mixture is smooth and fully combined.
- Chill the Custard: Pour the custard through a fine mesh strainer into the ice bath setup prepared earlier. Stir occasionally to speed cooling. Once the custard is cold (about 10 minutes), cover the surface directly with plastic wrap and refrigerate for at least 4 hours or overnight to develop flavor and texture.
- Prepare Peanut Butter Swirl: While the custard chills, whisk together peanut butter, heavy cream, and a pinch of salt in a small bowl until creamy and smooth.
- Churn the Ice Cream: Following your ice cream maker’s instructions, churn the chilled custard until it reaches a soft-serve consistency.
- Add Peanut Butter Swirl and Freeze: Transfer the churned ice cream to a freezer-safe container. Add dollops of the peanut butter mixture intermittently, swirling gently with a spatula to create a marbled effect. Cover the container tightly and freeze until firm, at least 4 hours.
Notes
- For the richest chocolate flavor, use high-quality Dutch process cocoa or a blend with black cocoa powder. Natural cocoa will yield a lighter taste.
- Espresso powder is optional but highly recommended for intensifying the chocolate notes.
- Use smooth, creamy peanut butter brands like Skippy or Jif for the best texture in the swirl. Natural peanut butters may separate or alter texture.
- If you don’t have an ice cream maker, consider using a no-churn method by freezing the custard in a shallow container and stirring every 30 minutes until firm.
- Leftover egg whites can be saved and used in recipes like meringues or angel food cake.
Chef’s Secrets to Creamy Ice Cream
Achieving the perfect creamy texture in homemade ice cream hinges on a few key techniques.
First, tempering the egg yolks properly ensures a smooth custard base without scrambling.
Slowly adding warm milk mixture to the eggs while whisking helps maintain even heat distribution.
Cooking the custard to exactly 185°F thickens it just right to provide richness without graininess.
Using a fine mesh strainer to remove any cooked egg bits guarantees silky smoothness.
For a deeper chocolate flavor, incorporating Dutch process cocoa and optional espresso powder elevates the taste dramatically.
Lastly, chilling the custard thoroughly before churning is crucial—it allows the mixture to develop flavors and churn into creamy perfection without ice crystals.
These steps, combined with high-quality ingredients, transform a simple recipe into an indulgent treat.
Serving Suggestions for Ultimate Enjoyment
This luscious chocolate peanut butter ice cream pairs beautifully with a variety of desserts and snacks.
Serve it alongside warm brownies or chocolate chip cookies for a classic indulgence. It also complements fresh berries or sliced bananas for a refreshing contrast to its richness.
For a sophisticated twist, drizzle with salted caramel sauce or sprinkle with chopped roasted peanuts for added texture.
This ice cream works wonderfully in milkshakes or as a filling for ice cream sandwiches.
Whether served in a cone, a bowl, or as part of a plated dessert, its creamy texture and balanced flavors make it a crowd-pleaser perfect for gatherings or a quiet night in.
Storage Tips to Preserve Freshness
Proper storage is essential to maintain the creamy texture and rich flavor of your homemade ice cream.
Always store ice cream in an airtight, freezer-safe container to prevent freezer burn and the absorption of odors from other foods.
Placing a piece of parchment paper or plastic wrap directly on the surface before sealing minimizes ice crystal formation.
Keep the ice cream at the back of the freezer where the temperature is most stable, avoiding frequent temperature fluctuations from opening the door.
For best taste and texture, consume within 2 weeks.
When ready to serve, allow the ice cream to sit at room temperature for 5-10 minutes to soften slightly, making scooping easier and enhancing the flavor experience.
Frequently Asked Questions About Recipe
1. Can I use natural peanut butter?
Natural peanut butter tends to separate and can make the swirl less smooth. For best results, use a creamy, commercially processed peanut butter like Skippy or Jif.
2. Is espresso powder necessary?
No, espresso powder is optional but recommended as it intensifies the chocolate flavor without adding coffee taste. You can omit it if you prefer.
3. What if I don’t have an ice cream maker?
You can try a no-churn method by freezing the custard in a shallow dish and stirring vigorously every 30 minutes until firm. The texture will be slightly different but still delicious.
4. How long can I store the ice cream?
Homemade ice cream is best enjoyed within 2 weeks for optimal texture and flavor. Beyond that, ice crystals may form, impacting quality.
5. Can I use egg substitutes or make it vegan?
This recipe relies on egg yolks for creaminess and texture, so it’s challenging to substitute without altering results. For a vegan alternative, consider recipes specifically designed without eggs and dairy.
This recipe has been adapted and simplified from the original version by cinnamonshtick. We’ve refined the steps for a smoother cooking experience and added helpful notes, nutrition insights, and essential kitchen tools to make it even easier for home cooks.