
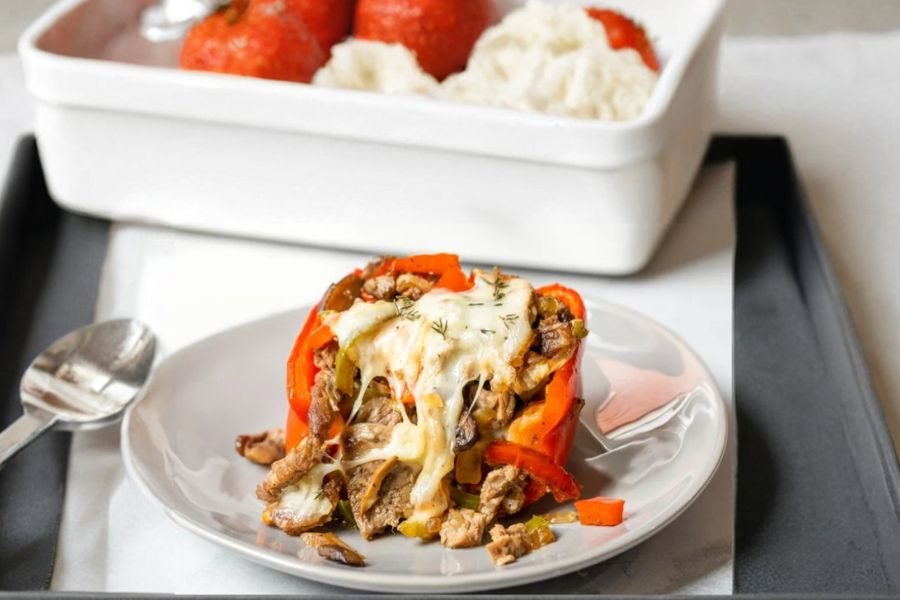
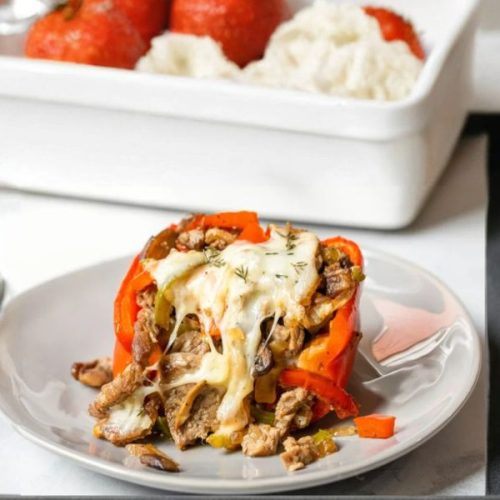
Philly Cheesesteak Stuffed Peppers transform the classic sandwich into a low-carb, nutrient-packed meal that’s both comforting and satisfying.
Vibrant bell peppers cradle a savory blend of tender sirloin, caramelized onions, and earthy mushrooms, all topped with gooey provolone cheese for a melty finish.
High in protein and rich in fiber, this dish supports muscle health while keeping you full longer.
With minimal added fats and naturally low in carbs, it’s a smart choice for anyone following a balanced or keto-friendly diet.
Beyond its nutritional benefits, this recipe shines for everyday cooking—it’s straightforward to prepare, customizable with different peppers or cheeses, and makes excellent leftovers, perfect for meal prep or family dinners.
The combination of textures, flavors, and colors makes it visually appealing and irresistibly delicious.
Must-Have Tools for Perfect Results
Nonstick Baking Dish
Essential for baking the peppers evenly without sticking, a durable baking dish also doubles for casseroles, lasagna, and roasted vegetables, making it a versatile kitchen staple.
Chef’s Knife
A sharp, high-quality chef’s knife ensures smooth, precise slicing of steak, onions, and peppers, reducing prep time while providing safety and control in the kitchen.
Large Skillet or Griddle
Ideal for caramelizing vegetables and quickly searing steak, a heavy-bottomed skillet or flat griddle ensures even heat distribution, preventing burning and maximizing flavor.
Cutting Board
A sturdy cutting board protects your countertops while providing a safe surface for chopping, mixing, and combining ingredients efficiently. Opt for a board large enough to handle vegetables and meat together.
Tongs
Perfect for stirring, flipping, and transferring hot steak or peppers, tongs allow precise control and reduce the risk of burns, making them invaluable for everyday cooking.
Tasty Philly Cheesesteak Stuffed Peppers
Equipment
- 1 Large Baking Dish
- 1 Large Skillet or Griddle
- 1 Chef’s Knife
- 1 Cutting Board
- 1 Pair of tongs
Ingredients
- 6 bell peppers assorted colors
- 3 tablespoons olive oil divided
- 1 large white onion thinly sliced
- 8 ounces cremini mushrooms trimmed and thinly sliced
- 1 teaspoon salt divided
- 3/4 teaspoon freshly ground black pepper divided
- 2 pounds sirloin steak thinly sliced
- 9 slices provolone cheese
- 1 tablespoon fresh thyme leaves for garnish
Instructions
- Preheat the Oven: Set your oven to 400°F (200°C) to ensure it reaches the perfect roasting temperature while you prep the peppers. This step allows the peppers to cook evenly, tenderize without collapsing, and develop a natural sweetness. Meanwhile, gather all ingredients and tools so everything is ready to use.
- Prepare the Bell Peppers: Lay each pepper on its side and carefully slice off about one-third from the top, creating a “lid.” Remove the seeds and ribs from inside with your fingers, leaving the stem intact to help the pepper hold its shape during baking. Slice the removed tops into thin strips to cook later with the onions and mushrooms.
- Bake the Pepper Shells: Arrange the hollowed peppers upright in a large baking dish, cut side up. Bake them for 30 minutes without adding any oil—this allows them to soften slightly while maintaining firmness. This pre-roasting step ensures the peppers won’t release too much water when stuffed.
- Caramelize Onions and Mushrooms: Heat 2 tablespoons of olive oil in a large skillet or griddle over medium heat. Add the sliced onions, reserved pepper strips, mushrooms, ½ teaspoon salt, and ½ teaspoon black pepper, stirring occasionally. Cook for 12–15 minutes until the vegetables are tender and lightly caramelized, then transfer them to a cutting board for chopping later.
- Sear the Steak: In the same skillet, heat the remaining 1 tablespoon olive oil over medium-high heat. Add the thinly sliced sirloin steak, sprinkle with the remaining ½ teaspoon salt and ¼ teaspoon pepper, and spread the steak into a single layer. Allow it to cook for 1–2 minutes without stirring, then quickly toss to finish cooking evenly.
- Chop and Combine Filling: Transfer the cooked steak to the cutting board and roughly chop it. Chop the caramelized onions, mushrooms, and pepper strips, then mix everything together by hand to create a uniform filling. This ensures each bite of the stuffed pepper contains a balanced blend of meat and vegetables.
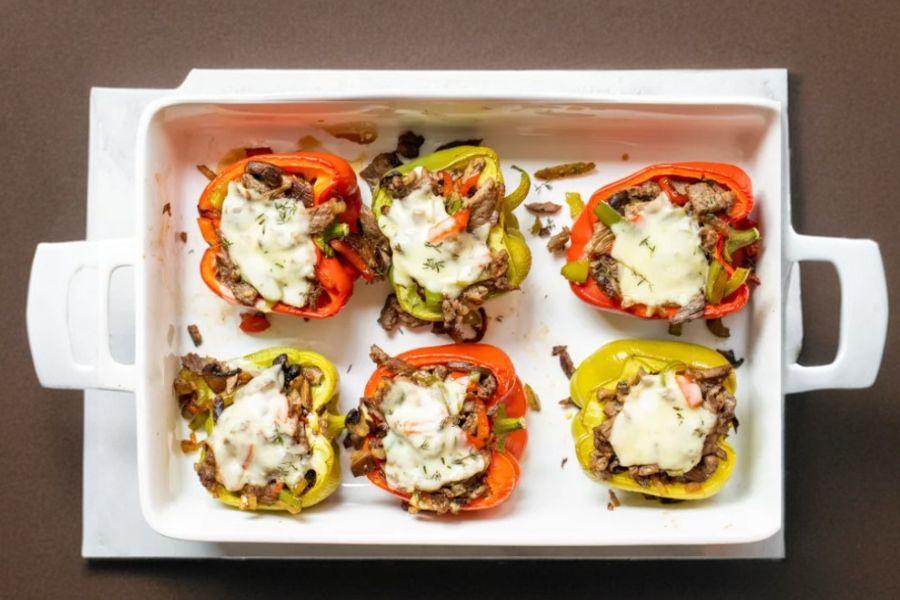
- Stuff the Peppers: Carefully remove the pre-baked peppers from the oven when cool enough to handle. Fill each pepper generously with the steak and vegetable mixture. Place a slice of provolone on top of the filling, then add more filling and top with the remaining slices of cheese until the pepper is full.
- Bake the Stuffed Peppers: Return the filled peppers to the oven and bake for an additional 15 minutes, or until the cheese is fully melted and the peppers are tender. Remove from the oven, sprinkle with fresh thyme, and serve warm for maximum flavor and presentation.
- Serve or Store Leftovers: Serve immediately as a hearty, protein-packed main course. Leftovers can be stored in an airtight container in the refrigerator for 3–4 days, and are best reheated in a 350°F oven for 15–20 minutes to maintain the texture and melted cheese.
Notes
- Use assorted bell pepper colors for visual appeal and added nutrients.
- Thinly slice the steak for faster cooking and tender bites.
- Caramelize onions and mushrooms slowly to enhance their natural sweetness.
- Pre-bake peppers to prevent sogginess when stuffed.
- Serve immediately after baking for best texture; cheese will harden if cooled too long.
- Leftovers reheat well in the oven; avoid microwaving to prevent peppers from becoming watery.
Chef’s Secrets for Maximum Flavor
To elevate this Philly Cheesesteak Stuffed Peppers recipe, focus on building layers of flavor.
Use high-quality sirloin for tenderness, and ensure it is sliced very thinly to sear quickly without overcooking.
Caramelizing the onions and mushrooms slowly is key—it brings out natural sweetness and deepens the overall flavor.
When stuffing the peppers, don’t overpack; leaving a little space allows steam to circulate and prevents the filling from becoming mushy.
For an extra flavor boost, sprinkle a pinch of smoked paprika or garlic powder into the vegetable mixture before filling.
Finally, always let the peppers cool slightly after baking so the flavors meld beautifully while keeping their structure intact.
Serving Suggestions for Family Meals
Philly Cheesesteak Stuffed Peppers are versatile enough for weeknight dinners, meal prep, or entertaining guests.
Pair them with a crisp green salad or roasted asparagus for a complete, low-carb meal.
For a heartier option, serve alongside garlic mashed potatoes or quinoa to soak up any melted cheese and juices.
Garnish with fresh herbs such as thyme or parsley for added color and freshness.
These peppers can also be sliced in half for individual servings, making them perfect for portion control or packed lunches.
Their vibrant appearance makes them visually appealing for family meals or dinner parties.
Storage Tips for Longevity
To maximize freshness, store leftover stuffed peppers in an airtight container in the refrigerator for up to 3–4 days. Avoid stacking them tightly to prevent the cheese from sticking or the peppers from collapsing.
When reheating, use a 350°F oven for 15–20 minutes rather than a microwave, which can make the peppers watery and the cheese rubbery.
You can also prepare the filling in advance and refrigerate separately for up to 2 days, then stuff and bake the peppers fresh, preserving their texture and flavor.
For longer storage, freeze individual peppers in airtight containers for up to 2 months, reheating slowly in the oven to maintain structure.
Frequently Asked Questions About Recipe
1. Can I use other meats instead?
Yes! Chicken, ground turkey, or even plant-based beef substitutes work well. Adjust cooking times to ensure meat is fully cooked and tender.
2. Are these peppers keto-friendly?
Absolutely. Bell peppers are naturally low in carbs, and this recipe uses protein-rich steak and minimal added fats, making it ideal for low-carb or keto diets.
3. Can I make this recipe ahead of time?
Yes, you can prepare the filling and pre-bake the peppers a day ahead. Assemble and bake the peppers just before serving for optimal freshness.
4. Can I use shredded cheese instead of slices?
Yes, shredded provolone or mozzarella works perfectly. Spread evenly over the filling to achieve the same melty, gooey effect.
5. How do I prevent peppers from becoming soggy?
Pre-baking the peppers and avoiding excess oil in the filling prevents sogginess. Ensure they are upright while baking to allow moisture to escape.
This recipe has been adapted and simplified from the original version by simplyrecipes. We’ve refined the steps for a smoother cooking experience and added helpful notes, nutrition insights, and essential kitchen tools to make it even easier for home cooks.