

This pumpkin pie recipe stands out for its perfect balance of rich flavor, smooth texture, and seasonal warmth, all wrapped in a flaky, buttery homemade crust.
What makes it especially appealing is its emphasis on natural ingredients and minimal processing—canned pumpkin puree (preferably Libby’s) paired with real spices creates a deeply flavorful, aromatic filling that’s comforting yet not overly sweet.
Nutritionally, pumpkin is an underrated superfood. It’s rich in fiber, vitamin A, and antioxidants, while also being low in calories and fat.
Using heavy cream and eggs, the recipe provides a source of protein and healthy fats, offering better satiety compared to typical sugar-heavy desserts.
For those interested in plant-forward eating, this recipe can be slightly adapted with coconut milk or almond cream for a lower saturated fat option.
Despite its elegant presentation, this recipe is surprisingly approachable and meal-prep friendly—the filling and sugared cranberries can be made ahead, and the pie freezes beautifully.
It’s an excellent choice for holidays or weekday indulgence with a nourishing twist.
Must-Have Tools for Perfect Results
Pyrex 9-Inch Deep Dish Glass Pie Plate
Purpose: Holds the crust and filling securely for even baking.
Why You Need It: This dish’s deep sides prevent overflow and ensure perfect slices. Plus, glass conducts heat evenly and lets you monitor browning from below—ideal for achieving a golden crust.
OXO Good Grips Silicone Baking Mat
Purpose: Used to dry sugared cranberries and bake pie crust leaves without sticking.
Why You Need It: Reusable, easy to clean, and versatile—it replaces parchment paper and is perfect for cookies, pastries, and more.
KitchenAid Classic Rolling Pin
Purpose: Rolls out chilled pie dough smoothly and evenly.
Why You Need It: Its comfortable grip and durable weight make rolling precise and easy, ensuring uniform crusts and cookies every time.
USA Pan Pie Weight Set
Purpose: Prevents pie crust puffing during blind baking.
Why You Need It: Distributes weight evenly for a flat, crisp crust. Great for all your pre-baked pies or tarts.
Cuisinart Precision Series Whisk
Purpose: Blends the pumpkin filling to a silky smooth consistency.
Why You Need It: A high-quality whisk creates lump-free batters and emulsifies sauces—essential in both baking and cooking.
Homemade Pumpkin Pie
Equipment
- 1 9-inch Deep Dish Pie Plate
- 1 Rolling Pin
- 1 Pastry brush
- 1 Whisk
- 1 Baking Sheet
- 1 Silicone Baking Mat or Parchment Paper
- 1 Medium Saucepan
- 1 Mixing Bowl (large)
- 1 Slotted Spoon
- 1 Pie Weights (or dried beans)
- 1 Cooling rack
- 1 Leaf-Shaped Cookie Cutter (optional)
Ingredients
Sugared Cranberries
- 1 cup 100g fresh cranberries (do not substitute frozen)
- ¾ cup 180ml water
- 1¼ cups 250g granulated sugar, divided
Pumpkin Pie Filling
- 1 15 oz / 425g can pure pumpkin purée (preferably Libby’s)
- 3 large eggs
- 1¼ cups 250g packed light or dark brown sugar
- 1 tablespoon 8g cornstarch
- ½ teaspoon fine sea salt
- 1½ teaspoons ground cinnamon
- ½ teaspoon ground ginger
- ¼ teaspoon ground nutmeg
- ⅛ teaspoon ground cloves
- ⅛ teaspoon freshly ground black pepper
- 1 cup 240ml heavy cream
- ¼ cup 60ml milk
Pie Crust & Garnishes
- 1 disc of homemade or store-bought pie dough enough for 9-inch deep-dish crust
- Extra pie dough for decorative crust leaves optional
- 1 large egg
- 1 tablespoon 15ml milk (for egg wash)
Instructions
- Start with Sugared Cranberries (Make Ahead): Begin the day before if decorating with sugared cranberries. Place fresh cranberries in a heat-safe bowl. In a saucepan, heat water with ¾ cup (150g) of sugar over medium heat, stirring until dissolved. Once it simmers, remove from heat and cool for 5 minutes. Pour the warm syrup over the cranberries and let soak for 15 minutes. Transfer the cranberries to a lined baking sheet using a slotted spoon. Let dry uncovered for 1 hour. Then toss in remaining ½ cup (100g) sugar to coat, and allow to dry for another hour. Store in the fridge for up to 3 days.
- Prepare and Par-Bake the Crust: Roll out one chilled pie dough disc into a 12-inch round on a floured surface. Gently press into a 9×2-inch deep-dish pie plate, trimming and folding edges to create a thick rim. Crimp or flute edges as desired. Chill for 15 minutes while preheating the oven to 375°F (190°C).Line crust with crumpled parchment paper and fill with pie weights or dried beans. Bake for 10 minutes. Remove weights and paper, prick the base with a fork to vent, and return to oven for 7–8 minutes until lightly golden. Remove and keep warm.
- Mix the Pumpkin Filling: In a large bowl, whisk together pumpkin purée, eggs, and brown sugar until smooth. Add cornstarch, salt, spices, and pepper. Stir in heavy cream and milk, whisking vigorously until silky and well-combined.
- Fill and Bake the Pie: Pour the filling into the warm pie shell, filling about ¾ of the way up. You may have a small amount of filling leftover—perfect for mini pies. Bake for 55–60 minutes. The edges should be set, and the center slightly jiggly. After 25 minutes, cover the crust edges with foil or a crust shield to prevent over-browning. Begin checking for doneness at the 50-minute mark.
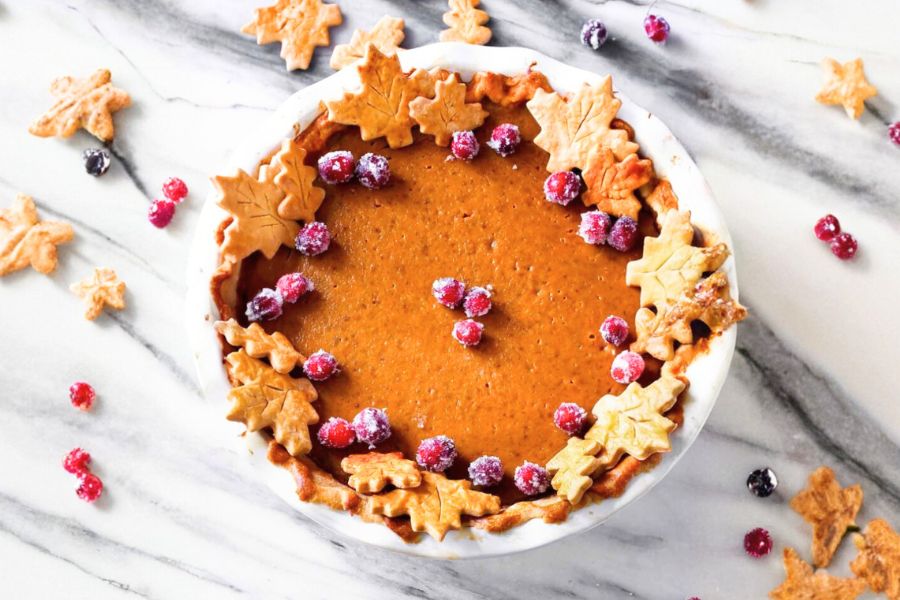
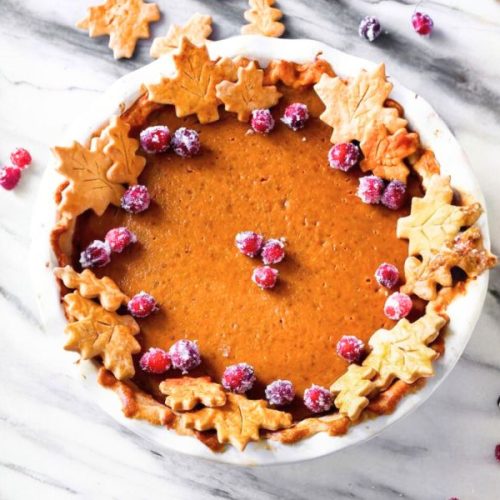
- Cool and Garnish: Remove pie from oven and allow to cool on a wire rack for at least 3 hours. Once cooled, decorate with sugared cranberries and optional crust leaves. Serve with whipped cream if desired.
- Make Decorative Pie Crust Leaves (Optional): Roll out extra dough to ⅛-inch thickness. Cut into leaf shapes using cookie cutters. Brush lightly with egg wash (egg + milk mixture). Score veins with a knife for added detail. Bake at 350°F (177°C) for 10 minutes or until golden. Cool before garnishing.
Notes
- Make Ahead Tips:
- Cranberries: Prepare up to 3 days in advance.
- Pie Dough: Can be made and chilled up to 3 days ahead, or frozen for 3 months.
- Filling: Mix the night before and refrigerate for deeper flavor. No need to bring to room temperature before baking.
- Pumpkin Purée:
Canned pumpkin (not pumpkin pie filling) works best for consistency. If using fresh purée, blot excess moisture before mixing. - Spice Swap:
Replace ginger, nutmeg, cloves, and pepper with 1 teaspoon pumpkin pie spice if preferred. Keep the cinnamon as listed for best flavor. - Alternative Crust Options:
A graham cracker or cookie crust works but may result in slightly messier slices. Still, pre-bake for 10 minutes without pie weights. - Storage:
Refrigerate leftover pie for up to 5 days. Freeze tightly wrapped for up to 3 months; thaw overnight in the fridge before serving.
Chef’s Secrets for Pie Perfection
Creating a flawless pumpkin pie is all about technique and timing. One of the key secrets is starting with a par-baked crust—this ensures the base remains crisp, not soggy, even under a rich filling.
Don’t skip chilling the pie dough before rolling, as this helps maintain the flaky texture.
For a beautifully smooth filling, whisk the ingredients vigorously to eliminate lumps and fully incorporate the eggs, cream, and sugar.
Baking at the right temperature is critical—overbaking will lead to cracks, while underbaking leaves the center raw.
The sweet spot is when the edges are set, and the center jiggles slightly like set gelatin. Lastly, don’t rush the cooling time.
Letting the pie cool for at least three hours prevents runny slices and allows flavors to settle beautifully.
Serving Ideas That Impress Guests
This velvety pumpkin pie is stunning on its own, but a few thoughtful touches can elevate the experience.
Top each slice with a generous dollop of freshly whipped cream, or add a drizzle of warm caramel sauce for a decadent twist.
The sugared cranberries offer both a pop of color and a bright tart contrast that cuts through the creamy richness.
Serve with a hot mug of chai, spiced cider, or dark roast coffee for the ultimate fall pairing.
For a plated dessert presentation, garnish with a mint sprig, cinnamon stick, or edible gold leaf.
Hosting a holiday gathering? Pre-slice the pie, plate with whipped topping, and refrigerate for quick and elegant serving.
Smart Storage and Freezing Advice
Pumpkin pie stores exceptionally well, making it ideal for both make-ahead preparation and leftovers.
Once fully cooled, cover the pie tightly with plastic wrap or foil and store in the refrigerator for up to 5 days.
If you plan to bake ahead of time, this pie freezes beautifully. After baking and cooling completely, wrap the whole pie (or individual slices) in plastic wrap, followed by a layer of aluminum foil.
Label and freeze for up to 3 months. When ready to enjoy, thaw overnight in the refrigerator—avoid microwaving, as it can create a soggy crust.
For best texture, allow refrigerated pie to come to room temperature for 15–20 minutes before serving.
Frequently Asked Pumpkin Pie Questions
1. Can I use fresh pumpkin instead of canned?
Yes, but it requires extra care. Fresh pumpkin purée tends to be wetter than canned, so you’ll need to blot it with paper towels to remove excess moisture. This step is key to maintaining the pie’s creamy, sliceable texture.
2. Why does my pie crack on top?
Cracks usually mean the pie was overbaked. It should be removed from the oven when the outer edges are set and the center still jiggles slightly. Overbaking causes the custard to tighten and crack as it cools. Cool it slowly and avoid sudden temperature changes.
3. Can I make this recipe dairy-free?
Absolutely. You can substitute full-fat canned coconut milk for the cream and your favorite non-dairy milk (like almond or oat) for the regular milk. Keep in mind that the flavor may subtly change, but the texture will remain rich and creamy.
4. How do I know when the pie is done?
Check for doneness by giving the pie a gentle shake. The center should wobble slightly but not slosh. You can also insert a thin knife about 1 inch from the center—it should come out mostly clean. The pie will continue to set as it cools.
5. Can I skip blind baking the crust?
While not required, blind baking (or par-baking) is strongly recommended. It prevents a soggy bottom and gives you a crisp, golden crust that holds up beautifully under the silky filling. If you’re short on time, a graham cracker crust can work—but expect a softer texture.
This recipe has been adapted and simplified from the original version by sallysbakingaddiction. We’ve refined the steps for a smoother cooking experience and added helpful notes, nutrition insights, and essential kitchen tools to make it even easier for home cooks.