
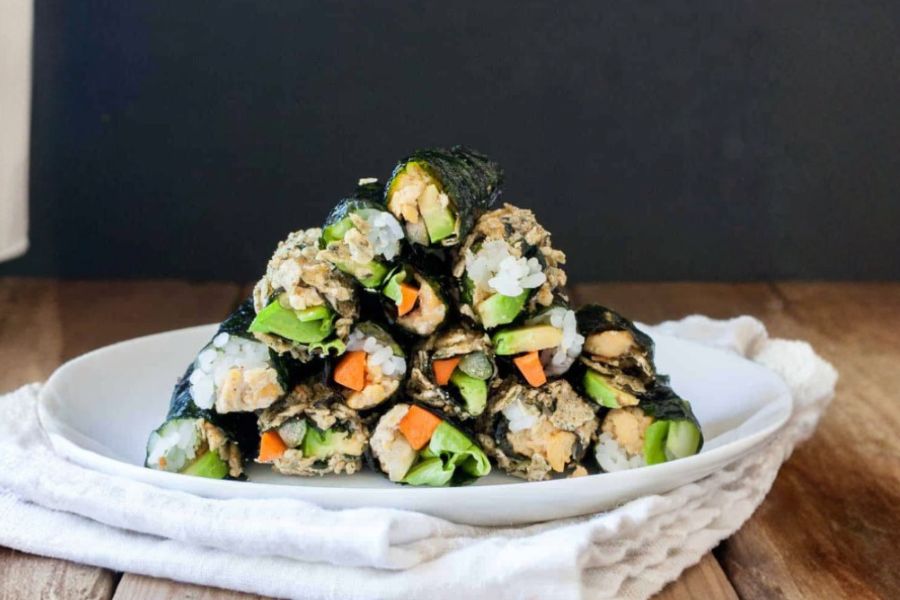
These sushi-inspired seaweed snacks are a fun, wholesome twist on classic sushi rolls, delivering bold flavor and nourishing ingredients in bite-sized portions.
What makes them stand out is their flexibility—each roll can be tailored with fresh veggies, chickpeas, and sauces for endless variety.
With plant-based protein from chickpeas, healthy fats from avocado, and fiber-rich vegetables, they’re both satisfying and light.
Each serving is low in calories and saturated fat, making it an ideal everyday snack or quick lunch option.
Because the recipe requires minimal cooking and just a handful of simple steps, it’s perfect for busy weeknights, meal prep, or even as a hands-on activity for kids.

Nutritious, customizable, and ready in under 30 minutes, these rolls prove that healthy eating doesn’t have to be complicated.
Must-Have Tools for Perfect Results
Sharp Chef’s Knife
Essential for slicing vegetables into thin matchsticks and achieving even cuts. A high-quality knife also streamlines prep for countless other meals.
Mixing Bowls
Perfect for mashing chickpeas and blending sauces. Stackable bowls save space and are endlessly useful for meal prep and baking alike.
Flat Cutting Board
Provides a sturdy surface for assembling and rolling seaweed snacks. A large, non-slip board also doubles as a workspace for daily chopping.
Measuring Spoons
Ensures precise sauce ratios for balanced flavor. Accurate measurements are invaluable in all types of cooking and baking.
Shallow Bowl or Plate
Handy for coating rolls in crushed chips. Also versatile for breading, marinating, or serving side dishe
Quick Sushi Seaweed Snacks
Equipment
- 1 Sharp chef’s knife
- 2 mixing bowls
- 1 Flat Cutting Board
- 1 Set Measuring Spoons
- 1 Shallow Bowl or Plate
Ingredients
- 2 small packages seaweed snacks any flavor
- 1 cup cooked sticky rice white or brown
- 1 cup chickpeas about ½ can, divided
- 1 –3 tbsp vegan mayo or preferred sauce
- 1 –3 tbsp spicy cilantro cream or other sauce
- 1 –3 tbsp additional sauce for coating/dipping
- ½ avocado thinly sliced
- ½ carrot stick cut into matchsticks
- ½ celery stick cut into matchsticks
- ½ cucumber cut into matchsticks
- ¼ cup shredded lettuce
- ½ cup crushed chips optional, for crunch
Instructions
- Soften the Seaweed: Place the seaweed snack sheets between two slightly damp paper towels and let them rest for 5–7 minutes. This gentle steaming effect makes the seaweed flexible enough to roll without tearing. Be careful not to oversaturate the towels—too much moisture will cause the sheets to fall apart.
- Prepare the Chickpea Base: Drain and mash the chickpeas with a fork until they reach a chunky, spreadable consistency. Divide them evenly into two bowls. Stir one sauce into each bowl (such as vegan mayo in one and spicy cilantro cream in the other) so you have two flavorful filling bases ready to go.
- Slice the Vegetables: Using a sharp chef’s knife, cut the carrot, celery, and cucumber into thin matchstick pieces. Slice the avocado into delicate, even slices. Keep the vegetables neatly arranged on a plate so they’re easy to grab during assembly.
- Assemble the Rolls: Lay one softened seaweed sheet flat on a cutting board. Place a small spoonful of rice in the center, followed by a bit of chickpea mixture and a few pieces of vegetables. Avoid overfilling to ensure the roll seals neatly.
- Roll and Seal: Carefully wrap the seaweed around the fillings, pressing gently as you roll to form a tight cylinder. The natural stickiness of the softened seaweed should hold the roll together. Repeat with remaining sheets and fillings, mixing and matching ingredients for variety.
- Add Crunch (Optional): For a crispy coating, spread a light layer of sauce on the outside of a finished roll using a spoon or clean finger. Roll it gently in a shallow dish of crushed chips until fully coated. This step adds fun texture and extra flavor.
- Serve and Enjoy: Arrange the rolls on a serving plate and drizzle or serve with extra sauce for dipping. These snacks are best eaten fresh but can be stored in an airtight container in the refrigerator for a short time if prepping ahead.
Notes
- You can swap in any type of rice—white, brown, or even quinoa for a protein boost.
- Use your favorite sauces; anything creamy or tangy works well as a binder for the chickpeas.
- Don’t overfill the seaweed sheets—keeping fillings light helps them roll tightly.
- For added crunch, coat the rolls in crushed chips, panko crumbs, or sesame seeds.
- These are highly customizable—let kids help build their own rolls for a fun family activity.
Chef’s Secrets for Success
The key to perfect seaweed snack rolls is balance—keeping fillings light yet flavorful so the seaweed holds together without tearing.
Always soften the seaweed sheets just enough to make them pliable but not soggy.
When slicing vegetables, aim for thin, uniform matchsticks to ensure even bites and easy rolling.
A sharp chef’s knife is essential for this step.
Don’t skip the mashed chickpea filling—it adds bulk, protein, and creaminess that helps bind everything together, preventing the rolls from falling apart.
Finally, variety is your best friend: mixing different sauces and toppings keeps each roll exciting and prevents repetition.
Serving Suggestions for Every Occasion
These rolls are incredibly versatile and can be enjoyed as a light lunch, snack, or appetizer.
For a balanced meal, pair them with a warm miso soup or a fresh side salad.
They also make an eye-catching platter for parties or gatherings, especially if you prepare multiple variations with different sauces and vegetables.
If serving to kids, set up a “build-your-own-roll” station so they can experiment with fillings and feel involved.
For added elegance, sprinkle sesame seeds on top or serve with small dipping bowls of soy sauce, spicy mayo, or teriyaki glaze.
Storage Tips to Keep Freshness
While these seaweed rolls are best enjoyed fresh for maximum crunch and flavor, they can be stored for later use with a few tricks.
Place the finished rolls in an airtight container lined with parchment paper to prevent sticking. Keep them refrigerated for up to 24 hours.
If you plan to prepare ahead, store the softened seaweed sheets, fillings, and sauces separately, then assemble just before eating.
Avoid freezing, as seaweed loses its texture when thawed.
For the best experience, consume within a day while the vegetables remain crisp and vibrant.
Frequently Asked Questions Answered
1. Can I use canned chickpeas straight from the can?
Yes, just be sure to drain and rinse them well to remove excess sodium and improve texture before mashing.
2. What if I don’t have sticky rice?
You can use brown rice, quinoa, or even cauliflower rice. Just keep portions small to prevent rolls from falling apart.
3. Are these rolls suitable for kids?
Absolutely! They are soft, bite-sized, and customizable. Kids enjoy making their own combinations, which makes mealtime more fun.
4. How do I prevent the seaweed from tearing?
Don’t overfill the sheets, and ensure they’re softened with lightly damp paper towels—too much moisture will weaken them.
5. Can I make these gluten-free?
Yes! Choose gluten-free sauces and chips. The seaweed and chickpeas are naturally gluten-free.
This recipe has been adapted and simplified from the original version by veggiesdontbite. We’ve refined the steps for a smoother cooking experience and added helpful notes, nutrition insights, and essential kitchen tools to make it even easier for home cooks.