
This Toasted Marshmallow Ice Cream offers a nostalgic twist on a classic dessert, capturing the smoky-sweet essence of campfire marshmallows in a creamy, velvety frozen custard.
What makes this recipe truly special is the balance between indulgence and simplicity: the custard base is rich yet light, and the toasted marshmallow chunks deliver bursts of gooey sweetness with every bite.
While dessert, it provides moderate protein from egg yolks and whole milk, and healthy fats from the double cream, making it more satisfying and nourishing than many store-bought alternatives
Easy to prepare in under an hour (plus chilling time), it’s an excellent choice for family gatherings, summer treats, or meal-prep-friendly dessert portions.
Its homemade quality ensures minimal additives while letting you control sweetness and texture, making it an indulgent yet wholesome option for everyday enjoyment.
Must-Have Tools for Perfect Results
Heavy-Based Saucepan
Essential for gently heating milk and cream without scorching. Its thick base ensures even heat distribution, making it perfect for custards, sauces, and soups.
Medium Mixing Bowl
Ideal for whisking egg yolks and sugar into a smooth custard base. Multipurpose for mixing batters, tossing salads, or marinating ingredients.
Ice Cream Machine
Ensures smooth, creamy texture and consistent freezing for the custard. Also versatile for frozen yogurts, gelatos, and sorbets.
Paring Knife
Perfect for scraping vanilla beans to extract maximum flavor. Handy for precise cutting, zesting, and delicate prep work across the kitchen.
Measuring Cups & Spoons
Accurate measurements guarantee consistent results and reduce waste. Useful for baking, cooking, and portion control.
Creamy Toasted Marshmallow Ice Cream
Equipment
- 1 Heavy-based saucepan
- 1 Medium mixing bowl
- 1 Ice cream machine
- 1 Paring knife
- Measuring cups and spoons
Ingredients
- 480 ml whole milk
- 300 ml double cream heavy cream
- 5 large egg yolks
- 100 g granulated sugar
- 1 vanilla bean pod
- 200 g mini marshmallows divided
Instructions
- Vanilla-Infused Cream Preparation: Begin by gently pouring the whole milk and double cream into a heavy-based saucepan. Slice the vanilla bean pod lengthwise and scrape out the tiny seeds using the dull edge of a paring knife, then add both seeds and pod to the milk mixture. Warm the mixture over medium heat, stirring occasionally, until small bubbles form along the edges, ensuring it never reaches a boil to preserve the delicate flavors.
- Egg Yolk Custard Base: In a medium mixing bowl, whisk together the egg yolks and granulated sugar until pale, creamy, and smooth. Slowly pour a small portion of the warm vanilla cream into the yolks while continuously whisking to temper them, preventing curdling. Gradually incorporate the rest of the warm cream, creating a silky custard ready for cooking.
- Cooking the Custard: Return the tempered mixture to the saucepan and cook over low heat, stirring constantly with a heatproof spatula. Cook until the custard thickens slightly and coats the back of the spatula, forming a luxurious, creamy consistency. Remove from heat immediately to avoid overcooking, and strain through a fine sieve to remove any coagulated bits for an ultra-smooth texture.
- Chilling the Custard: Transfer the custard to a clean bowl, cover with cling film pressed directly onto the surface to prevent a skin from forming, and refrigerate for at least 4 hours, or until thoroughly chilled. This step ensures the ice cream will freeze evenly and develop a rich, creamy mouthfeel.
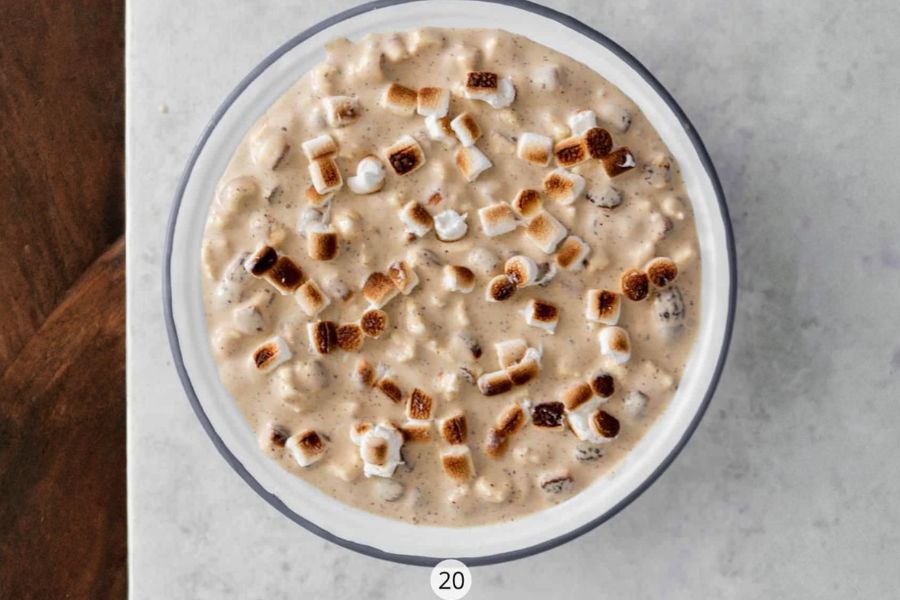
- Toasted Marshmallow Addition: Preheat a small skillet or use a kitchen torch to lightly toast half of the mini marshmallows until golden brown and slightly caramelized, giving them a smoky, campfire flavor. Fold the toasted marshmallows into the chilled custard along with the remaining plain mini marshmallows to create pockets of gooey, melty sweetness throughout the ice cream.
- Churning the Ice Cream: Pour the custard and marshmallow mixture into your ice cream machine and churn according to the manufacturer’s instructions until it reaches a smooth, soft-serve consistency. This step aerates the ice cream, giving it that light yet creamy texture that melts perfectly on the tongue.
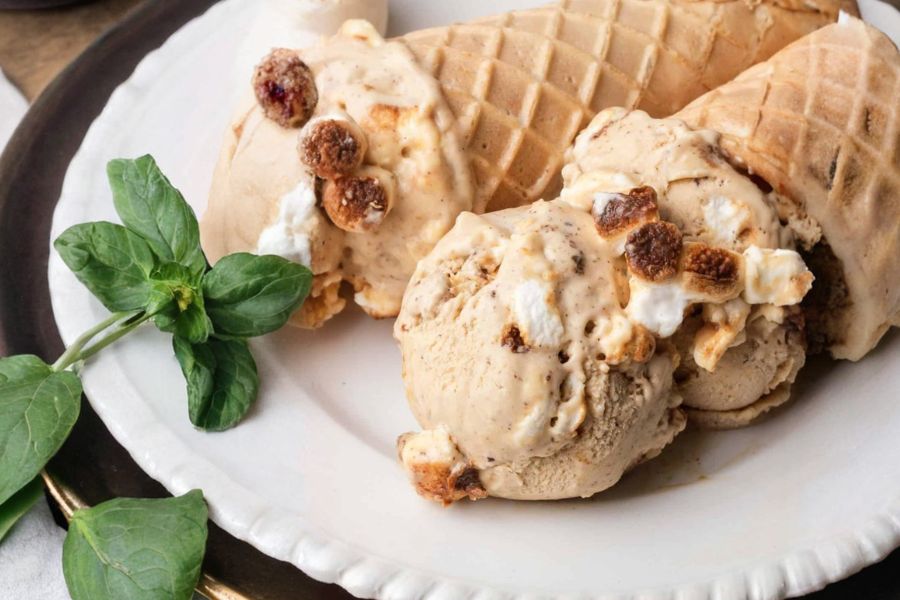
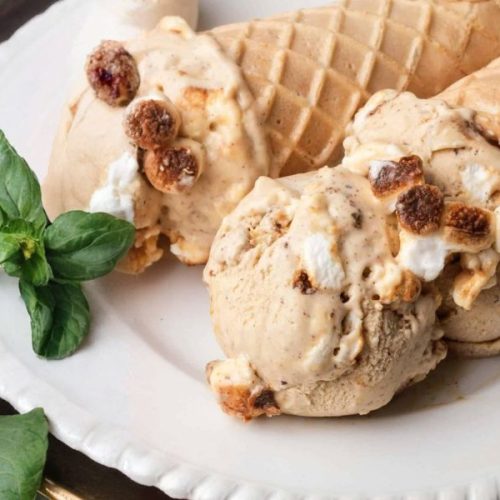
- Freezing to Set: Transfer the churned ice cream into an airtight container and freeze for an additional 2–4 hours or until firm. Once set, scoop generously into bowls or cones, and enjoy the delightful combination of creamy custard and smoky-sweet marshmallow chunks reminiscent of a summer campfire treat.
Notes
- For best flavor, use fresh, high-quality vanilla beans instead of extract.
- Toast marshmallows lightly; over-toasting can make them bitter.
- Always temper egg yolks with warm cream to prevent curdling.
- Press cling film directly onto custard while chilling to avoid a skin forming.
- For extra texture, consider folding in chopped roasted nuts or chocolate chunks.
- Serve shortly after scooping for the creamiest texture, as homemade ice cream melts faster than commercial varieties.
Chef’s Secrets For Creamy Custard
The key to ultra-smooth ice cream lies in patience and careful temperature control. Gently heat milk and cream to just below boiling to infuse flavors without scorching.
Tempering the egg yolks gradually with the warm cream prevents curdling and ensures a rich, silky custard base.
Chilling the mixture thoroughly before churning allows the ice cream machine to aerate it properly, resulting in a creamy, light texture that melts beautifully.
Finally, folding in toasted marshmallows at the right moment preserves their soft, gooey pockets while dispersing smoky sweetness throughout the ice cream.
Serving Suggestions For Summer Delight
This ice cream shines on its own but pairs beautifully with a variety of desserts. Scoop it over chocolate brownies or warm fruit cobblers for a nostalgic campfire twist.
For added texture, sprinkle with crushed graham crackers or drizzle with caramel or chocolate sauce.
Serve in waffle cones for casual summer fun or in elegant bowls with fresh berries for a refined touch.
Its versatility makes it perfect for family gatherings, dinner parties, or simply a satisfying treat on a warm day.
Storage Tips For Ice Cream Longevity
Store your homemade ice cream in an airtight container to prevent ice crystals from forming.
Press a layer of parchment paper or plastic wrap directly on the surface before sealing to maintain smoothness. Keep the freezer at a consistent temperature of around -18°C (0°F) for best results.
Homemade ice cream is best consumed within 1–2 weeks for optimal flavor and texture.
When scooping after freezing, allow it to sit at room temperature for 5–10 minutes to soften slightly, making it easier to serve.
Frequently Asked Questions Answered Clearly
1. Can I use vanilla extract instead?
Yes, you can substitute vanilla extract for beans, but fresh vanilla seeds provide a more intense, natural flavor and tiny flecks that enhance the visual appeal of your ice cream.
2. Can I make this dairy-free?
You can replace whole milk and cream with full-fat coconut milk or almond milk, but the texture will be slightly less creamy. Chilling thoroughly and using an ice cream machine helps maintain richness.
3. How do I prevent ice crystals?
Chill the custard completely before churning, churn at the recommended speed, and store in an airtight container with parchment on top. Avoid repeated thawing and refreezing.
4. Can I prepare this without an ice cream machine?
Yes! Pour the custard into a shallow container and freeze, stirring every 30 minutes for the first 2–3 hours to break up ice crystals. This creates a slightly denser, but still creamy, ice cream.
5. How long do toasted marshmallows last in ice cream?
Toasted marshmallows maintain their texture best for a few days in the ice cream. Over time, they may soften fully but still add sweetness and flavor throughout.
This recipe has been adapted and simplified from the original version by emmaduckworthbakes. We’ve refined the steps for a smoother cooking experience and added helpful notes, nutrition insights, and essential kitchen tools to make it even easier for home cooks.