
Homemade pita chips are the ultimate combination of simplicity, flavor, and crunch.
With only three basic ingredients, you can transform plain pita bread into a crisp, golden snack that rivals anything you’d find in a store.
What makes these chips appealing is not only how quick they are to prepare but also how much healthier they are compared to pre-packaged alternatives, which often contain preservatives or excess oils.
Baked instead of fried, they’re lower in saturated fat yet still deliver satisfying crunch and flavor.
Olive oil provides heart-healthy monounsaturated fats, while the pita bread contributes plant-based protein and dietary fiber, making this snack both nourishing and energizing.
They are also versatile—equally delicious on their own, paired with hummus, or served alongside soups and salads.
Ready in just 15 minutes, these chips are ideal for everyday snacking, meal prep, or entertaining guests with a fresh, homemade touch.
Must-Have Tools for Perfect Results
Chef’s Knife
A reliable, sharp knife ensures clean and even cuts when slicing pita bread into triangles, and it’s indispensable for daily chopping and prepping tasks in the kitchen.
Baking Sheet
A sturdy, rimmed baking sheet distributes heat evenly, helping the pita chips crisp up perfectly. Beyond snacks, it’s great for roasting vegetables, cookies, or sheet-pan dinners.
Pastry Brush
Essential for brushing olive oil evenly over the pita triangles, ensuring consistent flavor and crispiness. It’s also handy for greasing pans, glazing baked goods, and spreading marinades.
Parchment Paper or Baking Mat
Prevents sticking and allows for easy cleanup. It also promotes even baking and is a reusable, eco-friendly upgrade for any kitchen.
Crispy Homemade Pita Chips
Equipment
- 1 Chef’s Knife
- 1 Large Baking Sheet
- 1 pastry brush
- 1 Parchment Paper Sheet or Baking Mat
Ingredients
- 4 pita breads
- 3 tablespoons olive oil
- Sea salt or kosher salt to taste
Instructions
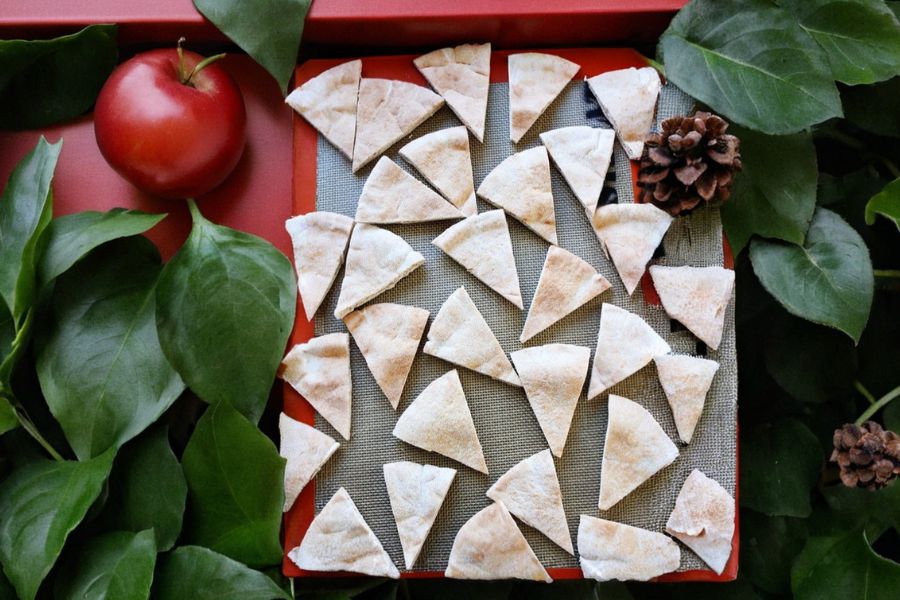
- Preheat the Oven: Set your oven to 400°F (200°C) and allow it to fully preheat. Line a large baking sheet with either parchment paper or a silicone baking mat to prevent sticking and ensure even baking.
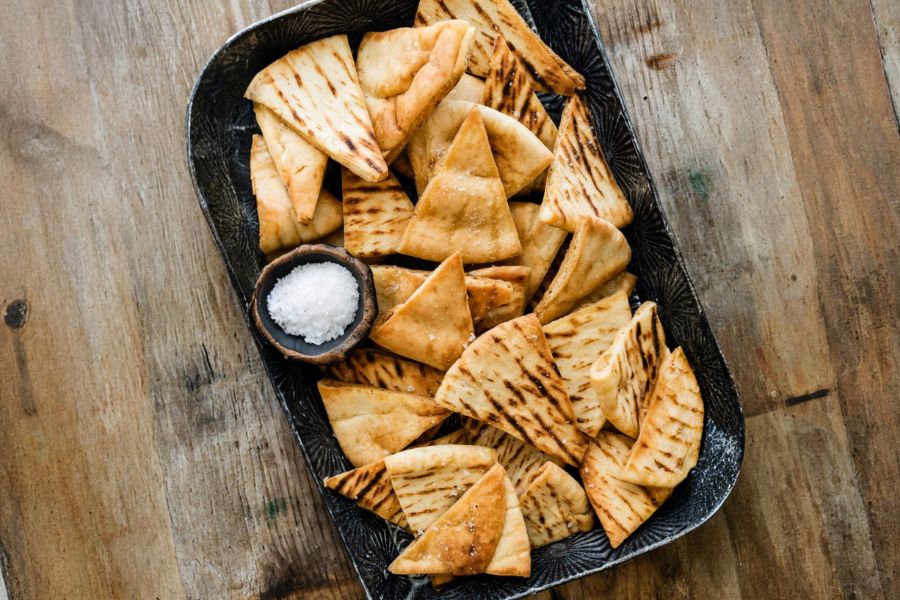
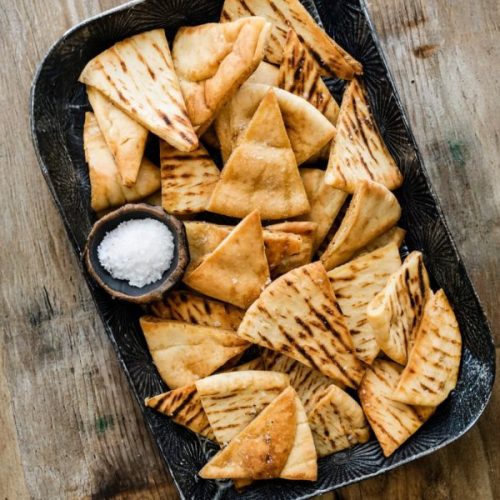
- Prepare the Pita Bread: Place the pita breads on a cutting board. Using a sharp chef’s knife, slice each pita into 8 equal wedges, similar to cutting a pizza. This ensures uniform chips that bake evenly.
- Arrange on Baking Sheet: Spread the pita wedges across the prepared baking sheet in a single layer. Avoid overlapping pieces, as this prevents crisping and can lead to uneven browning.
- Brush with Olive Oil: Using a pastry brush, lightly coat the top side of each wedge with olive oil. Flip the pieces over and brush the second side as well to guarantee both sides crisp up beautifully.
- Season Generously: Sprinkle sea salt or kosher salt evenly over the pita wedges. Adjust the seasoning to your taste preference—keep it light for a subtle flavor or add a little more for extra savoriness.
- Bake to Perfection: Place the baking sheet in the preheated oven and bake for 10 minutes, or until the chips turn golden brown and crisp. Keep an eye on them during the last few minutes to prevent over-baking.
- Cool and Serve: Remove the tray from the oven and allow the chips to cool completely on the baking sheet. Once crisp, enjoy them plain, dip them into hummus or salsa, or serve alongside soups and salads.
Notes
- Cut pita wedges evenly to ensure uniform crispness during baking.
- Keep the wedges in a single layer on the baking sheet to avoid sogginess.
- Adjust salt to your preference, or try adding garlic powder, paprika, or za’atar for extra flavor.
- Chips will continue to crisp slightly as they cool—don’t overbake.
- Store leftovers properly in an airtight container to maintain crunch.
Chef’s Secrets for Perfect Crispness
The secret to irresistibly crunchy pita chips lies in even preparation and careful baking.
Always preheat the oven thoroughly—this ensures the chips start crisping right away.
When cutting pita, aim for equal-sized triangles so they bake at the same rate.
A light, even coating of olive oil is key: too little oil results in bland chips, while too much can make them greasy.
Keep a close eye during the final minutes of baking since pita chips can quickly shift from golden to burnt.
Finally, allow them to cool on the baking sheet before serving; this resting time helps lock in the crunch.
Serving Suggestions for Any Occasion
Homemade pita chips are endlessly versatile and can be served in countless ways.
Pair them with creamy dips like hummus, guacamole, or tzatziki for a crowd-pleasing appetizer.
They also work beautifully alongside soups or salads, adding crunch and texture.
For a creative twist, use them as a base for nacho-style toppings—layer with roasted vegetables, melted cheese, or beans.
Hosting a party?
Create a Mediterranean-inspired snack board with pita chips, olives, cheeses, and fresh veggies.
Whether served as a light snack or part of a bigger meal, they never disappoint.
Storage Tips to Keep Freshness
Pita chips taste best fresh out of the oven but can be stored for later enjoyment.
Once completely cooled, transfer them to an airtight container or resealable bag.
Keep at room temperature, away from humidity, for up to 5 days.
If the chips lose their crispness, simply reheat them in a 350°F oven for a few minutes to restore crunch.
Avoid refrigerating, as moisture can make them stale more quickly.
For long-term storage, freeze pita wedges (uncooked) and bake when needed, ensuring fresh chips anytime.
Frequently Asked Questions Answered
1. Can I use whole wheat pita?
Yes! Whole wheat pita works perfectly and adds extra fiber and nutrients while keeping the same great crunch.
2. Can I make these oil-free?
You can bake pita wedges without oil, though they’ll be drier and less flavorful. For a lighter option, lightly spray with water and sprinkle with spices before baking.
3. What seasonings work best?
Classic sea salt is great, but try garlic powder, smoked paprika, za’atar, or cinnamon sugar for sweet chips. The recipe is flexible to your taste.
4. How do I stop them from burning?
Watch closely during the last few minutes of baking. If your oven runs hot, reduce the temperature to 375°F and extend the baking time slightly.
5. Can I make them in an air fryer?
Absolutely! Air fry pita wedges at 375°F for 5–7 minutes, shaking halfway through. They’ll turn out extra crispy in less time.
This recipe has been adapted and simplified from the original version by twopeasandtheirpod. We’ve refined the steps for a smoother cooking experience and added helpful notes, nutrition insights, and essential kitchen tools to make it even easier for home cooks.