Prepare Your Baking Vessels: Begin by thoroughly greasing your baking vessels to ensure the cakes release easily after baking. If using 6-ounce ramekins, spray each one generously with a nonstick cooking spray, making sure to coat every inch of the interior surface. Next, dust the inside of each ramekin lightly with cocoa powder—tilt and rotate the ramekin so the powder coats the bottom and sides evenly. Tap out any excess cocoa powder. This layer acts as a nonstick barrier and enhances the chocolate flavor of your cakes. If you don’t have ramekins, you can use a muffin tin—spray and dust at least six of the muffin cups following the same process.
Preheat the Oven: Set your oven temperature to 425°F (218°C). This high heat is essential to create the perfect crust on the outside of the cakes while leaving the center molten and gooey. Allow the oven to fully preheat before placing your cakes inside to ensure even cooking.
Melt the Chocolate and Butter: Coarsely chop your semi-sweet chocolate into small, even pieces for quicker melting. Place the unsalted butter in a microwave-safe, heatproof bowl, then add the chopped chocolate on top. Microwave the mixture in short 10-second intervals on high power. After each interval, remove the bowl and stir gently with a silicone spatula to combine and prevent the chocolate from scorching. Repeat this process until the chocolate and butter are completely melted and the mixture is smooth and glossy. If you prefer, melt the butter and chocolate using a double boiler method by placing the bowl over simmering water, stirring until melted.
Mix Dry Ingredients: In a separate small bowl, whisk together the all-purpose flour, powdered sugar, and salt until fully combined. This ensures that the dry ingredients are evenly distributed, which helps create a consistent batter texture.
Whisk the Eggs and Yolks: In another bowl, combine the two whole eggs and two extra egg yolks. Whisk them together vigorously until the mixture is uniform and slightly frothy. This aeration helps give the cakes a tender crumb and lift during baking.
Combine All Components into Batter: Slowly pour the dry ingredient mixture into the melted chocolate and butter bowl. Follow with the whisked eggs and yolks. Using a silicone spatula or wooden spoon, gently fold the ingredients together. Stir carefully until the batter is smooth and thick, but do not overmix. If you encounter any lumps, use a whisk to gently smooth them out without deflating the batter.
Fill the Ramekins or Muffin Cups: Evenly distribute the batter into your prepared ramekins or muffin cups, filling each about three-quarters full. This portioning allows room for the cakes to rise without spilling over. Place the filled vessels on a baking sheet for easy handling.
Bake Until Perfect: Transfer the baking sheet with ramekins or muffin cups into your preheated oven. Bake ramekins for approximately 12 to 14 minutes. For muffin tins, reduce the time to about 8 to 10 minutes since the cakes will be smaller and bake faster. The cakes are done when the edges appear firm and set, but the centers remain soft and slightly jiggly when gently nudged.
Rest and Invert the Cakes: Remove the baking sheet from the oven and let the cakes cool for about 1 minute. This brief rest allows the cakes to set just enough to hold their shape when flipped. Wearing oven mitts, place a plate upside down over each ramekin and carefully invert them to release the cakes onto the plate. For muffin cups, gently run a spoon or knife around the edges before flipping to loosen the cakes.
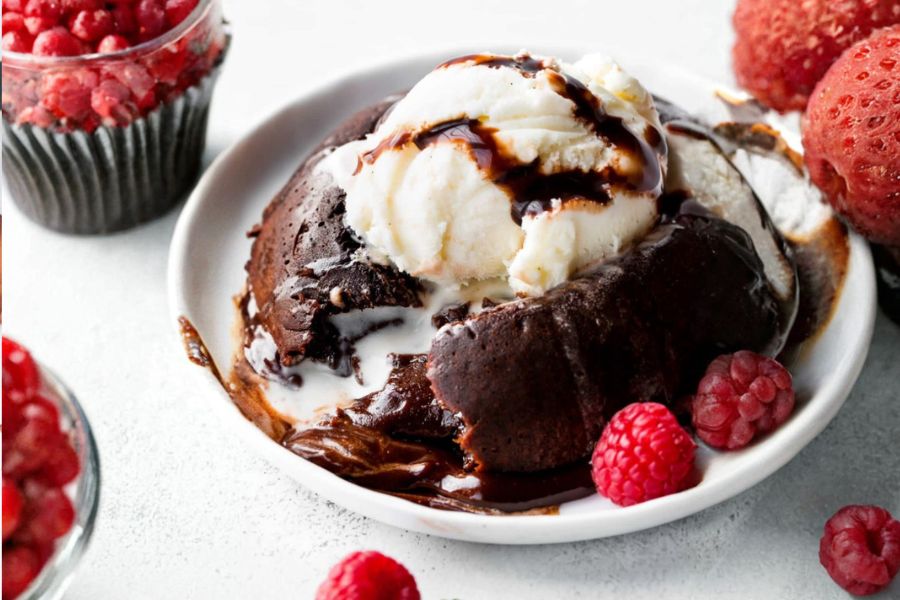
Serve Immediately with Toppings: Serve your molten chocolate lava cakes immediately to enjoy the warm, gooey centers at their best. Add optional toppings such as a scoop of vanilla ice cream, fresh berries, or a drizzle of chocolate syrup for contrast and extra indulgence.