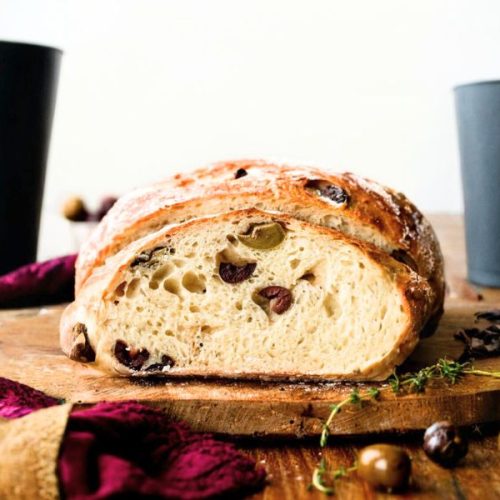
Flavorful Olive Bread
A straightforward no-knead bread bursting with olive and herb flavors, delivering a crispy crust and soft, garlicky crumb. Perfect for beginners and seasoned bakers alike, this loaf is a delicious, nutritious addition to any meal.
Equipment
- 1 Large Glass Mixing Bowl
- 1 Wooden Spoon or Silicone Spatula
- 1 Nonstick Baking Sheet (rimmed or rimless)
- 1 Bread Lame or Very Sharp Knife
- 1 Instant-read thermometer
Ingredients
- 3 ¼ cups 430g bread flour, spooned & leveled
- 2 tsp instant or active dry yeast
- 2 tsp coarse salt e.g., sea salt
- 2 tsp dried oregano
- 1 ½ tsp garlic powder
- 1 heaping cup 135g roughly chopped olives
- 1 ½ cups 360ml water, room temperature (~70°F/21°C)
- Optional: cornmeal for dusting baking sheet
Instructions
- Combine Dry Ingredients and Olives: In a large, ungreased glass mixing bowl, whisk together the bread flour, yeast, coarse salt, dried oregano, and garlic powder until evenly distributed. Using a wooden spoon or silicone spatula, gently fold in the chopped olives, ensuring they are well incorporated throughout the dry mixture without crushing them.
- Add Water and Form Dough: Pour the room-temperature water gradually into the flour mixture while stirring gently with your spoon or spatula. The dough will appear dry and shaggy at first; continue mixing and folding until all the flour is moistened and a sticky dough forms. If needed, use your clean hands to bring the dough together into a rough ball—expect the dough to be very sticky and soft.
- First Rise - Room Temperature Fermentation: Cover the bowl tightly with plastic wrap or aluminum foil, ensuring no air can get in, and leave the dough on your kitchen counter at normal room temperature (around 70°F/21°C). Allow the dough to rise undisturbed for 2 to 3 hours, during which it will almost double in size, cling slightly to the bowl’s sides, and develop numerous air bubbles indicating active fermentation.
- Optional Cold Fermentation for Flavor Development: For enhanced flavor and texture, refrigerate the covered dough for at least 12 hours and up to 3 days. This slow fermentation deepens the bread’s aroma and chewiness. The dough may puff and then slightly deflate during this time, which is perfectly normal. When ready to proceed, remove the dough from the fridge and let it come to room temperature before shaping.
- Prepare Baking Surface and Shape Dough: Lightly dust a large nonstick baking sheet with flour and optionally some cornmeal to prevent sticking and add texture to the crust. Turn the dough out onto a well-floured work surface and, using generously floured hands, gently shape it into a round loaf as best as possible—remember, the dough will remain sticky, so don’t over-handle it. Transfer the shaped dough to the prepared baking sheet.
- Final Proofing: Loosely cover the dough on the baking sheet with a clean kitchen towel or plastic wrap and let it rest at room temperature for 45 minutes. During this time, the dough will relax and puff up slightly, readying it for baking. While proofing, preheat your oven to 425°F (218°C) to ensure it’s fully heated by baking time.
- Score the Dough for Expansion: Once proofed, use a very sharp bread lame or knife to score the top of the dough with a shallow slash or an “X” about half an inch deep. Scoring helps control how the bread expands in the oven and creates that classic artisan look. If the dough has flattened, gently reshape it with floured hands before scoring.
- Create Steam for a Crispy Crust (Optional): For a beautifully crisp crust, place a shallow metal or cast-iron pan on the lowest oven rack while preheating. When ready to bake, carefully pour 3 to 4 cups of boiling water into this pan to generate steam, then immediately place the baking sheet with the dough on a rack above and close the oven door quickly to trap the steam inside.
- Bake the Bread: Bake the loaf on the center rack of your preheated oven for 35 to 40 minutes or until the crust is a deep golden brown. To check doneness, gently tap the bottom of the warm loaf—if it sounds hollow, it’s ready. For a more precise test, use an instant-read thermometer; the internal temperature should read 195°F (90°C).
- Cool Before Slicing: Remove the bread from the oven and transfer it to a wire rack. Let it cool completely for at least 10 to 20 minutes to allow the crumb to set properly. Slicing too early can lead to a gummy texture. Store any leftovers loosely covered at room temperature for up to 3 days, or refrigerate for up to 10 days.
Notes
- The dough can be refrigerated for up to 3 days before baking, making this recipe ideal for prepping ahead.
- You can freeze baked bread for up to 3 months; thaw it in the fridge and bring to room temperature before serving.
- For freezing dough, complete steps 1 to 3, wrap tightly, and freeze up to 3 months; thaw overnight in the fridge before shaping and baking.
- If you prefer, bake in a preheated Dutch oven or on a pizza stone for a different crust texture (see detailed tips in the main recipe).
- Use bread flour for best texture, but all-purpose flour works as a substitute without adjustments. Avoid whole wheat for this dough or substitute up to 1 cup.
- Instant yeast works faster, but active dry yeast can be used with a slightly longer rise time.
- Using coarse salt enhances flavor; if only fine salt is available, reduce to 1½ teaspoons.
- Fresh herbs and garlic can replace dried versions for a more vibrant flavor profile.