Healthy Chicken and Pesto Panini
A protein-packed chicken pesto panini layered with juicy chicken breast, fresh arugula, roasted red peppers, and creamy mozzarella, pressed between golden whole-grain sandwich thins. A healthy, flavorful, and quick meal that’s perfect for lunch or dinner
Equipment
- 1 large skillet1 small bowl (for seasoning mix)
- 1 panini press, grill pan, or heavy skillet
- 1 spatula or tongs
- 1 set of measuring spoons
Ingredients
- 1 teaspoon dried oregano
- ½ teaspoon ground black pepper
- 4 chicken breast cutlets about 1 pound total
- 1 tablespoon extra-virgin olive oil
- ¼ cup basil pesto refrigerated or homemade
- 4 whole-grain sandwich thins or substitute sturdy bread
- 2 cups baby arugula loosely packed
- 4 strips roasted red peppers drained and patted dry
- 5 ounces fresh mozzarella cheese sliced
- Cooking spray
Instructions
- Season the Chicken Cutlets: Place the chicken cutlets on a cutting board or plate. In a small bowl, combine the dried oregano and ground black pepper, then sprinkle the mixture evenly over both sides of each cutlet. This simple seasoning brings out the natural flavor of the chicken and adds an herby, peppery base before cooking. Gently press the seasonings into the surface of the meat so they stick while searing.
- Sear the Chicken Until Golden: Heat 1 tablespoon of olive oil in a large skillet over medium-high heat. When the oil shimmers, add the chicken cutlets in a single layer without crowding the pan. Cook for about 3 minutes per side, or until the chicken is golden brown and cooked through (internal temperature should reach 165°F / 74°C). Avoid moving the chicken too soon — letting it sear undisturbed helps build a flavorful crust. Transfer the cooked cutlets to a plate to cool slightly.
- Slice the Chicken for Layering: Once the chicken is cool enough to handle, place it back on the cutting board. Using a sharp knife, cut each cutlet crosswise into two smaller pieces. This ensures even distribution in the sandwiches and makes the panini easier to bite into once pressed.
- Prepare the Bread and Spread Pesto: Take your sandwich thins (or bread of choice) and split them open. Spread basil pesto evenly on the inside of each half — top and bottom. The pesto not only adds bright, herby flavor but also acts as a moisture layer, keeping the bread from drying out during grilling. Be generous, but don’t overdo it, as too much pesto can make the bread soggy.
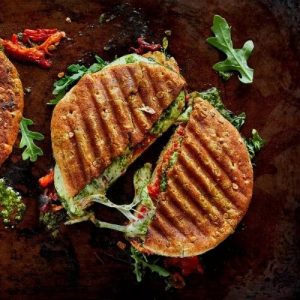
- Assemble the Panini Layers: Start with the bottom half of each sandwich thin. Layer on a small handful of baby arugula, followed by a portion of the sliced chicken. Next, add one strip of roasted red pepper, then place several slices of fresh mozzarella on top. Finish by placing the top half of the bread, pesto side down, pressing gently with your palm so the layers hold together.
- Preheat and Prepare the Cooking Surface: Lightly coat a panini press, grill pan, or large nonstick skillet with cooking spray before heating. If using a press or electric grill, follow the manufacturer’s instructions to preheat until hot. For a stovetop skillet, set the heat to medium. This ensures the sandwiches crisp evenly without burning.
- Grill the Panini Until Crisp and Melty: Place the assembled sandwiches onto the hot cooking surface. If using a press or grill, close the lid and cook for 3–4 minutes, until the bread is golden and the mozzarella has melted. If using a skillet, press a heavy pan (such as a cast-iron skillet) on top of the sandwiches to mimic a press. Cook for about 2 minutes, then carefully flip, press again, and cook for another 2 minutes. The goal is evenly toasted bread and gooey, melted cheese.
- Serve Warm and Enjoy: Transfer the hot panini to a cutting board and let them rest for about a minute to allow the cheese to settle slightly. Slice each sandwich in half on the diagonal for easy serving. Enjoy immediately while the bread is crisp and the cheese is perfectly melty.
- Make-Ahead and Meal-Prep Tips: To save time, cook and slice the chicken in advance, storing it in an airtight container in the fridge for up to 3 days. When ready to eat, assemble and press the panini fresh. Fully assembled panini can be made ahead but are best enjoyed the same day, as bread tends to lose its crispness after refrigeration. Leftovers can be reheated in a skillet to bring back some crunch, but avoid microwaving — it makes the bread rubbery.
Notes
- Whole-grain sandwich thins keep the panini lighter, but sourdough or ciabatta also work well.
- Fresh mozzarella melts beautifully, though Gouda, provolone, or Gruyère are delicious substitutes.
- If you have leftover cooked chicken, skip the stovetop step and use it directly.
- Pat roasted red peppers dry with paper towels to prevent sogginess.
- A cast-iron skillet pressed on top of the sandwiches is a great alternative to a panini press.
- Don’t overload the sandwich with fillings — balance ensures it grills evenly.
- Brush bread with olive oil for extra crispiness if desired.
- Allow cooked panini to rest for a minute before slicing so the cheese sets slightly.
- Make the chicken in advance and assemble panini fresh for best results.
- Leftovers are best reheated in a skillet rather than the microwave to restore crisp texture.