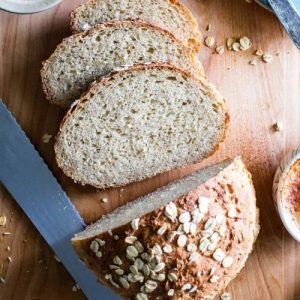
Maple Oat Bread
A soft, chewy bread loaded with rolled oats and lightly sweetened with maple syrup. High in fiber, low in saturated fat, and perfect for vegan diets, this hearty loaf is ideal for breakfast, sandwiches, or meal prep.
Equipment
- 2 x 1-quart (0.94 L) oven-safe bowls
- Rubber spatulaLarge mixing bowl
- Small Mixing Bowl
- Measuring cups and spoons
- Forks for handling dough
- Cooling rack
- Oven
Ingredients
- 1 cup 114 g rolled oats, plus extra for topping
- 1/4 cup 80 g maple syrup
- 1 cup 225 g boiling water
- 1 cup 225 g room temperature water
- 2 1/4 cups 288 g unbleached all-purpose flour
- 1 cup 145 g white whole wheat flour (or whole wheat flour)
- 2 teaspoons kosher salt
- 2 1/4 teaspoons instant yeast
- Butter or coconut oil for greasing
Instructions
- Hydrating the Oats: In a small mixing bowl, combine 1 cup (114 g) of rolled oats with 1 cup (225 g) of boiling water and 1/4 cup (80 g) of maple syrup. Stir gently to ensure all the oats are submerged and coated with liquid. Let this mixture sit undisturbed for 10 minutes. During this time, the oats will absorb the water, soften, and release a subtle natural sweetness from the maple syrup, forming a thick, porridge-like base that will make your bread hearty and moist.
- Preparing the Dry Ingredients: While the oats are soaking, take a large mixing bowl and whisk together the dry ingredients: 2 1/4 cups (288 g) of unbleached all-purpose flour, 1 cup (145 g) of white whole wheat flour (or regular whole wheat flour), 2 teaspoons kosher salt, and 2 1/4 teaspoons instant yeast. Whisking evenly distributes the yeast and salt throughout the flour, ensuring consistent fermentation and flavor in your bread.
- Combining Wet and Dry Mixtures: Once the oats have hydrated, add 1 cup (225 g) of room-temperature water to the oat mixture and stir gently to combine. Pour the wet oat mixture into the bowl of dry ingredients. Using a rubber spatula, fold the mixture together until it begins to come together as a sticky dough. This is the stage where the oats, syrup, and flours start forming a cohesive mass, setting the foundation for a chewy, hearty bread.
- Kneading the Dough: Once the dough begins to form, transfer it to your hands and knead gently in the bowl or on a lightly floured surface. Knead until the dough is soft, slightly sticky, and well-combined. It should form a cohesive, slightly tacky ball that holds together but is not dry. This kneading stage develops the gluten in the flour, giving the bread structure while keeping it tender and moist.
- First Rise (Fermentation): Cover the bowl with a damp tea towel or plastic wrap and place it in a warm, draft-free area. Allow the dough to rise for 1 to 1.5 hours, or until it has doubled in size. If your kitchen is cool, you can place the covered bowl in a turned-off oven that’s been warmed for 30 seconds, or next to a heatproof bowl of hot water in the microwave, creating a warm, humid environment for the yeast. The dough should feel soft and airy, signaling that the yeast is actively fermenting.
- Preparing the Oven and Bowls: While the dough is rising, preheat your oven to 375°F (190°C) and position the oven rack in the center. Grease two 1-quart (0.94 L) oven-safe bowls generously with softened butter or coconut oil. These bowls will shape your loaves and help create a beautiful crust.
- Deflating the Dough: Once the first rise is complete, it’s time to gently deflate the dough. Using two forks, start from the center of the dough and pull it toward the center repeatedly, rotating the bowl a quarter turn after each pass. This process releases excess air while maintaining the dough’s structure. It doesn’t need to be perfectly smooth—rustic is beautiful!
- Dividing the Dough: Using the forks or lightly wet hands, divide the dough into two equal portions. Lift each portion and place it carefully into the prepared greased bowls. If your dough is very sticky, wetting your hands will make handling easier. These portions will form your loaves and will rise slightly above the rims of the bowls during the second rise.
- Second Rise (Proofing): Allow the dough to rise for 10–20 minutes while the oven preheats. The tops of the dough should just crown the rims of the bowls. Lightly mist the tops with water using a spray bottle and sprinkle a small amount of oats (about 1 teaspoon per loaf) on top for a rustic finish. This second rise ensures your loaves are light and airy inside while developing a golden crust outside.
- Baking the Bread: Carefully place the bowls into the preheated oven and bake for 40 minutes, or until the loaves are golden brown all around. If the tops look pale after 40 minutes, return them to the oven for an extra 5 minutes. Baking in bowls gives the bread structure and encourages even cooking while producing a soft, chewy crumb.
- Cooling the Loaves: Once baked, remove the bowls from the oven and gently turn the loaves out onto a cooling rack. Allow the bread to cool for 15 minutes before slicing. This resting period allows the crumb to set and prevents the bread from becoming gummy when cut.
- Storing and Serving: Store cooled loaves in a brown paper or plastic bag for up to 3 days. For longer storage, wrap tightly in plastic and freeze for up to 2 weeks, thawing at room temperature overnight. Serve warm for breakfast, toast with nut butter, or use for sandwiches. This bread is a versatile, satisfying addition to everyday meals.
Notes
- You can use white whole wheat flour or regular whole wheat flour—both work well.
- For vegan bread, substitute butter with coconut oil for greasing the bowls.
- If your kitchen is cool, create a warm, humid environment by placing the covered dough in a microwave or oven with a heatproof bowl of hot water to help the dough rise.
- Slight variations in oven temperature or dough hydration can affect baking time; check for a golden crust before removing.
- This bread freezes well—wrap tightly and thaw at room temperature overnight.