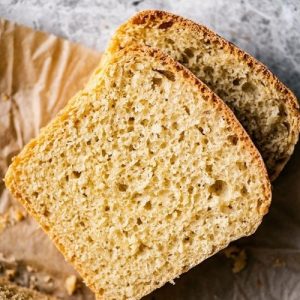
Simple Spelt Bread
This simple spelt bread recipe makes a wholesome, soft, and hearty loaf with just a handful of pantry staples. Rich in protein, fiber, and good fats, it’s a nutritious alternative to wheat bread and ideal for sandwiches, toast, or snacking. With minimal kneading and two short rises, it’s easy enough for beginners yet satisfying for experienced bakers.
Equipment
- 1 Large mixing bowl
- 1 wooden spoon or dough hook (for stand mixer)
- 1 stand mixer with dough attachment (optional)
- 1 tea towel or plate (for covering dough)
- 1 greased or parchment-lined loaf pan (9x5 in / 23x13 cm)
- 1 cooling rack
Ingredients
- 60 ml ¼ cup warm water
- 1 tablespoon honey or maple syrup
- 2 ¼ teaspoons active dry yeast
- 250 ml 1 cup non-dairy milk (or dairy, if preferred)
- 3 tablespoons olive oil
- 500 g approx. 3 – 3 ½ cups whole grain or sprouted spelt flour
- 1 teaspoon sea salt
Instructions
- Activate the Yeast (Blooming): Begin by pouring the warm water (about 60 ml / ¼ cup) into a large mixing bowl or the bowl of your stand mixer. Stir in the honey or maple syrup until it dissolves fully. Now sprinkle the yeast evenly over the surface of the water mixture. Do not stir immediately—let it rest undisturbed for 8–10 minutes. During this time, the yeast will begin to “wake up” and feed on the natural sugars. When ready, the surface should look foamy and slightly bubbly, a sign the yeast is alive. If there’s no visible activity, discard the mixture and start over with fresh yeast—this step is essential to guarantee a successful rise.
- Combine the Base Ingredients: Once your yeast mixture is active, add the milk and olive oil directly into the same bowl. Then measure out 2 cups (about 300 g) of spelt flour and add it in along with the sea salt. Using a wooden spoon or a dough hook if using a stand mixer, stir everything together until it forms a loose, shaggy dough. At this stage, the dough will still look rough and sticky—this is normal, as you haven’t added all the flour yet.
- Build the Dough (Gradual Flour Addition): Once your yeast mixture is active, add the milk and olive oil directly into the same bowl. Then measure out 2 cups (about 300 g) of spelt flour and add it in along with the sea salt. Using a wooden spoon or a dough hook if using a stand mixer, stir everything together until it forms a loose, shaggy dough. At this stage, the dough will still look rough and sticky—this is normal, as you haven’t added all the flour yet.
- First Rise (Bulk Proofing): Continue adding the remaining flour slowly, about ½ cup at a time. After each addition, knead the dough gently in the bowl (or let the mixer run on low speed). This gradual method allows the flour to absorb liquid evenly and prevents adding too much. Spelt flour absorbs water differently than wheat, so you may need slightly more or less depending on the batch. Stop adding flour once the dough feels smooth, elastic, and only slightly tacky when touched. The full kneading process should take 6–8 minutes by hand, or about 4–5 minutes in a stand mixer. Remember: spelt gluten is more delicate, so avoid over-kneading.
- Shape the Loaf: Shape the dough into a ball and place it in a lightly greased bowl. Turn the dough once to coat the surface with oil, which prevents drying out. Cover the bowl with a clean tea towel or a plate and place it in a warm, draft-free location. Let it rise for 60 minutes, or until it has doubled in size. You’ll know it’s ready when you gently press a fingertip into the dough and the indentation slowly springs back.
- Second Rise (Final Proofing): Once the dough has finished its first rise, punch it down gently to release excess air. Transfer it to a clean work surface and shape it into a loaf by tucking the edges under until the top looks smooth and rounded. .Place the shaped dough into a parchment-lined or well-greased standard loaf pan (9x5 in / 23x13 cm is ideal). Tuck any uneven edges underneath so the loaf bakes with a neat top.Cover the loaf pan with the tea towel once again and allow the dough to rise in a warm place for another 30 minutes. During this proofing stage, the dough should rise just above the rim of the pan. Meanwhile, preheat your oven to 180°C (350°F) so it’s fully hot when the dough is ready to bake.
- Bake the Bread: When the loaf has risen, remove the towel and place the pan into the preheated oven. Bake for 40–45 minutes, or until the crust turns golden brown and the loaf sounds hollow when tapped on the bottom. For a more precise check, you can insert a food thermometer into the center of the bread—the internal temperature should reach 88–93°C (190–200°F).
- Cool the Loaf:Once baked, carefully remove the bread from the pan and place it on a wire cooling rack.Allow it to rest for at least 10 minutes before slicing. This short cooling period helps the crumb set and prevents the loaf from becoming gummy when cut too soon.
- Store and Enjoy: Enjoy your bread warm, plain, or as the base for sandwiches and toast. To keep it fresh, store it in an airtight container at room temperature for up to three days. For longer storage, slice the loaf and freeze the slices in a sealed bag; they can be toasted directly from frozen whenever you need them.
- Tips for Success
- Use a kitchen scale for the flour if possible—spelt can pack differently in cups.
- Spelt dough is softer than wheat dough; don’t panic if it feels looser.
- Avoid over-kneading—spelt’s gluten is fragile and works best with gentle handling.
- If your kitchen is cold, proof the dough near a slightly warmed oven (but not too hot, or the yeast may die).
Notes
- Whole grain, sprouted, or light spelt flour all work well—each gives a slightly different flavor and texture.
- Spelt gluten is delicate, so knead just until smooth and elastic; over-kneading can cause a dense loaf.
- Warm, draft-free proofing spots speed up rising—inside a turned-off oven with the light on works well.
- A kitchen scale ensures accuracy since spelt flour varies in density more than wheat.
- Brush the top with a little olive oil or plant-based milk before baking for a softer crust.
- To enhance flavor and nutrition, mix in seeds (sunflower, pumpkin, flax) or herbs during shaping.
- Always allow the bread to cool before slicing to avoid a gummy interior.