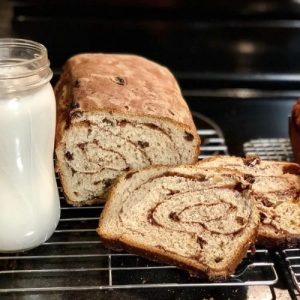
Soft Cinnamon Raisin Bread
Soft, lightly sweet cinnamon raisin bread with a hint of warm cinnamon, perfect for breakfast, snacking, or meal prep. Easy to make from scratch and deliciously satisfying.
Equipment
- 1 small saucepan
- 1 Large mixing bowl
- Measuring cups and spoons
- Wooden spoon or spatula
- Loaf pans, 3 (9x5-inch each)
- Damp cloth or kitchen towel
- Wire cooling rack
Ingredients
- 1 ½ cups milk
- 1 cup warm water 110°F / 45°C
- 2 packages 0.25 oz each active dry yeast
- 1 cup raisins
- 3 large eggs
- 1 ¼ cups white sugar divided
- ½ cup margarine softened
- 1 teaspoon salt
- 8 cups all-purpose flour
- 2 tablespoons milk for brushing
- 2 tablespoons ground cinnamon
- 2 tablespoons butter melted
Instructions
- Prepare the Milk: Begin by warming 1 ½ cups of milk in a small saucepan over medium heat. Heat it slowly until tiny bubbles start appearing along the edges, but do not let it boil. This step ensures the milk is warm enough to help the yeast activate without killing it. Once warmed, remove the milk from the heat and let it cool to lukewarm—warm but comfortable to touch.
- 2: Activate the Yeast: In a large mixing bowl, pour 1 cup of warm water (around 110°F / 45°C) and sprinkle in the two packages of active dry yeast. Gently stir to dissolve and allow it to rest for about 5 minutes. You’ll know the yeast is ready when it becomes frothy and foamy, indicating it’s fully activated and ready to leaven your bread.
- 3: Combine Wet Ingredients and Raisins: Once the yeast is activated, add 1 cup of raisins, 3 large eggs, ½ cup of sugar, ½ cup of softened margarine, and 1 teaspoon of salt to the bowl. Mix everything together until fully incorporated. Next, gradually stir in the cooled milk prepared earlier. The dough will begin to come together, creating a slightly sticky, yet workable mixture.
- 4: Incorporate the Flour: Slowly add the 8 cups of all-purpose flour, one cup at a time, stirring constantly. This gradual method helps prevent lumps and ensures even distribution of the flour. Once all the flour is added, the mixture should form a stiff, slightly sticky dough that holds its shape.
- 5: Knead the Dough: Transfer the dough to a lightly floured surface. Using the heels of your hands, knead the dough for several minutes, folding it over and pressing firmly. Continue until the dough becomes smooth, elastic, and slightly springy to the touch. Proper kneading develops the gluten, giving the bread a soft, airy texture.
- 6: First Rise (Bulk Fermentation): Grease a large bowl with a little margarine or oil. Place the kneaded dough inside, turning it to coat all sides lightly with grease. Cover the bowl with a damp cloth or kitchen towel to keep the dough moist. Let it rise in a warm, draft-free area until it doubles in size, approximately 1 hour. This first rise allows the yeast to create air pockets for a light, fluffy bread.
- 7: Prepare the Loaf Pans: While the dough is rising, grease three 9x5-inch loaf pans generously with margarine or nonstick spray. Ensure every corner is coated to prevent sticking. Set the pans aside, ready for the shaped dough.
- 8: Shape the Dough: Once the dough has doubled, punch it down gently to release excess air. Transfer it to a lightly floured surface and roll it into a large rectangle about ½-inch thick. Brush the surface lightly with 2 tablespoons of milk to help the sugar and cinnamon stick evenly.
- Add Cinnamon Sugar Filling: In a small bowl, mix the remaining ¾ cup of sugar with 2 tablespoons of ground cinnamon. Sprinkle this mixture evenly over the moistened dough rectangle. This step ensures that each bite of bread will be sweet and fragrant with cinnamon.
- 10: Roll and Cut the Dough: Starting from one long edge, roll the dough tightly into a log, roughly 3 inches in diameter. Once rolled, cut the log into three equal portions. Tuck the ends underneath each section to create neat loaves, ready to be transferred to the prepared pans.
- 11: Second Rise (Proofing): Place the shaped loaves into the greased pans. Lightly cover them with a damp cloth or towel, and let them rise again for about 1 hour. This second rise allows the bread to expand fully and develop a tender, airy crumb.
- 12: Preheat the Oven: While the loaves are rising, preheat your oven to 350°F (175°C). Ensuring the oven is fully heated before baking helps the bread rise evenly and develop a beautiful golden-brown crust.
- 13: Bake the Bread: Bake the loaves in the preheated oven for approximately 45 minutes, or until the tops turn lightly golden brown and the bread sounds hollow when tapped gently on the bottom. Baking thoroughly ensures a soft interior and crisp crust.
- 14: Add Finishing Touch: Immediately after removing the bread from the oven, brush the tops with 2 tablespoons of melted butter. This adds a lovely shine, extra flavor, and a soft, slightly moist crust.
- 15: Cool and Serve: Transfer the loaves to a wire cooling rack and let them cool completely before slicing. Cooling prevents the bread from becoming gummy inside and ensures clean, even slices. Once cooled, enjoy fresh slices plain, toasted, or with your favorite spread.
Notes
- For best results, use fresh, active dry yeast to ensure proper rising.
- Lukewarm liquids are essential—too hot can kill the yeast, too cold slows activation.
- Knead the dough thoroughly to develop gluten for a soft, airy texture.
- Make sure to allow both the first and second rises for optimal fluffiness.
- Adjust sugar or cinnamon to taste; you can increase for a sweeter loaf.
- Raisins can be soaked in warm water or rum for extra plumpness.
- Brush tops with butter immediately after baking for a soft, flavorful crust.
- Bread slices freeze well—wrap tightly in plastic wrap or foil for up to 3 months.